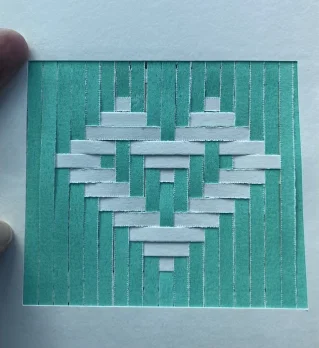
Paper weaving panel: a calm first over-and-under session
Arts and Crafts Maker Guide.
0:00 / 8:57
What you'll make
A small woven-paper panel made from one slotted base sheet and contrasting paper strips. You can mount it on a card, keep it as a study, or make a small series with different color and strip-width choices.
The making time is about twenty-five to forty minutes, plus drying time if you glue the back to cardstock. The episode is designed for listening while your hands work: it names the over-and-under order, gives tactile checkpoints, and shows how to recover from a crooked row, a split slit, or a strip that tears.
Materials
Two sheets of paper: one for the base and one for the weaving strips
Scissors
Glue stick
Scrap paper to protect the table
Optional: ruler, pencil, paper clips or low-tack tape, and a shallow tray for loose strips
Medium-weight copy paper, construction paper, old envelopes, and clean paper-bag sheets all work. A firmer base is easier to handle; the strips should bend without cracking. For a first attempt, use one strip color that contrasts clearly with the base.
Prepare the table
Work on a flat area larger than the panel. Keep the scissors closed when they are not in use, and keep small paper pieces, glue, and the finished work away from children and pets. Ordinary glue does not call for special protective equipment, but read the label if you choose another adhesive and wash your hands afterward.
Fold the base in half, mark evenly spaced cuts, and stop each cut before the outside border. Unfold it and check that the openings are parallel. Cut the second sheet into strips a little narrower than those openings. They can be uneven; the panel does not need machine-perfect measurements.
The do-along sequence
Build the base. Fold the base, mark six to eight spaces, and cut from the fold toward the open edge. Leave a border so the base stays in one piece.
Weave the first row. Start from the left and pass the strip over, under, over, under across the openings. Leave both ends sticking out.
Reverse each new row. The second strip starts under, then over. The third starts over again. If you lose count, check the row above and reverse it.
Close small gaps. After each strip, push the row gently toward the border. Use a side-to-side nudge rather than pulling hard on one end.
Secure the back. When the panel feels full, trim the loose ends just inside the border. Add a thin coat of glue along the back edge, then press the ends down.
Mount if you like. Glue the panel to cardstock for a card front or small study. Press it under a clean sheet and let it dry flat according to the adhesive label.
Troubleshooting
A row is crooked: Lift only the last strip and reseat it. Avoid pulling the whole panel apart.
A slit splits: Tape the back, cover the repair with cardstock, and leave a wider border next time.
The paper buckles: Use less glue and lighter pressure. Heavy paper or strips that are too wide can also make the panel stiff.
The pattern looks irregular: That is a valid variation. For a checkerboard, reverse the first move on each row. For a looser texture, repeat the same starting direction for two or three rows.
Variations and cleanup
Use close colors for a quiet, shadow-led surface, or alternate bright strips for a stronger pattern. Try painted paper, a clean paper bag, or a page of handwritten notes. Keep the base size fixed and change one choice at a time: strip width, starting pattern, or color contrast.
Put usable strips back in the tray, recycle narrow offcuts, close the scissors, and wipe the glue tip if its label allows it. Wash your hands and leave the panel flat where it will not be disturbed while it dries.