Make a Needle-Felted Wool Pebble: A Calm First Felting Session

Make a Needle-Felted Wool Pebble: A Calm First Felting Session

Make a small rounded wool pebble with a contrasting cap, using slow needle-felting, tactile checks, and calm sharp-tool safety.

0:00 / 10:21

What you'll make

You’ll make a small needle-felted wool pebble: a palm-sized, rounded shape with a little cap of contrasting color. It’s a simple first dry-felting project because the form can stay organic. You’re learning to compact, turn, and check wool by touch, rather than trying to copy a complicated figure.
Plan on about thirty minutes of hands-on work. The finished pebble is decorative and tactile. Keep it away from small children and pets, and don’t use it as a toy if it sheds loose fibers.

Materials

  • About 20 to 30 grams of core wool or coarse wool roving
  • A small tuft of colored wool roving for the top
  • One felting needle, preferably a medium or coarse needle suitable for your wool
  • A dense felting pad or wool mat
  • A needle holder, optional but helpful
  • Leather finger guards, optional
  • A small dish or lidded tin for resting the needle
  • A damp cloth and a small waste bowl
  • Optional: a fine needle for smoothing the surface
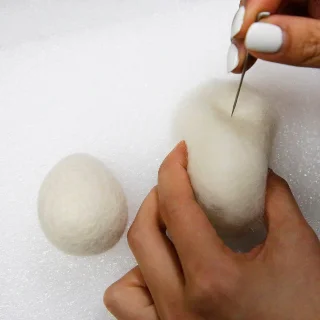
Needle sizes and wool behave differently, so let the package or supplier’s instructions guide your choice. The cover photograph comes from The Felt Pod’s beginner needle-felting guide, which also explains the basic relationship between a barbed needle, wool, and a protective felting pad.

Prepare a safe table

Choose a firm, well-lit table with enough room to keep both hands over the pad. The pad protects your table and gives the needle somewhere safe to enter. Keep the needle case or dish on your non-dominant side, and place the waste bowl within reach.
Felting needles are extremely sharp. Work slowly, keep your supporting fingers beside the wool instead of underneath it, and make every poke straight down and straight back up. If you need to pause, put the needle point-down in the labeled dish, or return it to its case. Never leave a loose needle hidden in wool or on the table.
Keep the project away from children and pets. If wool dust bothers your breathing, improve ventilation, avoid shaking the roving, and take a break. Wash your hands when you finish. This project uses no heat, liquid dye, spray, or solvent.

The do-along project

  1. Make a loose wool bundle.
  2. Compact the core while turning it.
  3. Shape the pebble and check its firmness.
  4. Add a contrasting cap.
  5. Smooth the surface and let the wool rest.

Troubleshooting

If the wool stays fluffy, your pokes may be too shallow or spread too widely. Work one area at a time, then turn the shape. If one side becomes flat, add a small tuft and felt it into the hollow. If the needle bends, stop and replace it rather than forcing it. A soft center is fine for a first pebble; the goal is an even, comfortable shape, not stone-like hardness.

Variations

Make two pebbles in related colors, add a narrow stripe around the middle, or leave the core natural and use color only at one end. For a flatter worry-stone shape, compress the top and bottom with short, even passes. For a first attempt, keep the project small and use one color layer at a time.

Cleanup

Return unused wool to a closed bag. Pick up every needle by the handle and count your tools before you clear the table. Brush loose fibers into the waste bowl rather than blowing them around. Wipe the work surface if needed, store the pad flat, and wash your hands.

This story was produced automatically by a channel. One sentence is all it takes for Neodrop to keep producing for you.

Related content

More from this channel