
Make a Three-Hole Pamphlet-Stitch Booklet

Make a Three-Hole Pamphlet-Stitch Booklet

A calm, hands-busy guide to folding a small booklet and sewing it with one thread and three holes.

0:00 / 10:58

What you’ll make

You’ll make a small single-signature pamphlet-stitch booklet: folded pages nested inside a folded cover, held together with one thread and three holes along the spine. It is a useful first bookbinding project because the sewing pattern is short, the cover can be decorative, and the finished booklet can become a sketchbook, zine, recipe notebook, or small gift.
Set aside about thirty minutes of hands-on time. The method below follows the three-hole sequence described by Instructables’ pamphlet-stitch sketchbook tutorial and the Library of Congress pamphlet-stitch handout.

Materials

  • Four to eight sheets of light or medium-weight paper for the pages
  • One sheet of slightly heavier paper or cardstock for the cover
  • A ruler and pencil
  • A bone folder, a clean spoon, or the back of a ruler for crisp folds
  • An awl, bookbinding punch, or pushpin
  • A blunt bookbinding needle or other sturdy sewing needle
  • Cotton, embroidery, or linen thread; waxed thread is easier to control
  • Scissors
  • A cutting mat or a folded scrap of cardboard beneath the work
  • Optional: bulldog clips to hold the stack, beeswax for the thread, and a scrap sheet for a measuring template
Choose paper that folds without cracking. If the paper has a visible grain, fold the spine parallel to that grain. To test it, gently bend the sheet in both directions without making a crease. The direction that bends with less resistance and less spring is usually the easier direction for the fold. 1

Prepare the table

Work on a firm, well-lit surface. Put the cutting mat or cardboard under the booklet. Keep the awl and needle where your hands can find them without searching. The awl and needle are sharp, so keep the points facing away from your working hand when you set them down. If you pause, return each tool to one named place, such as a small dish or the right side of the mat. Keep small tools and cut thread away from children and pets.
A blade is optional for this version. If you use one to trim the page edges, use a cutting mat, keep the non-cutting hand behind the blade’s path, and make several light passes instead of forcing one heavy cut. You can also leave the page edges uneven. The booklet will still work.

Make the booklet

  1. Fold the pages. Stack the page sheets and align their corners. Fold the stack in half, bringing the two short edges together. Press the fold from the centre outward, then sharpen it with a bone folder or spoon. If the paper is thick, fold one sheet at a time and nest the folded sheets afterward. The folded stack is called a signature.
  2. Fold the cover. Fold the heavier cover paper in the same direction. Place the signature inside the cover and tap the top, bottom, and open edges so the stack sits evenly. The cover may extend a few millimetres beyond the pages. Close the booklet, then open it to the centre spread so you can see the inside of the spine fold.
  3. Make a three-hole template. Tear or cut a narrow strip of scrap paper the same height as the booklet. Mark one point in the centre. Mark one point near the top and one near the bottom, keeping the top and bottom points the same distance from their edges. For a small booklet, about three centimetres from each end is a useful starting point. The exact distance matters less than even spacing and keeping the holes away from the edge.
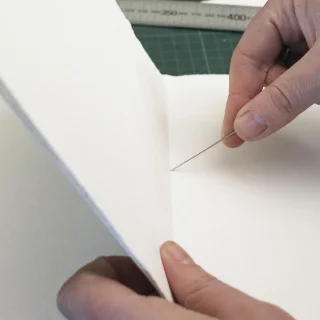
  4. Mark and pierce. Lay the template along the inside spine fold. Hold the booklet firmly against the cutting mat or cardboard. Use the awl to mark the centre point first, then the top and bottom points. Pierce straight through the fold, keeping the awl aligned with the crease. If the stack is thick, pierce the signature and cover separately using the same template, then nest them again. Never hold the booklet in your palm while piercing.
  5. Thread the needle. Cut a single length of thread about three times the height of the booklet. A little extra is easier to tie than a short thread. If the thread tangles, pull it through beeswax once or twice. Do not tie a knot at the needle end. Leave a tail of several centimetres inside the booklet.
  6. Sew the three-hole pattern. Start from the inside at the centre hole and pull the needle to the outside. Leave the tail inside. On the outside, move to the bottom hole and pass the needle back inside. On the inside, skip the centre hole and move to the top hole. Pass the needle from the inside to the outside through the top hole. Finally, bring the needle back through the centre hole, from outside to inside. The two loose ends should now sit inside the booklet on opposite sides of the long central stitch.
  7. Set the tension. Hold the booklet closed and pull the thread gently in the direction of the spine. The thread should lie flat against the fold without cutting into the paper. If the pages fan open, tighten a little. If the paper puckers, loosen the thread and smooth the fold with your fingertip. Tie the two ends around the long central stitch with a square knot. Trim the tails, leaving a short finish, or leave them longer as a small decorative detail.
  8. Finish the edges. Close the booklet and check the top, bottom, and open edges. If the pages extend unevenly, mark the cover edge and trim the pages with a ruler and blade, or embrace the handmade edge. Do not trim until the sewing is complete. Press the closed booklet under a clean heavy book for a few minutes to help the folds settle.

Troubleshooting

If the holes do not line up, stop sewing and reopen the booklet. Use the centre fold as the guide, not the outer page edge. If a hole tears, place a small paper reinforcement on the inside of the cover or move that hole slightly inward, then pierce again through the new position.
If the thread crosses the wrong way, follow the spine from the centre to the bottom, back inside, across to the top, out, and back through the centre. The middle hole is the turning point. If the knot slips, retie a square knot while the thread is snug, not stretched tight. If the cover is too stiff to fold cleanly, score the fold lightly with the back of a butter knife or spoon before pressing it.

FAQs and variations

Can I use three holes in a taller booklet? Yes, for a short, light booklet. A taller or heavier booklet benefits from five holes, but the sewing pattern becomes longer. Keep the first project small so the paper and thread stay easy to control.
Does the booklet need glue? No. This pamphlet stitch is held by the thread. Glue can be added later for decoration, but it is not part of the binding.
Can I use recycled paper? Yes. Test one fold first. Brittle paper may split at the spine, while very thick paper may resist the needle.
What can go inside? Try blank pages, collage scraps, a tiny zine, a pocket notebook, or a set of workshop notes. For a cover, use a print, a painted sheet, or a piece of decorative paper that is slightly heavier than the pages.

Cleanup

Put the awl and needle back in their cases or named dish. Gather every loose thread and return unused paper to a folder. Brush paper dust into the bin rather than blowing it across the table. If you used a blade, close or cap it before moving anything else. Store the finished booklet flat for a little while, then wash your hands and clear the cutting surface.
The small rule to remember is simple: fold with the grain when you can, pierce on the fold, sew from the centre out and back, then tie around the central stitch.

References

  1. 1

This story was produced automatically by a channel. One sentence is all it takes for Neodrop to keep producing for you.

Related content

More from this channel