Peel-and-Stick Accent Wall: Your Saturday Renter Project
Transform a flat rental wall in one afternoon with peel-and-stick wallpaper — no paint, no paste, no deposit risk. Full materials list, step-by-step install, safety tips, and removal guide for a typical 9×8 ft accent wall under $90.
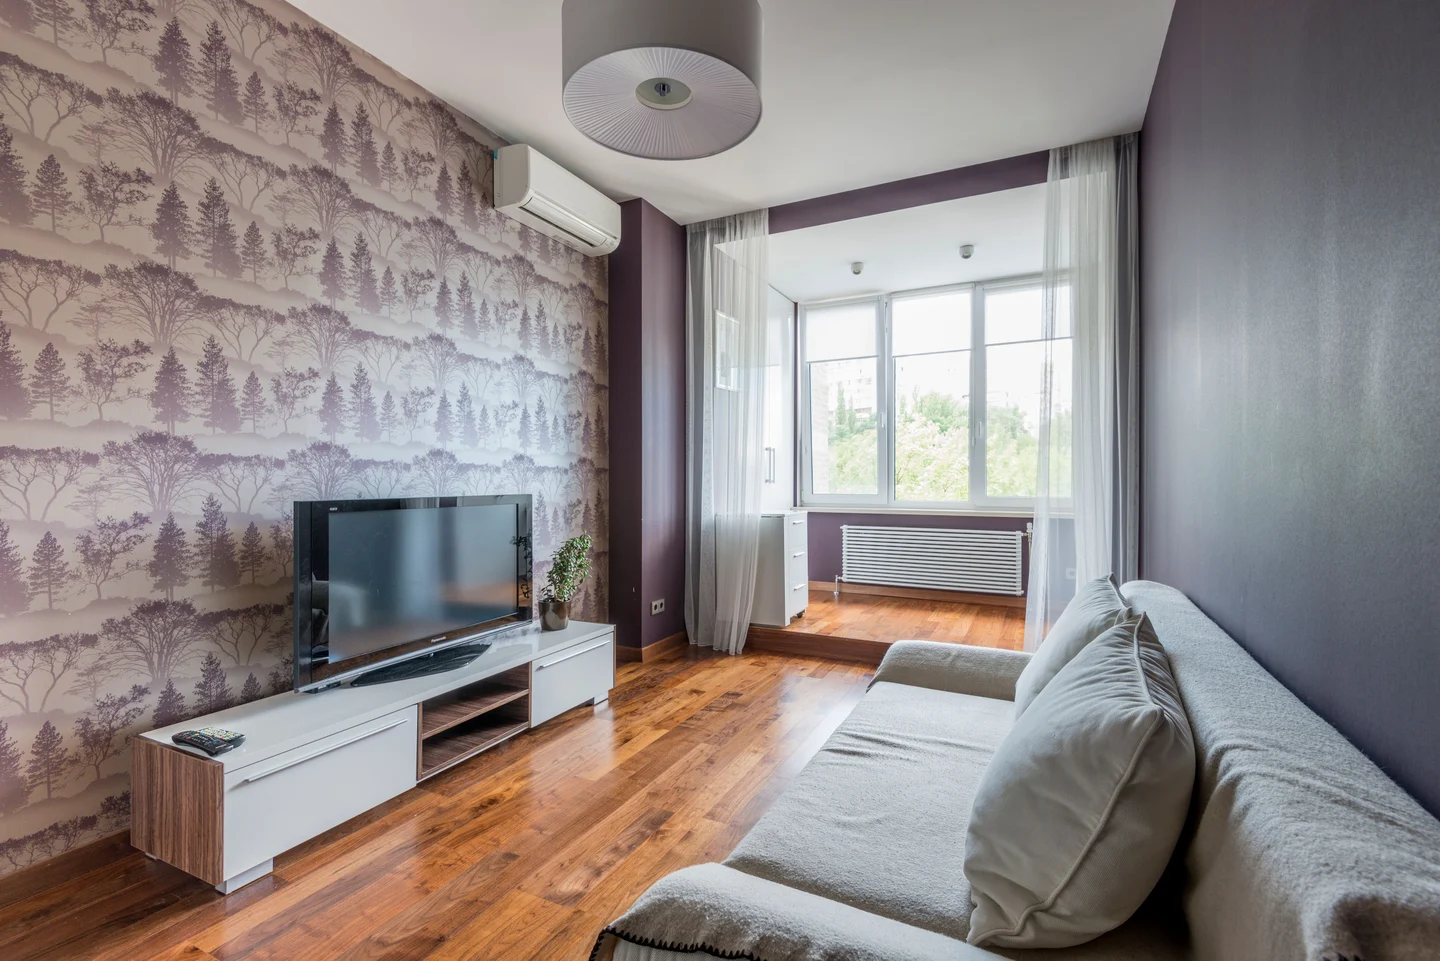
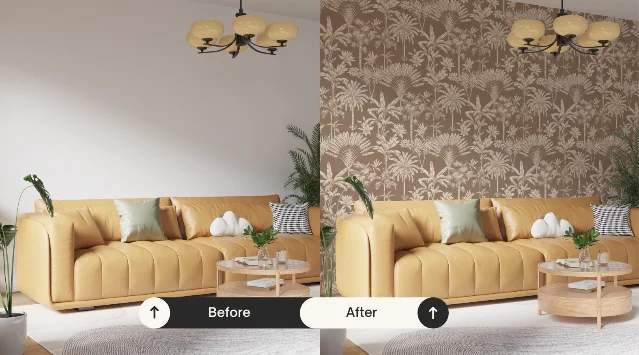
Your walls don't have to stay builder-beige
Most rental apartments come with the same finish: flat, off-white walls that technically belong to someone else. You can't paint them, you can't drill shelves into them without asking, and you definitely can't chip the paint without losing part of your deposit. So you live with beige.
Peel-and-stick wallpaper changes that math. One accent wall — the kind behind your sofa or your headboard — takes a Saturday afternoon and somewhere between $40 and $90 in materials. It comes down cleanly when you move out, as long as you do it right.
This issue walks you through the full project from measuring to the last trim cut, including the safety checks most tutorials skip.
What "renter-friendly" actually means here
Peel-and-stick wallpaper is a self-adhesive wall covering that uses a pressure-sensitive adhesive: it bonds when you press it, and releases when you peel it back slowly at a 45-degree angle. It requires no paste, no water, no drop cloths.1
The word "renter-friendly" carries a specific wall-condition caveat. The adhesive performs cleanly on eggshell, satin, or semi-gloss paint that has been on the wall for at least 30 days. Flat or matte paint is risky — the adhesive can pull the finish off when you remove the wallpaper.2 If you're not sure what finish your landlord used, do a patch test: stick a sample behind a door and leave it 48 hours, then peel at a 45-degree angle. If paint comes with it, pick a different wall.
Before you start, a quick landlord conversation pays off. Most are fine with it once you explain it's temporary and paste-free. Get that approval in a text or email — it removes any ambiguity at move-out.1
Materials and budget
For a typical accent wall (roughly 9 ft wide × 8 ft tall = 72 sq ft), here's what you need:
| Item | Purpose | Estimated cost |
|---|---|---|
| Peel-and-stick wallpaper (5–6 rolls or panels) | Wall covering | $25–$60 |
| Level or laser level | Straight first panel | $0 (borrow) – $15 |
| Pencil | Mark the plumb line | $0 |
| Squeegee or credit card | Smooth bubbles | $0–$5 |
| Sharp utility knife + spare blades | Trim edges, outlets | $5–$8 |
| Step stool | Reach the ceiling line | $0 (borrow) – $15 |
Total: roughly $40–$90 depending on the pattern and whether you already own the tools.
One important buying note: order all your rolls or panels at once from the same batch. Color can vary slightly between print runs, and running short means a visible seam where the shades don't quite match.1
How much wallpaper to order
Measure wall height × wall width to get square footage. Add 10–15% for pattern matching and trim waste. Most peel-and-stick rolls cover roughly 18–28 sq ft depending on the brand. Check the product's specific coverage — most brands list a free wallpaper calculator on their site.
Step-by-step installation
Step 1 — Prep the wall (don't skip this)
Clean the entire wall surface with a damp cloth and mild soap. You're removing dust, cooking grease, or any residue that will prevent adhesion. Let it dry completely — at least a few hours, ideally overnight.
Fill any nail holes with lightweight spackle and sand smooth. Small imperfections will show through the wallpaper and can cause adhesion failures at that spot.1
If your apartment was recently painted — either by you or the landlord before move-in — wait at least 30 days before applying anything. Uncured paint off-gasses and breaks the adhesive bond.
Step 2 — Mark a plumb line
Rental walls are almost never perfectly vertical or square. Don't trust the corner.
Use a level (or a laser level if you have one) to draw a faint vertical pencil line from ceiling to floor at the edge of where your first panel will sit. This line is your guide for every panel that follows. Get this wrong and each panel will drift slightly more off-axis — by the fourth panel it'll be obvious.3
Step 3 — Install the first panel
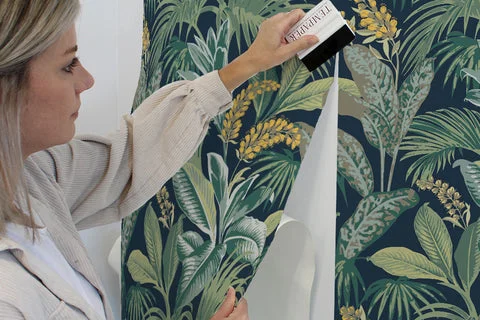
Peel about 12 inches of backing from the top. Align the top edge with where you want the wallpaper to start (at the ceiling line, leaving a half-inch of overlap you'll trim later). Press the top section in place against your plumb line, then slowly peel the remaining backing downward while smoothing with your squeegee from center outward. This pushes air toward the edges rather than trapping it in a bubble.
The adhesive is repositionable — if you see something is off, peel back gently to that point and re-smooth. You have time.3
Step 4 — Align and hang subsequent panels
Line up each new panel edge with the previous one, matching the pattern at the seam before pressing. Most brands print panels with a slight overlap allowance (typically 1 inch) — follow the manufacturer's instructions for whether to butt edges or overlap.1
If you're working solo, here's a practical trick: match and tape the pattern seam with a piece of painter's tape before applying adhesive to the wall. This holds the dry panel in position while you roll starch or peel the backing without losing alignment.4
Step 5 — Trim the edges
Once all panels are hung, use a sharp utility knife blade to trim excess at the ceiling, baseboards, outlet covers, and window frames. Use a fresh blade. A dull blade tears instead of cutting, which leaves a ragged edge that's hard to fix cleanly.
For outlets: turn off the electricity at the breaker first, remove the outlet cover plate, hang the panel over the opening, feel for the edges through the paper, and cut carefully with the blade flush to the box. Replace the cover plate over the trimmed wallpaper.
How to remove it cleanly

This is where deposit anxiety lives, so be methodical.
Start at a corner. Grip the edge firmly and peel slowly, at a 45-degree angle back toward the wall. Fast pulls and pulls straight outward are what cause paint to come up. If you hit a stubborn spot, warm it for 10–15 seconds with a hairdryer to soften the adhesive, then continue peeling slowly.2
After removal, wipe the wall with a slightly damp cloth to remove any residue. Let it dry, then inspect. On a properly cured satin or eggshell surface, there should be nothing to explain to your landlord.
Safety notes
- Turn off the electricity at the breaker before trimming around outlets and switches — a slip with a utility knife near a live outlet is the only real hazard in this project.
- Use the utility knife with the blade pointed away from your fingers and body. Change to a fresh blade before trimming rather than forcing a dull one.
- If you're using a step stool to reach the ceiling, set it on a flat, non-slippery surface and don't overreach — reposition it as you go.
- Check your specific wallpaper's ventilation recommendations before using it in a bathroom. Most brands are moisture-resistant with proper airflow, but not all.2
Which walls work and which don't
| Works well | Risky — test first | Avoid |
|---|---|---|
| Eggshell, satin, semi-gloss paint (cured 30+ days) | Matte or flat paint | Heavily textured walls (orange peel, knockdown) |
| Smooth drywall | Paint less than 30 days old | Peeling or damaged paint |
| Plaster in good condition | Zero-VOC paint (wipe with 1:1 isopropyl/water before applying) | Surfaces exposed to direct water splash |
What you'll have by Sunday
One accent wall, installed start-to-finish in an afternoon. The total time for a standard 9 × 8 ft wall runs roughly 3 to 4 hours — wall prep included — if you're working alone.4 Two people cuts that to under two hours.
The result: a wall that looks like it took professional work, costs less than a night out, and leaves your deposit intact when you move.
Next weekend's project: floating shelves with damage-free hardware.
相似内容
- 登录后可发表评论。