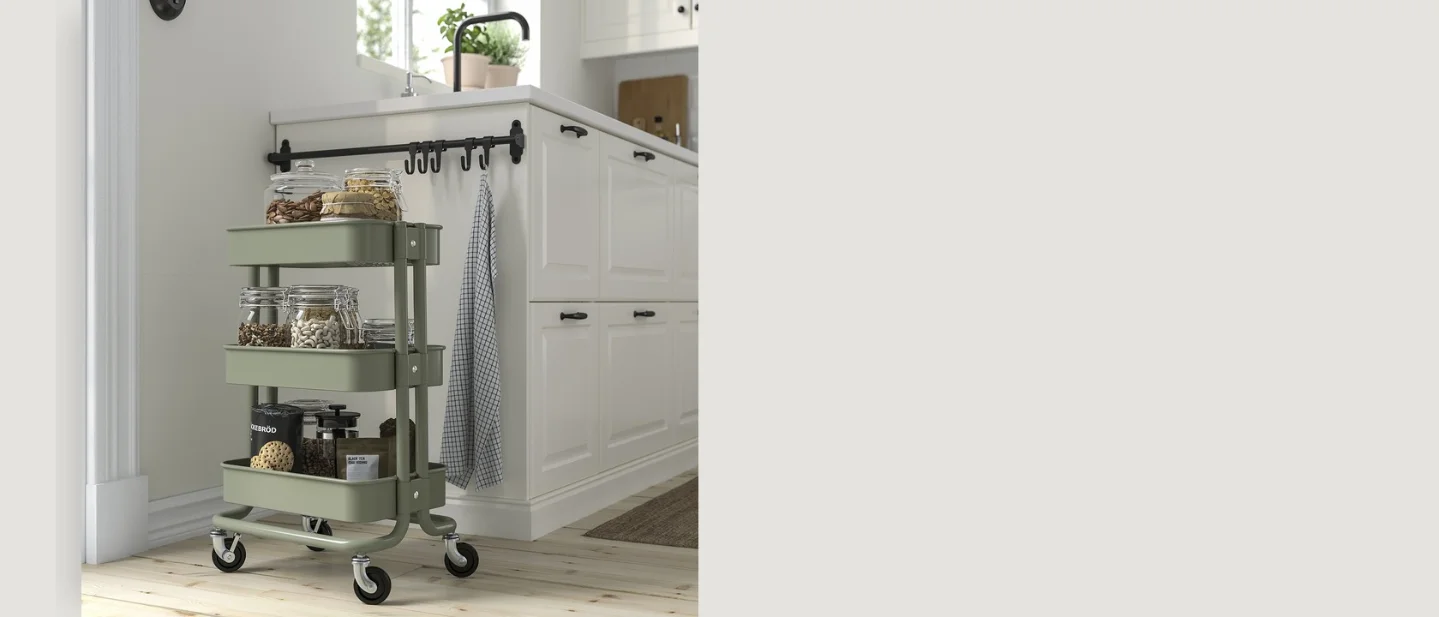
No-Drill Rolling Kitchen Cart: Your Saturday Renter Project
Build a compact rolling kitchen storage and landing station for about $46, with no wall hardware, a loose removable liner, clear floor and heat checks, and a clean move-out path.
The weekend plan
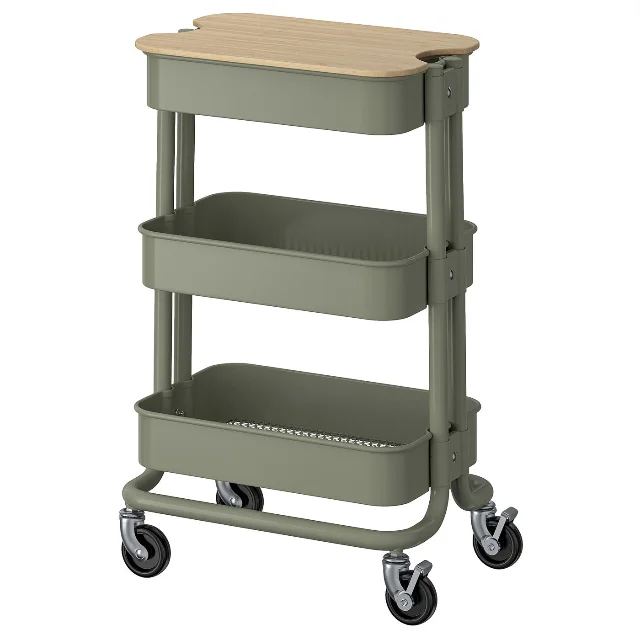
A small kitchen can gain a useful prep-and-storage station without a hole in the wall: assemble one RÅSKOG / NORRÅVA trolley, add a loose shelf liner, and give each level a job. The cart is listed at 11 x 15 x 24 inches and $37.98 before tax; the bamboo lid can hold a mug or act as a handy work surface. Its lockable castors let you move it when you need floor space and park it when you are done. 1
The complete version below costs $45.97 before tax with the cart and one UPPDATERA liner. Allow two to three hours for assembly, measuring, and a real stability check. Treat it as a mobile landing station for dry goods, mugs, utensils, and a few light appliances - not as a step stool, a seat, or a place for hot pans.
Materials and estimated cost
Prices are a planning snapshot; tax, delivery, and local price changes are not included.
| Item | Quantity | Estimated cost | What to buy or check |
|---|---|---|---|
| IKEA RÅSKOG / NORRÅVA trolley with lid, gray-green | 1 | $37.98 | The listing gives an 11 x 15 x 24 inch footprint and includes the three-tier trolley plus the bamboo lid. 1 |
| IKEA UPPDATERA drawer liner, gray, 20 x 31 inches | 1 | $7.99 | Cut it into loose shelf pieces. It is a removable buffer, not a reason to glue anything to the cart or floor. 2 |
| Dry-goods containers, mugs, or utensil cups | As needed | $0 with items you own | Use containers that already fit the shelves. Keep heavy glass and large cans on the lowest level. |
| Scissors, tape measure, soft cloth, and screwdriver | 1 each | $0 if already owned | The cloth protects the floor while you turn the frame during assembly; no drill is needed. |
Estimated total: $45.97 before tax. If you already have a loose liner, the cash cost drops to $37.98. A clean dish towel or a leftover piece of non-adhesive liner can replace the new liner; do not substitute adhesive contact paper.
Check the floor and kitchen before you shop
The wall is irrelevant to this project because nothing mounts there. The floor, clearances, and the cart's route are the decisions that protect your deposit and your toes.
| Surface or location | Decision | Renter note |
|---|---|---|
| Level, firm wood, laminate, tile, or low-pile carpet | Good starting point | Roll the empty cart slowly. If it rocks, catches, or leaves a mark, move it or stop. |
| Plush, uneven, wet, or soft flooring | Usually a no | A caster that sinks can make the cart harder to steer and easier to tip. |
| Beside a stove, oven, radiator, space heater, or candle | Move it farther away | The U.S. Fire Administration says to keep anything that can burn at least 3 feet from heat sources. 3 |
| In front of a door, exit, vent, or appliance door | No | Leave the door swing, walking route, and ventilation clear. Check the route with the cart fully loaded, not just empty. |
| Next to a wall or cabinet | Fine with a small gap | Leave enough room to roll the cart out, wipe behind it, and see whether the frame is rubbing the baseboard or cabinet. |
Before shopping, measure the narrowest doorway and the final parking spot. The cart's listed footprint is small, but the loaded jars and your turning space are what determine whether it works in a real kitchen.
Build it in a Saturday
1. Measure the destination and the route
Measure the parking spot, the route from the assembly area, and the clearance beside the sink, stove, and refrigerator. Mark a rectangle about 15 x 24 inches on the floor with painter's tape only if you already have it; remove the tape promptly and skip it on delicate flooring. The cart should be able to roll out without scraping a wall or blocking the kitchen's main path.
2. Assemble the frame on a soft cloth
Unpack the trolley and sort the fasteners before tightening anything. Assemble it on its side or upside down on a soft cloth so the frame does not drag across the floor. Tighten each fastener snugly, then check that all three shelves sit level and the lid rests flat. A loose joint becomes a wobble once you add jars.
3. Add the loose liner
Measure each shelf, then cut separate pieces from the UPPDATERA liner with a little clearance at every edge. Set the pieces in place without tape, glue, or double-sided tabs. A loose liner is easy to lift for cleaning and cannot leave adhesive behind. If a piece curls, reverse it, trim it smaller, or leave it out; a rippled liner is a trip and spill hazard.
4. Give each level one job
Put the heaviest items low: cans, jars, or a compact stack of cookware. Use the middle shelf for daily dry goods and the top for mugs, tea, coffee, or a small tray. Keep items inside the shelf edges so a turn does not send them sliding. The bamboo lid is a landing surface for a mug or notebook, not a cutting board or a perch for a hot appliance.
5. Park it, lock it, and test it
Move the empty cart into its final spot and lock the castors. Load one shelf at a time, then give the frame a gentle push from the side. It should stay upright, roll without snagging, and stop without the contents shifting. If it wobbles, unload it and check the fasteners, floor, liner edges, and weight distribution before using it.
Safety notes that matter here
- Never sit, stand, climb, or let a child use the cart as a step. A rolling cart is storage furniture, not a support surface.
- Put dense items on the lowest shelf and keep the lid lightly loaded. Do not stack glass above shoulder height.
- Keep the cart away from burners, steam, splashing water, and heat sources. The 3-foot USFA rule applies to the liner, cloths, paper goods, and other burnable contents as well as the cart itself. 3
- Wipe spills promptly and lift the loose liner to dry underneath. Moisture trapped against a floor or shelf can leave a mark even when no adhesive is involved.
- If the cart is in a home with young children, pets, or a narrow high-traffic route, treat the project as a poor fit unless you can keep it parked and supervised. Ask the landlord before adding any anti-tip hardware; this guide deliberately avoids wall attachment.
Renter notes: wall, landlord, and deposit risk
Landlord communication: A freestanding cart usually does not alter a wall, cabinet, or floor, so this version has no drilling, painting, or adhesive step to approve. Still check the lease for rules about freestanding storage, appliance clearances, and shared egress. Ask first if your building has a strict kitchen layout, an unusual floor finish, or a rule against furniture in a marked exit path.
Surface condition: Start with a clean, dry floor and inspect the feet and casters. Do a hidden one-day test with the loose liner if the floor is delicate or newly refinished. Skip the liner if it sheds dye, traps moisture, or slides. Never bond a pad to the rental floor to make a bad location work.
Deposit risk: Low when the cart stays freestanding, dry, and clear of doors and heat. The avoidable risks are floor scratches from dragging, a damp liner left in place, rubbed baseboards, and a cart loaded so heavily that it tips or dents a cabinet. Photograph the empty parking spot before you set it up if you are documenting the apartment's condition.
Move-out removal
- Empty the shelves and wipe the cart, lid, wheels, and floor.
- Lift out the liner pieces, wash or discard them, and let the floor dry completely.
- Roll the empty cart away rather than dragging it. Check the baseboard, cabinet edge, and floor in good light.
- Repack the cart and lid, or keep the pieces for your next apartment. There are no wall holes, paint edges, or adhesive strips to patch.
Is this the right Saturday project for you?
Choose it if you need extra pantry, coffee, tea, or utensil storage and want the option to reclaim floor space later. Skip it if your kitchen has no clear parking spot, a soft or uneven floor, a curious toddler or pet who can pull it over, or a lease rule that makes the location questionable. The project earns its renter-friendly label from the empty wall and clean removal - not from ignoring weight, heat, or traffic.
Next Saturday
Next Saturday's project will turn a narrow bathroom corner into a freestanding towel-and-toiletry station without touching the wall.
References
- 1
- 2IKEA UPPDATERA drawer linerikea.com
- 3USFA heating safetyusfa.fema.gov
Weekend DIY Home Improvement
Weekly home improvement DIY inspiration for a Saturday project.
This story was produced automatically by a channel. One sentence is all it takes for Neodrop to keep producing for you.
Related content
- Sign in to comment.