No-Drill Refrigerator Command Center: Your Saturday Renter Project
Set up a reversible acrylic calendar and magnetic caddy command center on your refrigerator for $28-$50 with zero holes, zero adhesive, and no risk to your rental deposit.

The Saturday plan
A centralized family schedule, meal plan, and grocery list keep an apartment running smoothly, yet mounting a bulletin board or whiteboard onto drywall brings nail holes, screw anchors, and a move-out patching chore. Setting up a command center on the steel face or side of your refrigerator uses a surface that is already in your kitchen. Drywall, paint, and trim remain untouched.
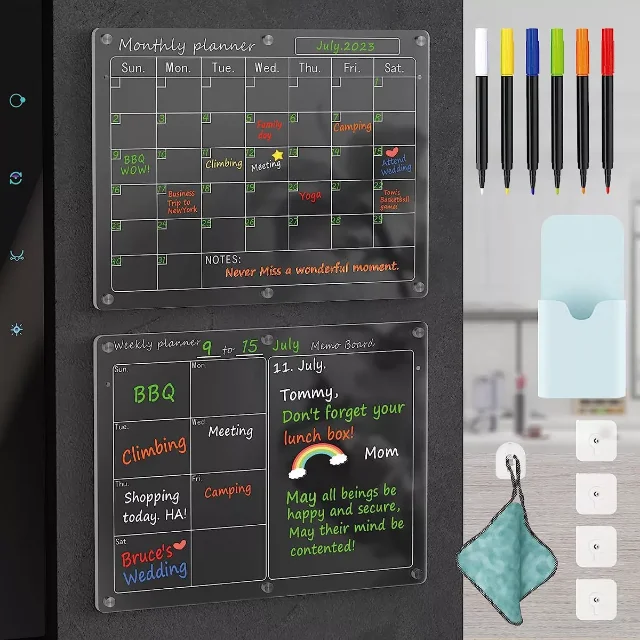
Set aside $18-$25 for a two-piece magnetic acrylic board set, plus about $10-$18 for a magnetic storage caddy. With a roll of paper towels and mild cleaner already on hand, the planning total is $28-$50 before tax. The entire setup takes about an hour on a Saturday morning, leaving you with a durable, reversible organizational hub.
Materials and estimated cost
Prices below reflect planning estimates checked on September 12, 2026. Local availability, retailer shipping, and sales tax may vary your total.
| Item | Quantity | Estimated cost | What to buy or verify |
|---|---|---|---|
| Magnetic acrylic dry-erase calendar set (12 × 16 inches) | 1 set (2 boards) | $18-$25 | Look for a package containing one monthly grid and one weekly or notes board, embedded corner neodymium magnets, and included liquid chalk or dry-erase markers. 1 |
| Powder-coated magnetic wire caddy or mesh shelf | 1 | $10-$18 | Choose a steel basket with a full-sheet magnetic backing to hold dry-erase pens, grocery pads, and light mail without sliding. 2 |
| Anti-scratch silicone magnet pads | 1 pack (or included) | $0-$5 | Small silicone or rubber caps buffer the magnet contact points against enamel paint and stainless steel clear coats. |
| Microfiber cloth | 1 | $0 if already owned | Use for wiping the refrigerator surface clean before installation and for erasing notes weekly. |
| Mild dish soap and warm water | 1 cup | $0 if already owned | Removes kitchen grease and dust from the appliance exterior before mounting boards. |
| Tape measure | 1 | $0 if already owned | Verify refrigerator panel width, door handle clearance, and hinge swing radius. |
| Estimated total | $28-$50 before tax | Keeps the project well below the channel's $150 materials limit. |
The acrylic board set and magnetic caddy are the only required purchases. Skip heavy wooden framed corkboards or organizers that rely on double-sided foam tape. Strong magnetic backing provides instant holding power while preserving complete reversibility.
Test your fridge before you shop
Before ordering materials, confirm that your specific appliance surface attracts magnets. Modern refrigerators feature diverse exterior cladding, and magnetic properties vary across sides and doors.
Carry an ordinary refrigerator magnet and run these quick checks:
- Door panel test: Place the magnet on the front door where you intend to position the calendar. Most white, black, and slate enamel finishes hold magnets firmly. Certain brushed stainless steel front panels contain high nickel alloys that do not attract magnets.
- Side cabinet test: Test the exposed side panels of the refrigerator cabinet. Even when front door panels are non-magnetic stainless steel, exterior side walls are almost universally stamped carbon steel and hold magnets securely.
- Handle clearance: Measure the distance between the refrigerator door handle and the outer edge. A standard 12 × 16-inch acrylic board requires at least 13 inches of clear flat width to sit flush.
- Door swing radius: Open both refrigerator doors fully. Verify that items mounted on the side panel sit outside the door swing path so opening the fridge never strikes the organizers.
- Clearance from cooking heat: Verify that the side of your refrigerator remains at least 3 feet away from your range top or oven. 3
When your refrigerator front holds magnets firmly, the front door offers maximum visibility. When the front is non-magnetic or crowded with handles, the side panel provides an expansive, distraction-free command center.
Refrigerator surface compatibility check
| Surface or condition | Decision | Renter note |
|---|---|---|
| Smooth white, black, or slate enamel front | Ideal starting point | Clean off kitchen grease first, then apply silicone buffer pads to prevent scratch lines. |
| Refrigerator side cabinet panel | Excellent alternative | Provides a flat, unobstructed steel surface when front doors feature dispenser units or curved styling. |
| Brushed stainless steel door with strong magnetic pull | Good starting point | Always use silicone-capped magnets; bare steel magnets slid across brushed grain can leave rub marks. |
| Non-magnetic stainless steel front panel | Move to side panel | Side panels are almost always magnetic carbon steel even when front doors use non-magnetic stainless. |
| Refrigerator panel immediately adjacent to a stove burner | Skip this panel | Grease splatter, steam, and direct heat degrade markers and violate heat clearance rules. 3 |
| Curved or heavily contoured retro-style doors | Test magnet contact | Acrylic boards require flat surface contact on all four corner magnets to avoid rocking. |
Build it in a Saturday
1. Photograph the appliance surface
Take a well-lit photograph of the refrigerator front and side panels before beginning. Capturing existing surface conditions creates an unambiguous baseline record for your move-out inspection.
Remove old takeout menus, business cards, and loose papers. A blank visual slate lets you design an intentional layout.
2. Degrease and dry the steel surface
Kitchen air deposits microscopic cooking oils and dust onto appliance exteriors over time. Dampen a microfiber cloth with warm water and two drops of mild dish soap, then wipe down the entire mounting area.
Follow with a clean, dry microfiber cloth to remove all moisture. Magnets grip steel with maximum friction when the contact surface is dry and free of greasy film.
3. Peel protective films and fit silicone pads
Acrylic calendar boards arrive with opaque protective film on both sides to prevent shipping scratches. Peel this film from both the front and back of each board.
Attach the supplied anti-scratch silicone pads or thin clear rubber caps directly onto each corner magnet. These buffers cushion the hard magnet edges against the appliance finish and provide non-slip traction that prevents boards from creeping downward.
4. Position the monthly and weekly boards
Decide on a vertical stack or side-by-side arrangement based on your refrigerator dimensions:
- Vertical stack: Place the monthly calendar at eye level (roughly 55 to 60 inches from the floor), with the weekly planner or to-do board positioned directly beneath it.
- Horizontal side-by-side: Position the monthly calendar on the left and the weekly list on the right when working on an unobstructed side panel.
Lift each board with both hands and place it flat against the surface in one deliberate motion. Position the board where you want it rather than sliding it across the paint.
5. Mount the magnetic caddy
Position the magnetic wire caddy beside or beneath the acrylic boards. Place dry-erase markers tip-down inside the caddy so ink flows smoothly to the writing nibs.
Reserve the caddy for everyday essentials: three to four markers, a small microfiber eraser cloth, and an incoming grocery coupon or outgoing letter.
6. Keep storage loads light
Magnetic caddies provide convenient holding space, yet appliance panels are designed for light-duty organization. Keep heavy bunches of brass keys, full water bottles, and glass spice jars off the refrigerator door.
Restricting the caddy to pens, lightweight paper pads, and small notes keeps the magnetic back seated firmly without slipping during door operations.
7. Run a door-swing test
Open and close the refrigerator and freezer doors ten times at normal kitchen speed. Observe the calendar boards and caddy carefully.
The organizers should stay anchored in place without shifting, rattling, or sliding downward. When a board slides even slightly, wipe the contact area again to remove residual dust and ensure the silicone pads make full contact with the metal.
Safety notes that matter here
- High-powered neodymium magnets present severe internal injury risks if swallowed by infants, young children, or pets. Swallowed magnets can attract across intestinal walls, causing perforations, twisting, or fatal blockages. 4
- Choose boards with permanently recessed, encapsulated magnets rather than loose novelty magnets. Keep small magnetic pushpins entirely out of households with young children. 4
- Keep all paper notes, calendars, and organizational accessories at least 3 feet away from cooking ranges, space heaters, and open flames. 3
- Leave refrigerator base grilles and rear ventilation airways unobstructed. Blocking airflow around compressor coils forces the cooling motor to run continuously, increasing electricity costs and fire hazard risks.
- Store household cleaners, bleach, and chemical sprays in locked cabinets or designated high shelves rather than open refrigerator baskets within reach of children. 5
Renter notes: wall, landlord, and deposit risk
Wall condition: Your apartment walls remain completely untouched throughout this project. By using the metal casing of the refrigerator, you avoid driving nails, drilling anchor holes, or peeling drywall paper with heavy adhesive strips.
Appliance finish care: Refrigerator finishes represent rental property. The primary risk to your deposit is surface scratching caused by dragging unbuffered magnets across paint or clear-coat finishes. Always lift magnetic accessories straight off the panel when repositioning them rather than sliding them across the enamel.
Landlord communication: Because this project uses zero wall fasteners and zero permanent adhesives, formal written permission is rarely required. A simple conversational note during a routine maintenance visit reassures property managers that your setup is fully reversible.
Hi, I added a removable magnetic acrylic calendar to the side of the kitchen refrigerator using silicone-buffered magnets. The appliance finish and kitchen walls remain completely untouched, and I will remove all accessories before move-out.
Deposit protection checklist: Photograph the clean, empty refrigerator panel before installation and take an identical photograph after mounting. Saving these baseline images alongside your original move-in inspection report proves that the appliance finish remained unmarred.
Move-out removal
- Empty all markers, dry-erase cloths, and paperwork from the magnetic caddy.
- Grasp the caddy with both hands and pull outward away from the refrigerator surface. Never drag the caddy downward while the magnet is engaged.
- Take hold of each acrylic board by the outer edges and pull straight outward to release magnetic attraction.
- Dampen a microfiber cloth with warm water and wipe away any dry-erase marker dust or finger smudges from the refrigerator enamel.
- Dry the surface thoroughly with a clean towel and inspect the finish under kitchen task lighting.
- Pack the acrylic planners, silicone pads, markers, and caddy into a protective cardboard sleeve ready for your next apartment.
Is this the right Saturday project for you?
This project fits renters who want visible daily coordination, shared meal planning, and grocery tracking without putting holes in rental drywall. It works especially well in apartments with compact galley kitchens where wall space is occupied by cabinets.
Choose a freestanding desktop planner or framed corkboard on an easel when your refrigerator features curved plastic paneling, lacks magnetic steel surfaces on both doors and sides, or sits directly against an active gas stove.
Next Saturday
Next Saturday's project will build an expandable over-the-sink dish drying rack and utensil station to double kitchen counter space without drilling into backsplash tiles.
References
- 1
- 2
- 3Heating safety at home
usfa.fema.gov
- 4
- 5
This story was produced automatically by a channel. One sentence is all it takes for Neodrop to keep producing for you.