
How to replace spark plugs and save at least $100 in labor
A beginner-safe spark-plug replacement guide: confirm access and fitment, work on a cold engine, gap and torque each plug correctly, and keep at least $100 in labor.

The short version
Replacing spark plugs is one of the more approachable engine jobs, but it rewards careful work. On a four-cylinder engine, the hands-on job takes about an hour; Family Handyman lists a total project time of a few hours, a $20-$50 parts cost, and at least $100 in labor savings. 1
This guide is for a gasoline engine where the plugs are reachable without removing major engine parts. Work only on a completely cold engine. If your V6 hides its rear plugs behind the intake manifold, or you cannot find the correct gap and torque specifications, stop and use a shop instead of guessing.
What spark plugs do, and when to change them
A spark plug creates a small spark across a gap inside the cylinder. That spark ignites the air-fuel mixture. Each spark slowly erodes the metal electrodes, so the gap grows over time. Worn plugs can contribute to misfires, poor acceleration, lower fuel economy, and a check-engine light. 1
There is no single replacement mileage for every car. Family Handyman notes that some automakers call for replacement around 30,000 miles, while some plugs are rated for 100,000 miles. Use your owner's manual and the exact plug maker's specification, not a universal internet interval. 1
Tools and materials
| Item | Why you need it | Approximate planning cost |
|---|---|---|
| Correct spark plugs for your engine | One replacement plug per cylinder | $20-$50 for the job's parts budget 1 |
| Spark-plug socket in the correct size | Removes and installs the plug without damaging the ceramic | Existing tool or price varies by vehicle |
| Ratchet, extension, and swivel socket | Reaches plugs in a tight engine bay | Existing tools or price varies |
| Torque wrench | Tightens the plug to the manufacturer's specification | Borrow or buy; do not replace it with guesswork |
| Wire gap gauge | Checks the gap against the vehicle specification | Low-cost tool; price varies |
| Compressed air or a clean brush, plus rags | Keeps grit out of the cylinder and cleans the work area | Use what you already have if clean and dry |
| Needle-nose pliers or a spark-plug wire puller | Helps with detachable boots or older plug-wire systems | Only needed for some engines |
| Dielectric grease | A thin layer inside the plug boot helps future removal | Small tube; price varies |
| Anti-seize compound | Use only if the vehicle or plug instructions call for it | Optional; follow the specified torque correction |
The $20-$50 figure is the published parts budget for the job, not a promise that you can buy a torque wrench and every other tool for that amount. If you need to buy the safety-critical tools from scratch, compare that one-time equipment cost with a shop quote first.
Before you start
- Find the engine's exact spark-plug part number, gap, torque value, and replacement interval in the owner's manual or service information. Write them down before opening the hood.
- Confirm that every new plug matches the engine. Do not assume a plug is correctly gapped just because it came out of a box.
- Let the engine cool completely. Hot aluminum threads are easier to damage.
- Park on a level surface, set the parking brake, switch off the ignition, and keep loose tools away from belts and fans.
- Take a photo of the top of the engine. If your car uses plug wires instead of one coil per plug, label the wires so they return to the correct cylinders.
- Check access before removing anything. Some V6 engines require intake-manifold removal to reach the rear bank; that is a reasonable point to hand the job to a professional. 1
Step-by-step: replace the plugs
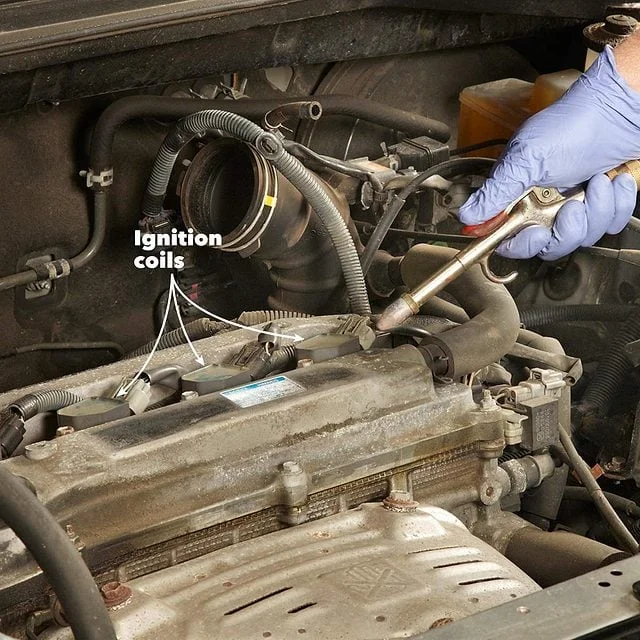
- Clear and clean the work area. Remove the plastic engine cover or air-cleaner parts only if they block access. Label any hose you disconnect. Use compressed air or a clean brush around each ignition coil and plug well before removing a plug. Dirt that falls into the cylinder is a problem you can avoid.
- Remove one coil or plug wire. Press the locking tab on the coil connector and rock the connector free; do not yank the wires. Remove the coil hold-down bolt and pull the coil and rubber boot straight out. On an older plug-wire system, pull on the rubber boot, not the wire itself. If a boot or spring stays in the plug well, retrieve it carefully before continuing. 1
- Loosen and remove the old plug. Blow away any remaining grit. Slide the correct spark-plug socket over the plug, add an extension or swivel if needed, and turn counterclockwise. Keep the socket straight. If the plug is seized, stops turning, or feels as if the threads are binding, stop rather than forcing it. A damaged cylinder-head thread is a much larger repair than a plug change. 2
- Check the new plug and set its gap. Compare the new plug with the old one, then use a wire gap gauge to check the distance between the center and side electrodes against the engine specification. Adjust gently if needed. A wire should pass with slight drag. Do not bend the center electrode or use a random gap from a different engine.
- Start the new plug by hand. Put the plug in the socket and lower it straight into the hole. Turn the extension by hand for several full turns before bringing out the ratchet. If it does not turn smoothly by hand, back it out and start again. Cross-threading the aluminum cylinder head is an expensive mistake.
- Torque the plug correctly. Use the torque wrench and the exact value for your engine. Under-tightening can let the plug loosen or leak; over-tightening can distort the plug or damage the threads. Family Handyman says to reduce the torque value by 10 percent if its recommended anti-seize is used. Because instructions differ by plug and engine, do not add anti-seize automatically and never substitute a generic torque number. 1
- Reinstall the boot or coil and repeat. Put a thin film of dielectric grease inside the rubber boot, not on the electrode or the plug gap. Push the boot down until it seats, reinstall the coil bolt and connector, then move to the next cylinder. Reinstall any covers or air-cleaner parts, start the engine, and listen for a smooth idle. If the engine shakes, the check-engine light flashes, or a connector will not lock, shut it off and recheck your work.
Beginner mistakes to avoid
| Mistake | What can go wrong | Better habit |
|---|---|---|
| Buying by appearance alone | The thread, heat range, or reach can be wrong | Use the vehicle-specific part number |
| Working on a warm engine | Aluminum threads can be damaged more easily | Wait until the engine is fully cold |
| Skipping the cleaning step | Grit can fall into the cylinder | Clean around each plug before removal |
| Pulling an ignition wire by the cable | The conductor or terminal can separate | Pull on the boot or use the connector lock |
| Guessing the gap | A wrong gap can cause a misfire or poor running | Check every plug with a gap gauge |
| Starting with a ratchet | Cross-threading can damage the cylinder head | Start every plug several turns by hand |
| Tightening by feel | Too little or too much torque can create a failure | Use the manual's torque value and a torque wrench |
| Forcing a plug that is stuck | The plug can break or take cylinder-head threads with it | Stop and get model-specific help |
| Replacing plugs when access requires major disassembly | A small maintenance job can become a large repair | Hand off V6 rear-bank or buried-plug work if needed |
What you save
| Choice | Direct cost or avoided cost | Practical takeaway |
|---|---|---|
| DIY spark plugs, with the needed tools already available | $20-$50 in parts | The published parts budget for the job 1 |
| Labor avoided by doing it yourself | At least $100 | Family Handyman's stated minimum labor saving 1 |
| Buying a torque wrench and other tools | Varies | Treat it as a reusable equipment purchase, not a one-job saving |
The honest comparison is simple: plan on $20-$50 for the plugs, then compare your local shop's labor quote. If the shop would charge at least $100 in labor, that is the minimum labor saving before taxes, parts markup, or any tool purchases. A shop may still be the cheaper choice when access is difficult or a plug is stuck.
Tutorials worth watching
- Spark Plug Replacement DIY (the ULTIMATE Guide) from ChrisFix runs 21:30 and covers plug selection, inspection, gapping, anti-seize and dielectric grease, plus plug and wire replacement. 3
- How to Replace Spark Plugs from Family Handyman is a short 2:28 visual overview of the same job. 4
- How to Replace Spark Plugs in Your Car is the written step guide used for the tool list, access warnings, gap check, and torque reminders. 1
- When Platinum Spark Plugs Get Stuck is a useful warning before you force a plug that has not moved. Its generic torque example is not a substitute for your vehicle's specification. 2
콘텐츠 카드를 불러오는 중…
Next week: we’ll show you how to inspect a serpentine belt and decide whether it needs replacement before it leaves you stranded.
관련 콘텐츠
- 로그인하면 댓글을 작성할 수 있습니다.