2026. 6. 24. · 08:15
How to replace your cabin air filter and save $35-$70 in 20 minutes
Replacing a cabin air filter is a glove-box job on many cars: buy the correct filter, match the airflow direction, and avoid paying a shop for a few minutes of labor. This guide shows the tools, steps, savings math, replacement interval, and beginner mistakes to avoid.

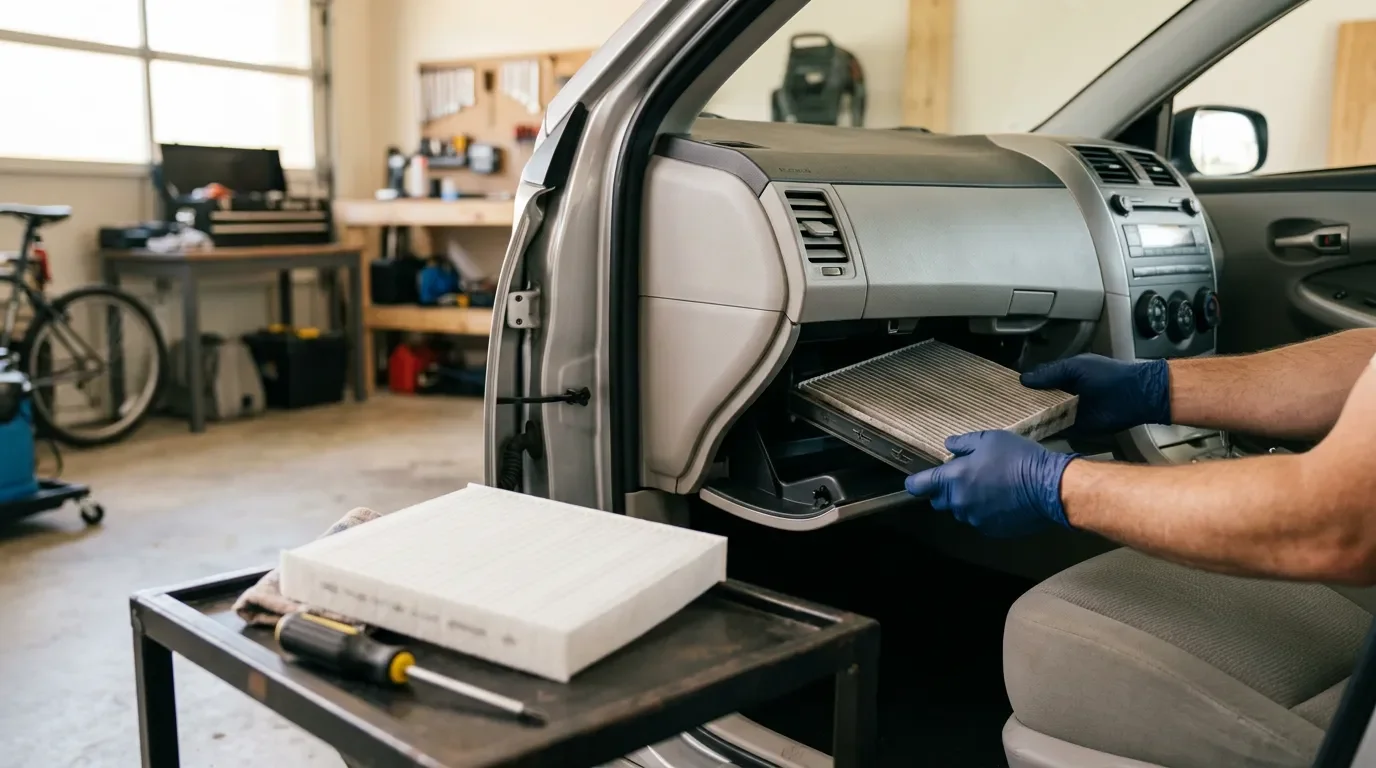
A cabin air filter is the filter for the air you breathe inside the car, not the engine air filter under the hood. In many cars it lives behind the glove box, takes less than 30 minutes to replace, and may need only a Phillips screwdriver 1.
The money angle is simple: Family Handyman's example used a $25 dealer filter after a local service center quoted $95 for parts and labor, so the DIY job saved $70 1. A Honda dealer example in one YouTube tutorial listed a $59.95 charge for the same basic job 2. For most beginners, this is one of the best first wins: low risk, cheap parts, and immediate practice reading the owner's manual.
What this filter does
The cabin filter sits in the heating, ventilation, and air-conditioning system. Car and Driver explains that it catches dust, smog, odors, allergens, and other contaminants before outside air enters the cabin 3. If it gets packed with leaves and dirt, airflow through the vents can drop, the fan may sound strained, and the cabin can smell stale 3.
Most modern vehicles have one, though the exact location varies by make and model. Car and Driver notes that many filters hide behind the passenger-side glove box, and some cars need only simple hand tools, such as a screwdriver or socket wrench 3. Family Handyman's example shows the same basic layout: lower the glove box, pull out the filter tray, copy the airflow direction, then reinstall the tray 1.
Should you do it yourself?
If your car's manual shows the cabin filter location and you can sit comfortably in the passenger footwell, this is usually a good DIY job. Skip it or ask for help if the manual shows the filter buried deep behind trim panels, if removing the glove box requires force, or if any airbag wiring is in the way. Do not pull on yellow connectors or wiring harnesses; yellow is commonly used around airbag systems.
| Decision point | Beginner answer |
|---|---|
| Time | Plan on 20-30 minutes the first time; Family Handyman's example took less than 30 minutes 1. |
| Tools | Start with a Phillips screwdriver. Some cars need no tools; others may need a screwdriver or socket wrench 3. |
| Parts cost | Use the exact filter for your year, make, model, and engine or trim. Family Handyman's example filter cost $25 at the dealer 1. |
| Shop cost | Expect the quote to depend on the car and local labor. Real examples found for this issue ranged from $59.95 at a Honda dealer to $95 at a local service center 2 1. |
| Savings | A conservative DIY win is roughly $35-$70 when the filter is easy to reach and you buy the part yourself 1. |
Tools and materials
You do not need a garage full of tools for this one.
- Correct cabin air filter for your car. Match it by year, make, model, and sometimes trim.
- Owner's manual, or the filter maker's instruction sheet.
- Phillips screwdriver, if your glove box or access panel uses screws.
- Flashlight or phone light.
- Small vacuum or damp rag, optional, for loose leaves in the filter pocket.
- Nitrile gloves, optional, if the old filter is dusty.
Do not buy by looks alone. Cabin filters can be almost the same size but still have different frames, tabs, or airflow arrows. If the new filter has an arrow marked airflow, the arrow should match the direction of the old filter or the vehicle instructions. Family Handyman specifically tells readers to note the old filter's pleat orientation and install the new filter the same way 1.
Step-by-step overview
Watch one model-specific tutorial first if you can. Then keep the manual open while you work.
콘텐츠 카드를 불러오는 중…
AutoZone's short tutorial says cabin and engine air filters can take only a few minutes, but the exact steps vary by vehicle 4. Treat that video as the big-picture walkthrough, then follow your own car's instructions.
For a slower example, this Honda Civic walkthrough shows the glove-box access pattern and documents a $59.95 dealer quote for the job 2.
콘텐츠 카드를 불러오는 중…
- Park safely and turn the car off. Set the parking brake. You do not need the engine running for this job.
- Empty the glove box. Take out papers, chargers, napkins, and anything that can fall into the footwell.
- Lower or remove the glove box. On many cars, you press in the sides of the glove box or remove a few screws. Family Handyman's example uses glove-box hinges and side pressure to drop it down 1.
- Find the rectangular filter door or tray. It is usually a narrow plastic cover behind the glove box. Do not force it. Look for clips, tabs, or arrows.
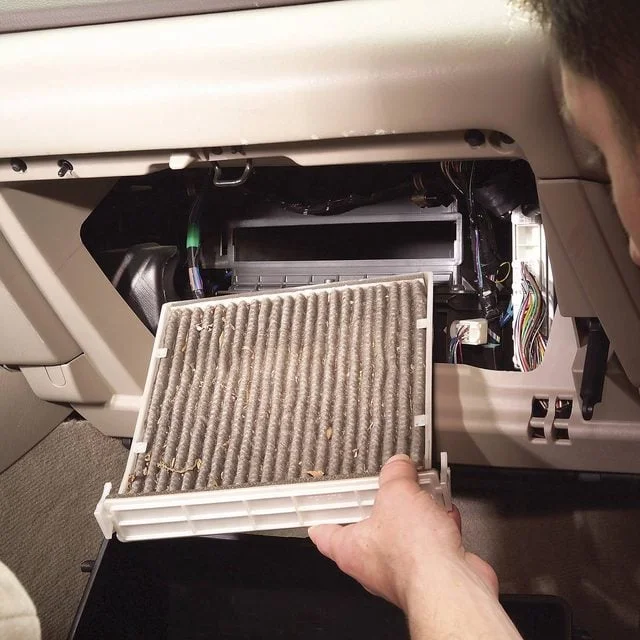
- Slide the old filter out slowly. Keep it level so leaves and grit do not dump into the blower opening.
- Check the old filter direction. Look for an airflow arrow or note which side faces up. Take a photo before removing it all the way.
- Clean loose debris only. If you see leaves in the tray, vacuum them out or wipe the area gently. Do not spray cleaner into the blower motor.
- Install the new filter. Slide it in with the arrow and pleats matching the old orientation or the manual.
- Reinstall the tray and glove box. Make sure clips are fully seated. If the glove box feels crooked, stop and realign it instead of pushing harder.
- Test the fan. Turn the car to accessory mode, run the blower on low and high, and listen for rubbing or clicking. If the fan suddenly makes noise, turn it off and recheck the filter seating.
When to replace it
The safest interval is the one in your owner's manual. Car and Driver says replacement cadence depends on driving conditions, environment, and filter type, and that owner manuals often give more than one schedule 3. Popular Mechanics gives a common cabin-filter lifespan of 12,000 to 15,000 miles, while AutoZone's tutorial description gives a broader 15,000 to 30,000 miles depending on driving conditions 5 4.
Replace it sooner if:
- the vents smell musty or dusty;
- the fan blows weaker than it used to;
- the fan makes new noise on high speed;
- the windshield fogs easily even with the defroster on;
- you drive in heavy dust, wildfire smoke, pollen season, or city traffic.
A dirty cabin filter usually will not strand the car, but it can make the ventilation system work harder. Family Handyman warns that a clogged filter can reduce heating and cooling efficiency, cause window fogging problems, and eventually contribute to blower-motor replacement costs of $150 or more 1.
Beginner mistakes to avoid
| Mistake | Why it matters | Easy fix |
|---|---|---|
| Buying the wrong filter | Similar-looking filters may not seal in the tray. | Search by year, make, model, and trim; compare the new filter to the old one before forcing it. |
| Installing it backward | The filter may not seat correctly, and airflow may suffer. | Copy the old filter's arrow or the manual's airflow direction 1. |
| Dumping leaves into the blower | Debris can make the fan click or rub. | Pull the old filter out level and vacuum the pocket before installing the new one. |
| Forcing the glove box | Plastic tabs break easily, especially in older cars. | Stop when it resists. Find the screw, damper arm, or side tab you missed. |
| Confusing it with the engine air filter | They do different jobs. The cabin filter cleans air for people; the engine air filter cleans air for combustion 3. | If the filter is under the hood near the engine, you are probably looking at the engine air filter, not the cabin filter. |
Bottom line
If your cabin filter is behind the glove box, replacing it yourself is a low-stress way to save about $35-$70 and learn how your car's interior air system is put together. Buy the exact filter, take a photo of the old one's direction, and do not force plastic parts. That is most of the job.
Next week, we'll move from interior air to rainy-day visibility: how to replace windshield wiper blades without scratching the glass.


이 콘텐츠를 둘러싼 관점이나 맥락을 계속 보강해 보세요.