hackaday.com
$50 PVC turbine produces 200W from a 3-meter water drop — no concrete, no permits
Daniel Connell's Low Head Turbine turns a 3-metre head of flowing water into ~200 W DC using a $30–50 BOM of PVC fittings, a 120 mm PC fan, and a scavenged hoverboard hub motor — no PCB, no firmware, no soldering required.

A scavenged hoverboard wheel, a $4 computer fan, and some PVC fittings. That's the core of the Low Head Turbine, an open-source hydroelectric generator built by Daniel Connell of OpenSourceLowTech — and the standout DIY hardware project of the week ending May 23, 2026. 1
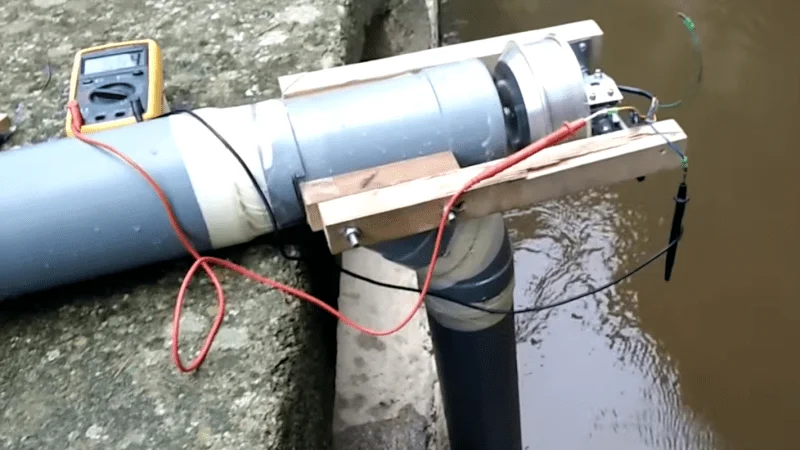
Turbine deployed at a real site — the Fluke multimeter on the rock is measuring the DC output voltage. 2
Loading link preview…
What it does and why it stands out
The turbine is a siphon-action pico hydroelectric generator. A PVC Y-connector acts as both the siphon tube and the turbine housing — water is pulled up and over a small dam or weir by siphon action, and as it flows through the pipe it spins a 120 mm PC fan impeller mounted on a shaft. That shaft runs into the rotor of a disassembled hoverboard hub motor, which acts as a three-phase AC alternator. 2
The output is rectified to DC — roughly 60 V × 3.3 A = ~200 W at 3 m of hydraulic head with 30–40 L/s of flow. 2 Real-world field results vary: a Scotland installation with 110 mm inlet pipe (vs. the recommended 125 mm) and a lower-voltage motor measured 125 W at 50 V / 2.5 A. 3
The standout angle isn't peak wattage — it's what the design eliminates. There's no earthworks, no concrete, no diversion channel to dig. 2 The unit plugs into any stream or canal that has a small drop. As Connell put it:
"One of the good things about this design is it doesn't need like proper earthworks. Like, we won't need to pour any concrete or anything." 3
Hackaday noted that low-head hydro is typically cost-prohibitive, but this design uses materials cheap enough to change that math. 1 Connell's own framing: "This free and open source turbine can be built for half the cost of a 120 watt solar panel, and will produce about ten times the power per day." 3
That claim assumes a reliable water source, which is the real constraint. But where water flows steadily, the numbers are hard to argue with.
Bill of materials
The turbine unit itself costs approximately $30–$50, excluding whatever length of PVC pipe you need to span your specific site. 2
| Item | Qty | Notes |
|---|---|---|
| PVC 45° Y-connector (110 mm × 160 mm, or 125 mm × 200 mm for higher output) | 1 | Double-socket only (rubber seals on top and inlet, open bottom) |
| PVC end cap (to fit top inlet of Y-connector) | 1 | |
| Hoverboard / balance board wheel (hub motor) | 1 | Second-hand boards typically £$€20–30; motorbike alternator is an alternative |
| 120 mm computer cooling fan | 1 | Standard seven-blade flat-pitch; server/high-RPM fiber-reinforced type for high-head installs |
| Battery pack heat-shrink tubing, 180 mm flat width | ~150% of fan height | For blade reinforcement |
| Plastic chopping board, 9–10 mm thick | 1 | Makes two centering rings |
| M8 threaded rod, 1 m | 1 | Stainless/galvanized/zinc-coated |
| M8 hex head bolts, ~50 mm | 4 | Stainless/galvanized |
| M8 countersunk bolt, ~30 mm | 1 | Allen key type preferred |
| M8 Nyloc / lock nuts | 14 | |
| M8 standard nuts | 9 | |
| M8 penny washers (~30 mm OD) | 12 | |
| M8 Form A washers (16 mm OD) | 12 | |
| M8 wingnuts | 2 | |
| M8 connector nut, ~30 mm | 1 | 24–40 mm acceptable |
| M4 70 mm countersunk machine screws | 3 | Length is for 160 mm pipe; cut to match if using different diameter |
| M4 20 mm countersunk machine screws | 2 | |
| M4 Nyloc nuts | 8 | |
| M4 washers | 5 | |
| O-rings, 8 mm ID, 2–3 mm thickness | 4 | Shaft seal; may use slightly more or fewer |
| Timber offcuts, ~50 × 15 × 400 mm | 3 pieces | Outdoor-treated or painted; pallet wood works |
| Flat aluminum bar, 24–30 mm wide × 2–3 mm thick × ~40 mm long | 2 pieces | Motor mount brackets |
All hardware is standard metric fastener stock. The chopping board and aluminum bar are the only semi-custom cuts. 2
Mechanical design overview
There is no PCB, no schematic, and no firmware in this project. The entire electrical side is the hoverboard hub motor acting as a three-phase brushless alternator — you wire its three phase leads through a three-phase bridge rectifier (not listed in the BOM, but any 50 A bridge rectifier rated above your expected voltage will do) to get usable DC. 2
The mechanical design divides into three sub-assemblies:
Flow section. The PVC Y-connector houses the impeller. Three M4 machine screws hold a small plastic centering ring (cut from the chopping board) at the center of the outlet, which keeps the shaft aligned. If the impeller diameter is smaller than the outlet bore, you nest cut-down PVC pipe sections inside the connector to reduce the flow area and recover velocity head. 2
Impeller. The PC fan is stripped of its housing, the center pin punched out, a chopping-board disk pressed into the hub, and battery pack heat-shrink applied over the full blade span. The heat-shrink is shrunk on incrementally (boiling water works fine — no heat gun needed) to form a reinforcing band that holds the blade tips together under flow load. 2
Generator mount. The hoverboard wheel is disassembled to expose its rotor (magnets) and stator (coils). An M8 shaft threads into a connector nut anchored to the rotor; two aluminum bar clamps grip the wheel axle from wooden side-rails bolted to the Y-connector. The shaft runs through a hole drilled in the PVC end cap, sealed with O-rings to prevent air ingress (which would break the siphon). 2
Loading link preview…
Publicly available design files: 2
- Circle layout template (PDF): opensourcelowtech.org/tutorials/hydro/CircleSheet_WaterTurbine.pdf — for drilling the centering ring and connector holes at accurate third-points
- Full 3D model (.zip, 62 MB): Google Drive link on the build guide page — full turbine assembly in a 3D format
- 3D-printable impeller shapes: A separate Google Drive folder from a 2024 collaboration with Kathmandu University testing multiple 3D-printed impeller geometries 4
There is no KiCad file, no Gerber, and no Eagle project — because there is no PCB to fab.
Firmware and software requirements
None. The turbine is a pure electromechanical system. The hoverboard motor generates three-phase AC, a bridge rectifier converts it to DC, and you connect the DC output to whatever you're charging or powering. 2
There is no microcontroller, no programming environment, and no source repository. If you want load regulation or battery charge management downstream, that's a separate project — the turbine itself has no control electronics.
Reproduction difficulty
Rating: Intermediate.
The build requires no soldering, no electronics assembly, and no programming. What it does require is comfort with:
- Hand-tool metalwork: grinding an M8 bolt head to fit a bearing, drilling accurately centered holes in round plastic, cutting threaded rod with a hacksaw
- PVC plumbing fits: cutting and nesting pipe sections, fitting rubber-sealed connectors
- Mechanical alignment: centering the shaft precisely in the end cap so the impeller doesn't rub at high RPM
- Hoverboard disassembly: separating the rotor from the stator with a mallet, avoiding contaminating the magnets with steel debris
Estimated build time: 1–2 days for one person with all materials on hand. 2
Tools required: power drill, 4/5/8/10/12 mm drill bits, ~34 mm and 16 mm hole saws, hacksaw, spanners (7 mm × 1, 13 mm × 2), metal file, tape measure, marker. A bench vise is optional but speeds up several steps significantly.
The one real gotcha: fan blade failure at higher head. In field tests at ~4.5 m of head (above the design's nominal 3 m), unreinforced PC fan blades fractured — notably at shutdown, when water hammer creates a pressure spike. 3 Connell identified the shutdown moment specifically: "So the second propeller also exploded but weirdly not until the last second when we turned off the water." 3 The fix is either the heat-shrink reinforcement method (described in the build guide) or upgrading to a fiber-reinforced server fan. For installations at or below 3 m of head, the standard fan with heat-shrink is documented to hold.
A fine mesh screen upstream of the inlet is worth adding — small stones ingested by the impeller abrade the plastic centering ring. 3
Part sourcing
Most of the BOM is available at any hardware store or plumbing supplier. The two items worth thinking about before starting:
Hoverboard wheel: The easiest route is a second-hand hoverboard from local classifieds — complete boards typically sell for £/$/€20–30. 2 Note that not all hoverboard hub motors are identical: some output 42–45 V DC per 1000 RPM and some output ~55 V DC per 1000 RPM. The higher-voltage motor produces more power at a given RPM. If you can't find a hoverboard, a motorbike alternator is the recommended substitute. 2
PVC pipe diameter: The build guide uses 110 mm inlet / 160 mm outlet as a starting point, but Connell's own data shows the Scotland test (110/160) produced 125 W while the Berlin test (125/200) produced 200 W — a 60% output difference primarily attributable to pipe bore. 3 If 125 mm Y-connectors are available in your region, they're worth sourcing. Availability of large-diameter PVC Y-fittings with rubber-sealed sockets (double-socket, not triple) varies by country — check plumbing wholesalers, not just hardware chains.
Everything else (M8 hardware, heat-shrink, chopping boards, timber, aluminum flat bar) is commodity stock with no sourcing risk.
Community reception
Loading link preview…
The build guide has been live since November 2022, and the YouTube build tutorial has accumulated 904,000 views, 12,700 likes, and 360 comments. 5 The real-world results video shows 333,000 views and 4,600 likes. 3 By YouTube engagement standards for a niche DIY channel, those numbers indicate a sustained builder audience rather than a single viral spike.
Hackaday covered the project on May 22, 2026, drawing 17 comments on the article page. 1 Comment text was not retrievable (Disqus loads via JavaScript), so no specific builder feedback or gotcha reports from that thread can be cited here.
Connell continues active development: a 2024 collaboration with Kathmandu University tested multiple 3D-printed impeller shapes for efficiency, with results published as video and a Google Drive data spreadsheet. 4 A "vectorizer" flow guide — intended to swirl water onto the blades and recover an estimated 5–10% additional efficiency — is in development. 3
All project documentation lives at opensourcelowtech.org/water_turbine.html. Questions to the builder go to opensourcelowtech.org@gmail.com or the Wind Turbine Makers Facebook group (Connell notes hydro questions are welcome there too).
Cover image from: Low Head Turbine Generates Plenty Of Power | Hackaday
Add more perspectives or context around this Drop.