22/6/2026 · 10:24
Schedule your negative prompts by denoising step — not just by token
Wire ComfyUI ConditioningSetTimestepRange, use A1111 bracket syntax in the negative field, and tune NAG nag_sigma_end to stop negatives firing at the wrong steps.

Your negative prompt fires at every single step, from pure noise to final detail pass. That's almost certainly wrong. The model's job at step 1 is completely different from its job at step 48 — yet you're throwing the same "bad anatomy, blurry, low quality" string at both. Three tools let you change this: ComfyUI's
ConditioningSetTimestepRange node, A1111's bracket editing syntax applied to the negative field, and NAG's nag_sigma_end cutoff. Here's how to wire each one.Why step-range matters: what the denoising curve actually does
Diffusion models don't build images linearly. High-noise (early) steps determine composition and large-scale structure; low-noise (late) steps refine edges, texture, and micro-detail. 1 The SDXL Refiner model is purpose-built around this: it's designed to operate in "the later stages of generation (approximately the last 20% of steps), focusing on detail optimization." 2
The practical implication for negatives:
- Steps 0–30% (composition phase): structural suppression matters most —
bad anatomy, extra limbs, disfigured faceshould be active here - Steps 30–70% (fill phase): texture/quality suppression is relevant —
blurry, low quality, jpeg artifactsbelongs here - Steps 70–100% (detail phase): the model is painting fine detail; running structural negatives at this stage often flattens or over-corrects what it's trying to add
NAG's
nag_sigma_end parameter quantifies exactly this. For SDXL, the default is nag_sigma_end = 4, which makes negative guidance stop at approximately 40% of sampling steps. 3 For Flux (flow-based), the default is 0.75. The authors built these defaults from empirical testing: stopping early costs nothing in quality and recovers speed.ComfyUI: ConditioningSetTimestepRange node
What it does: Wraps any CONDITIONING signal so it only activates within a
[start, end] percentage window of the total denoising run. 4 5Node location: Right-click canvas → Add Node →
advanced/conditioning → ConditioningSetTimestepRangeParameters:
start(FLOAT, 0.0–1.0): the step fraction where this conditioning begins to applyend(FLOAT, 0.0–1.0): the step fraction where it stops
Wire type: orange CONDITIONING wire — same as the output of
CLIPTextEncodeThe standard negative pipeline without step-ranging is:
CLIPTextEncode (negative text) → KSampler.negativeFor two-phase negative scheduling, build this instead:
CLIPTextEncode ("bad anatomy, extra limbs, disfigured")
    → ConditioningSetTimestepRange [start=0.0, end=0.3]
    → ConditioningCombine.conditioning_1

CLIPTextEncode ("blurry, low quality, jpeg artifacts, noise")
    → ConditioningSetTimestepRange [start=0.3, end=0.7]
    → ConditioningCombine.conditioning_2

ConditioningCombine → KSampler.negative
Steps 70–100% receive no negative conditioning at all. The
ConditioningCombine node (class ConditioningCombine, category conditioning) merges both ranges equally. 6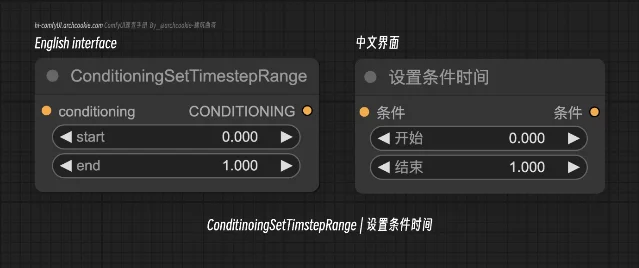
For finer control, use
ConditioningAverage instead of ConditioningCombine. 7 ConditioningAverage takes a conditioning_to_strength float — you can blend two negative ranges at different weights rather than merging them equally.If you use the December 2024 Cond Pair Set Props node, it bundles
ConditioningSetTimestepRange, masking, and hooks into a single node, reducing visual clutter for complex pipelines. 8Note on ComfyUI vs. A1111: ComfyUI doesn't support A1111's bracket[from:to:when]syntax at the prompt string level — that was requested in GitHub Issue #735 and the resolution wasConditioningSetTimestepRangeas the node-based equivalent. 9 The node approach is more powerful (you can assign entirely different negative text at each range, not just switch tokens), but requires explicit wiring.
A1111 / reForge: [to:when] bracket syntax in the negative field
A1111's prompt editing syntax is documented for positive prompts, but it works identically when placed in the negative prompt field. The A1111 wiki doesn't restrict it: "Prompt editing allows you to start sampling one picture, but in the middle swap to something else." 10
Syntax reference:
| Form | Behavior |
|---|---|
[A:B:0.4] | Use A for first 40% of steps, then switch to B |
[B:0.4] | Add B starting at step 40% (nothing before that) |
[A::0.4] | Remove A at step 40% |
[A:B:16] | Switch at absolute step 16 (integer = step count, not fraction) |
When
when is between 0.0 and 1.0, it's a fraction of total steps. An integer > 0 is an absolute step number. 10The delayed-negative pattern:
Paste this into your A1111 negative prompt field:
[ : bad anatomy, extra limbs, disfigured face, blurry, low quality : 0.6 ]This variant uses
[to:when] with an empty from — meaning the negative prompt is blank for the first 60% of steps. Only in the final 40% do the suppression tokens activate. The logic: during early denoising the image is still noise; the model hasn't committed to anatomy or texture yet, so structural suppression at that stage can interfere with composition-forming rather than help it. 11Reversed pattern (structural suppression only early, then cleared):
[bad anatomy, extra limbs : : 0.3]This applies the structural negatives for the first 30% of steps only, then removes them so the late-step detail pass is unobstructed.
Interface location: In A1111, the negative prompt field is directly below the positive prompt field. Paste the bracket string there exactly as shown — the
[, :, and ] characters are parsed by the sampler, not by CLIP.reForge compatibility: reForge is a fork built on A1111 and inherits its prompt parsing code. 12 No changelog entry removes bracket syntax. That said, bracket syntax in the negative field is untested in reForge specifically — no community reports confirm or deny it. Test with
[blurry::0.5] first to verify the syntax fires before committing to a complex pipeline.What the syntax does NOT support: LoRA tags inside brackets.
[<lora:name:1>::0.5] won't schedule a LoRA — it will either break the parse or be ignored. 10A1111 XYZ plot: sweep negative tokens to find which ones matter
Before you commit to a negative prompt string, use the XYZ Plot script to measure the actual effect of each token. Prompt S/R (Search/Replace) is the axis type to use.
How to open it: In A1111, scroll below the Generate button → Scripts dropdown → select
X/Y/Z plotHow Prompt S/R works: The first entry in your comma-separated value list is the search keyword. Every subsequent entry replaces it in the prompt field. 10 RunDiffusion confirms it scans both positive and negative: "Here you will select which prompt you want to change words out in, positive or negative." 13
Setup for a negative-only comparison grid:
- Keep the positive prompt fixed
- In the negative prompt, put a placeholder token:
PLACEHOLDER - In the XYZ Plot script:
- Set X type →
Prompt S/R - Set X values →
PLACEHOLDER, bad anatomy, blurry, low quality, mutated hands, ugly - Leave Y and Z axes empty, or set Y to
Seedfor variance testing
- Set X type →
- Click Generate
Each column of the grid replaces
PLACEHOLDER with one entry from the list. Column 1 has PLACEHOLDER literally in the negative field — which CLIP encodes as a near-empty semantic concept, functionally close to a blank negative. Columns 2–6 each isolate one suppression token. If columns 2 and 4 look visually identical, those two tokens are redundant for your current positive prompt and model combination.CSV edge case: If any of your token replacements contains a comma (e.g.,
bad anatomy, extra limbs as a single entry), wrap it in double quotes in the values list:PLACEHOLDER, "bad anatomy, extra limbs", blurry, "low quality, noise"Reading the grid: Look at anatomy, sharpness, and composition across columns — not just global quality. A token that improves sharpness on one column might tighten the composition in a way that looks flat. The grid isolates the variable; you interpret the tradeoff.
NAG nag_sigma_end: the quantitative cutoff
NAG (Normalized Attention Guidance, arXiv 2505.21179) applies negative guidance in attention space rather than conditioning space — which makes it effective on distilled and few-step models where CFG-based negatives collapse. 1 The
nag_sigma_end parameter is the step-range control:| Model family | Default nag_sigma_end | Approximate step coverage |
|---|---|---|
| SDXL (diffusion-based) | 4 | ~40% of steps |
| Flux (flow-based) | 0.75 | stops very early |
The README rationale: "For flow-based models like Flux,
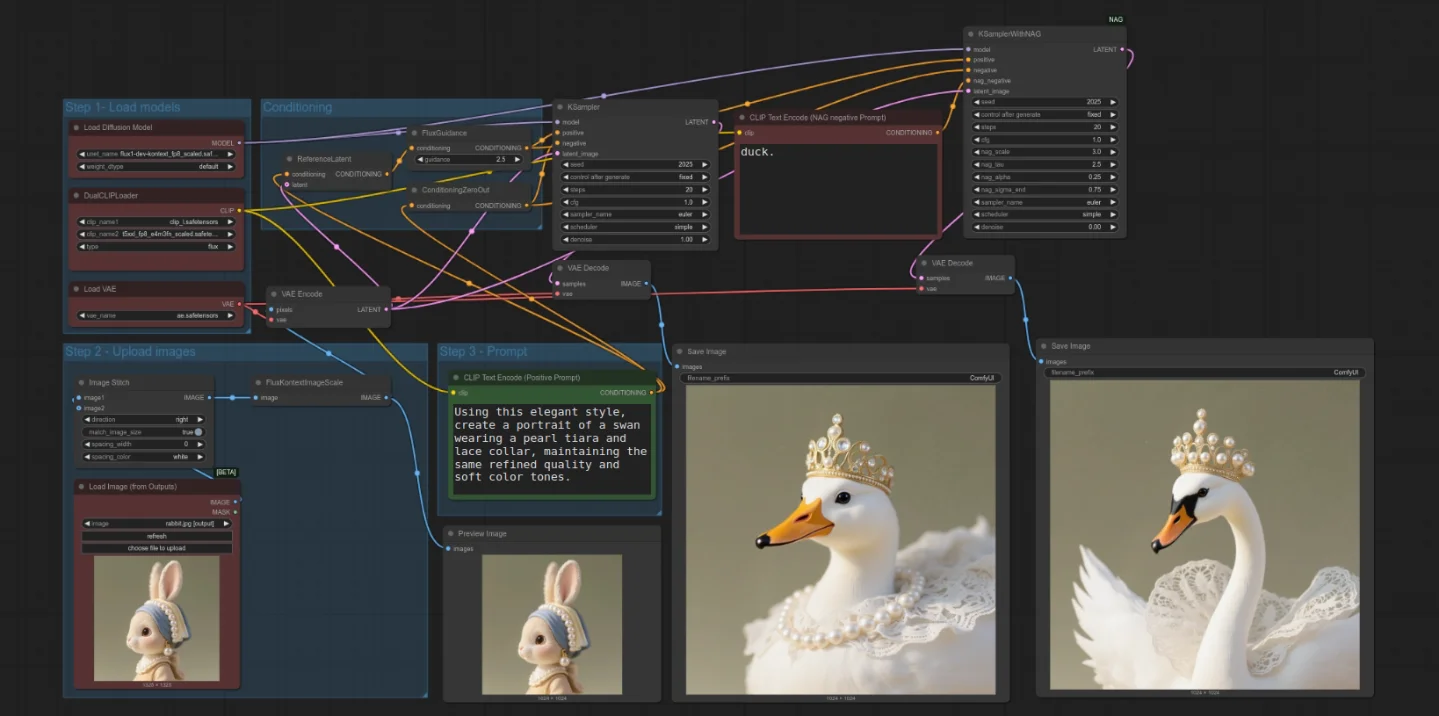
nag_sigma_end=0.75 achieves near-identical results with significantly improved speed." 3 In other words, running NAG guidance through all remaining steps after sigma drops below 0.75 adds computation without changing the output.Two implementation paths in ComfyUI:
Option A — Built-in
NAGuidance node (no extension required, available in current ComfyUI): 14- Node type:
NAGuidance - Input:
MODEL→ patches the model's attention mechanism, output isMODEL - Parameters:
nag_scale(0–50, default 5.0),nag_alpha(0–1, default 0.5),nag_tau(1–10, default 1.5) nag_sigma_endis exposed in theKSamplerWithNAG(Advanced) node variant
Option B — ChenDarYen/ComfyUI-NAG extension (317 GitHub stars): 15
- Install via ComfyUI Manager: search
ComfyUI-NAG - Use
KSamplerWithNAGas a drop-in replacement forKSampler - It adds
nag_negativeinput (separate from the standardnegativeconditioning),nag_scale,nag_sigma_end,nag_alpha,nag_tau
Copy-paste SDXL starting values:
nag_scale:     5.0
nag_alpha:     0.5
nag_tau:       1.5
nag_sigma_end: 4.0    ← stop NAG at ~40% of steps
Copy-paste Flux starting values:
nag_scale:     3.0
nag_alpha:     0.25
nag_tau:       2.5
nag_sigma_end: 0.75   ← stop NAG very early, near flow-matching endpoint
The NAG README caution: "For models that require more sampling steps and higher CFG, also prefer lower
nag_tau and nag_alpha." 3 Lowering nag_sigma_end from 4 to 2 on SDXL effectively shifts the negative cutoff later in the process — useful if you see NAG over-suppressing detail in the mid steps.
nag_sigma_end, nag_scale, nag_alpha, and nag_tau parameters alongside a standard negative conditioning input. 3ConditioningSetTimestepRange + NAG together: The two mechanisms operate at different levels —
ConditioningSetTimestepRange controls the conditioning pipeline (what the KSampler reads as negative guidance), while NAG patches the model's attention mechanism. They can coexist in the same workflow without conflict. The conditioning range sets which text tokens suppress at which steps; nag_sigma_end sets when the attention-space suppression stops. Stack them only if you have a specific reason for both — for most SDXL workflows, one or the other is enough.Today's minimum viable action: Open a workflow you've been happy with. Add one
ConditioningSetTimestepRange between your negative CLIPTextEncode and the KSampler, set start=0.0, end=0.7. Run it. You're cutting the final 30% of your negative conditioning with zero prompt changes. If the output looks better — and it often does on detail-heavy subjects — split the pipeline into two ranges as described above. The entire experiment takes under five minutes.Fuentes de referencia
- 1arXiv 2505.21179 — Normalized Attention Guidance
- 2ComfyOrg: CLIPTextEncodeSDXLRefiner built-in node documentation
- 3ChenDarYen/ComfyUI-NAG README
- 4ComfyOrg: ConditioningSetTimestepRange built-in node documentation
- 5ComfyUI Wiki: Conditioning Set Timestep Range
- 6ComfyUI Wiki: Conditioning (Combine)
- 7ComfyUI Wiki: Conditioning Average
- 8ComfyUI Blog: Masking and Scheduling LoRA and Model Weights
- 9Comfy-Org/ComfyUI GitHub Issue #735
- 10AUTOMATIC1111 stable-diffusion-webui Wiki: Features
- 11r/StableDiffusion: Understanding the Impact of Negative Prompts
- 12Panchovix/stable-diffusion-webui-reForge GitHub
- 13RunDiffusion: XYZ Grids — Comfy/A1111
- 14ComfyOrg: NAGuidance built-in node documentation
- 15RunComfy: ComfyUI-NAG detailed guide


Añade más opiniones o contexto en torno a este contenido.