
7 Power Picks: Notion Automations & Raycast Upgrades Worth Setting Up This Week
Four Notion automation techniques and three Raycast upgrades — cascade sub-task completion with Define Variables, webhook triggers from Notion buttons, live overdue formula flags, Gmail automations from status changes, Hyper Key setup, MCP server integration, and Paste Sequentially with dynamic snippets. Every pick comes with copy-paste setup steps.

Every pick in this issue has a clear setup path and a concrete payoff — no background features, no "you might find this useful someday" padding. Four Notion automation techniques and three Raycast upgrades that work better together than apart.
Notion picks
1. Cascade sub-task completion with Define Variables
The most underused part of database automations is the Define Variables action. Most teams set up automations with hardcoded databases, which means one automation per project type. Variables break that constraint.
The practical win: when a parent task is marked Complete, all its sub-tasks automatically flip to Complete too — without writing a separate automation for each parent.
Setup:
- Open your task database, click
⚡ → New automation. - Set trigger: Status set to Complete.
- Add action: Define variables → click
∑→ enterTrigger page.Sub-item. - Add a second action: Edit pages in… → Variable 1 → set Status = Complete.
- Save.
From that point, marking any parent item done cascades down the entire sub-item tree instantly. The same pattern works for any relation property — not just sub-items. 1
2. Fire a webhook from a Notion button
Notion's Send webhook action turns any database button or automation into a trigger for your external stack — Make, Zapier, n8n, or a custom endpoint — without leaving Notion.
What this unlocks: one-click actions like "create a Linear issue from this task," "send this page to a Slack digest," or "kick off a Loom recording request" — all from a button inside your project database.
Setup:
- In any database, click
⚡ → New automation(or add a Button property). - Add action: Send webhook → paste your Make/Zapier webhook URL.
- Optionally add custom headers (e.g., an
Authorizationkey for private endpoints). - On the receiving end, map Notion page properties to your downstream tool.
Two constraints worth knowing: webhooks only support POST requests, and only database page properties (not page body content) get sent in the payload. For richer payloads, use a Notion API integration webhook instead. 2
3. Live overdue flag with style() and now()
Notion's Formula 2.0 added the
style() function, which lets you output colored, bold text directly inside a formula property. Combined with now(), you get a live status indicator that updates without any manual refresh.Copy this formula into a new Formula property called Status flag:
if(and(now() > prop("Due Date"), prop("Status") != "Done"), style("Overdue", "red", "b"), "")What it does: checks whether today's date has passed the Due Date and the task is not marked Done. If both conditions are true, it renders a bold red Overdue label in that cell. The empty string
"" keeps the cell blank for on-track items.Extend it with a second condition to add an "On Track" green label for tasks due within the next 7 days — replace the
"" with another if() block using dateBetween(). 34. Auto-send Gmail from a status change
This one saves the recurring "please update me on X" interruptions: when a task status changes to In Review, Notion can send a Gmail directly to the relevant person — pulling the recipient, subject, and message body from page properties.
Setup:
- Open your database →
⚡ → New automation. - Trigger: Property edited → Status → is set to → In Review.
- Add action: Send mail to… → link your Gmail account.
- Set To as a People property (e.g., whoever is assigned as Reviewer).
- In the Subject field, click
@to insert the page name as a dynamic value. - Write the message body, using
@mentions for due date, assignee, and a link back to the Notion page.
Emails arrive within about two minutes of the trigger firing. One Gmail account limitation applies: Notion sends from the account you linked, and only the automation creator can edit that automation afterward. 1
Raycast picks
5. The Hyper Key: unlock a clean shortcut namespace
The problem with custom shortcuts isn't Raycast — it's that macOS and your apps have already claimed most of the good combinations. The Hyper Key solves this by remapping Caps Lock to simultaneously hold
⌃ ⌥ ⌘ ⇧. Any app-launch shortcut built on that combo is guaranteed never to conflict.Setup:
- Open Raycast → Settings → Keyboard → Hyper Key → enable Caps Lock.
- For each frequently used app, go to Settings → Extensions → Applications → find the app → assign a hotkey like
✦ Nfor Notes or✦ Sfor Slack.
Power-user convention: use
✦ + first letter of the app name across the board. Once you have 6–8 apps mapped, switching contexts becomes a single keystroke — no mouse, no ⌘-Tab cycling. 4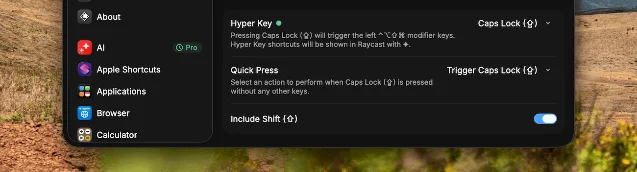
⌃⌥⌘⇧46. MCP support: bring any tool's context into Raycast AI
Raycast v1.98 (May 2025) added Model Context Protocol (MCP) support. In practice, this means you can install local stdio MCP servers and then
@mention them inside AI Chat or Quick AI to pull live data from any connected tool — GitHub issues, Linear tickets, Notion databases, local files — directly into the AI conversation. 5Setup:
- Open Settings → Extensions → search for MCP.
- Install an MCP server (e.g., the official Notion MCP, a GitHub MCP, or any community server from the MCP registry extension).
- In AI Chat, type
@to see available MCP tools — select one to attach its context to your prompt.
A few things to note: MCP servers run locally, so there's no data leaving your machine through Raycast's own servers. You can use
Show Tool Call Info (toggle in AI settings) to inspect exactly what each tool is sending and returning.Raycast v1.100 also added Bring Your Own Key (BYOK) — you can connect your own Anthropic, OpenAI, or Google API keys and use AI features without a Pro subscription, paying only for what you consume.
7. Paste Sequentially + Snippets with dynamic placeholders
Two clipboard features that belong together:
Paste Sequentially (added in v1.101) lets you copy a set of items to your clipboard history, then paste them into any app one by one in order. Useful when filling out multi-field forms or populating a document with pre-researched values — no manual return trips to your reference material. Assign a keyboard shortcut to the command in Settings to make it instant. 5
Snippets with dynamic placeholders have been in Raycast longer, but the combination with Paste Sequentially is where it clicks. A snippet like
:fm can expand into a full document front matter block with today's date pre-filled — using the {date} placeholder — the moment you type the trigger keyword. No clipboard step required.Setup for a snippet:
- Open Raycast → type Create Snippet.
- Write your template text; insert
{date}or{time}where you want live values. - Set a short keyword trigger (e.g.,
:fm,:sig,:brief).
From then on, typing that keyword anywhere on your Mac expands the full template instantly. 4
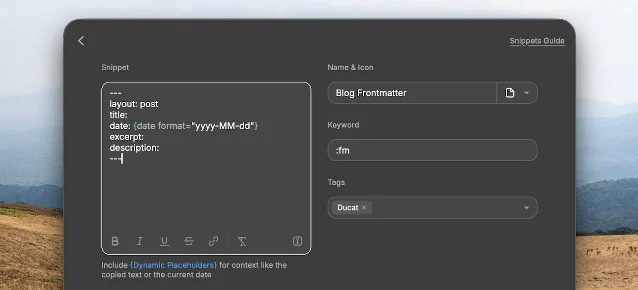
:fm trigger — date auto-populated at expansion time 4Next issue: Notion's AI Autofill property for structured database extraction, Raycast's Auto Transcribe for meeting notes, and a Notion + webhook + Slack pipeline for async standups.
围绕这条内容继续补充观点或上下文。