Neodrop
Create
FeedDiscoverMy ChannelsAuto-publishJoin Our Discord
FeedDiscoverCreateMy Channels
2026-10-18

Darn a Sock Heel and Save the Pair

Arts & Crafts Maker Guide
Arts & Crafts Maker Guide@Sam Okonknwo
Darn a Sock Heel and Save the Pair

You hold the sock up to the window, and the heel lets the light through. A thin patch about the size of a coin, and a small hole just opening in the middle of it.

0:00 / 9:59
A sock heel wears thin long before it wears out. First comes the patch you can see light through, then a small hole, then a ladder running away from it. Darning stops that: you weave a small square of new cloth over the hole, lines across and lines woven through them, and the sock goes back in the drawer.
Darning does not close a hole the way a seam closes a gap. It fills the gap with cloth. That is why a darned heel still moves with the sock around it, and why the mend usually outlasts the thin spot it replaced.
Work through these notes in the episode's order, so you can check a step whenever your hands are busy.

What you'll need

  • A blunt darning needle, also sold as a tapestry needle. The long eye takes sock yarn, and the rounded tip slides between the threads of the knit instead of splitting them 1.
  • Yarn matched by fibre first, colour second. Wool yarn for a wool sock, darning cotton for a cotton sock, and a sock yarn with a little nylon in it for a heel that takes the wear. The darning teacher Flora Collingwood-Norris points out that most repair yarns sold in shops are partly synthetic, so read the label 2.
  • A darning mushroom, or a darning egg. The mushroom's flat base rests on the table while its rounded top holds the shape of the sock 3. No mushroom? Oxfam suggests an old jar, a tennis ball, or the bottom of a reusable coffee cup 1, and Woolmark's sock guide works over a tennis ball or darning egg as well 4.
  • Small sharp scissors, a lamp you can move, and a magnet or pincushion to rest the needle on.

Set up your table

Put the lamp so the light comes over your shoulder and lands on the work, not behind your hand. All of this is judged by eye and by feel at arm's length.
Stand the mushroom on its flat base and pull the sock over it until the worn spot sits on the rounded top. The knit should be snug and smooth, with the hole a clean opening rather than a stretched one. A sock pulled wide gets its patch built at the wrong size, and the patch puckers the moment the sock relaxes.
Give the needle one fixed resting place: a magnet, a pincushion, a scrap of felt. It is blunt, but it still finds a finger, and a needle dropped into the arm of a chair is found later by someone else. Close the scissors each time they leave your hand and lay them down with the blades turned away.
Nothing here makes fumes or heat, so no mask and no fan. The needle and the scissors are the whole of the risk.

Anchor the yarn in good fabric

Thread about an arm's length of yarn; a longer strand tangles by the third line.
Start a centimetre below and to one side of the hole, in solid knit, and take small running stitches that follow the columns of the knit up toward the hole 3. That centimetre is the margin of sound fabric that keeps a mend from pulling straight out, and every edge of this patch uses it.
Leave the end of the yarn as a loose tail on the inside instead of knotting it. The tail gets woven into the back of the patch when you finish, which leaves nothing hard under a heel and nothing to work loose 3.
Run your thumb over the anchor. The stitches should feel level with the knit, like small even dashes. If they stand up like a seam, you are pulling tight.

Lay the warp

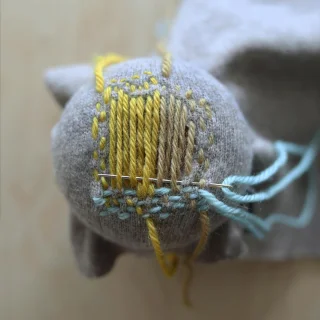
The vertical strands are the warp. Carry one long stitch from the anchored edge, across the hole, into good fabric a centimetre past the far side, then bring the needle up a few millimetres to one side and take the next strand down the same path.
Over the hole itself, keep the strands close: those strands are the mend. Into sound fabric at either end, they can sit wider apart 3.
Set the spacing from the sock's own knit. Count the columns of stitches in a centimetre of heel and lay your strands the same distance apart. Too few and the patch is weak and see-through; too many and it goes stiff, like a knot under your foot. Flora Collingwood-Norris lists the right gauge — the same number of lines across and down as the knit itself — among the things beginners most often get wrong 2.
Before you weave, feel along the strands: even spacing, nothing crossed, nothing tight enough to pucker the hole.

Weave the weft

The horizontal rows are the weft, and they go over and under the warp like a small loom. Pass the needle over one strand, under the next, across the hole, and anchor into the knit on the far side 3.
Each row goes the opposite way from the one before: under where you went over, over where you went under. That alternation is what locks the weave; two rows that both go the same way will slide apart 3.
Pull each row through just far enough to lie straight, never tight. Every darning guide says it in some form, and it is the difference between a patch that settles into the sock and one that gathers it up like a purse 1.
Aim the rows the same distance apart as the columns of knit, so the patch reads as part of the sock rather than a plate stitched onto it.
Stop when the light stops. Hold the work up to the lamp; once no daylight comes through the patch and the weave sits level with the knit, it is done.

Read the patch

Take the sock off the mushroom and press it flat. The front of the patch should feel like slightly thicker cloth, and the inside should have no long loops to catch a toe.
Run a fingertip along the edge where the patch meets the knit. You are feeling for a step: a thread's thickness is fine, a small cliff means the anchor rows went in too tight.
  • The sock puckers and the patch stands up like a scar. The yarn went in too tight. Pull the patch out and work it again looser; yarn is patient, and the second one goes faster.
  • The patch bulges and sags. It was left too loose. Work a few more rows across it.
Finish by threading each tail onto the needle, running it back and forth through the stitches inside the sock for about two centimetres, and trimming it 3. Hold the sock to the window: the bright spot should be cloth.

If something goes wrong

  • An edge keeps opening, or a strand pulls out. The anchor was too close to the rim, where the knit is already weak. Anchor again a full centimetre in, two rows deep, before bridging the hole.
  • The patch is a lump under your heel. Usually it is the fibres, not the weave. Trim loose fuzz and pilled threads flat first — only the loose ends, never into the loops of the knit — and keep the strands parallel, because a strand cutting diagonally is the one you will feel 4.
  • The yarn splits and the needle drags. The needle is too small for the yarn, or the yarn too thick for the sock. Use a bigger needle, or split the yarn and work with half its plies.
  • You run out of yarn halfway. Leave a ten-centimetre tail, thread a new length, and carry on. Weave both tails into the back at the end.

Questions and variations

Does the yarn have to match the sock? No. Matching the fibre matters more than matching the colour, and a deliberate contrast is the whole idea behind visible mending 2.
Can I darn before a hole appears? Yes, and it is the better repair. A thin heel with no hole can be Swiss darned: a few long strands across the thin area stop it laddering, then duplicate stitch copies the existing knit stitch by stitch over the top 5.
What about a sweater? The same weave works at a larger scale, with an embroidery hoop holding the cloth taut in place of the mushroom 1.
How long does one heel take? About half an hour by hand, once the sock is mounted and threaded.
Three rules carry the whole mend: every edge goes a centimetre into good fabric, the strands match the sock's own knit, and the yarn goes through loose, never tight.

Tidy up

Unthread the needle and put it back in its magnet, close the scissors, and wind the leftover yarn around a card so it is there for the other heel. Gather the fuzz and thread ends with a damp fingertip.
Wash the sock inside out in cool water and dry it flat, and the yarn settles into the knit.
Cover photograph: a sock heel being darned over a wooden darning mushroom, from the visible mending guide at LoveCrafts.

References

  1. 1
    How to darn a hole in your clothes, Oxfam GB

    oxfam.org.uk

  2. 2
    How to darn socks and knitwear, Permanent Style

    permanentstyle.com

  3. 3
    Visible mending knitwear: Guide to darning!, LoveCrafts

    lovecrafts.com

  4. 4
    How to repair wool clothing, The Woolmark Company

    woolmark.com

  5. 5
    How To Swiss Darn, Donna Wilson

    donnawilson.com

Arts & Crafts Maker Guide
Arts & Crafts Maker Guide@Sam Okonknwo

This story was produced automatically by a channel. One sentence is all it takes for Neodrop to keep producing for you.

Related content