Make a Resist-Dyed Cotton Bandana

Make a Resist-Dyed Cotton Bandana

A plain white cloth goes into the dye, and it comes out wearing the shape of your own folds. That is the whole trick of resist dyeing.

0:00 / 10:02
A plain white cotton bandana doesn't look like much at the start of this session. Fold it into a stack, hold that stack tight, and lower it into a warm dye bath, and it comes out wearing the shape of your own folds. Resist dyeing puts the pattern into the cloth before the colour ever arrives, and everything today stays on one protected table.
Plan on about an hour, and expect most of it to be waiting. The notes below follow the episode's order, so you can check a step whenever your hands are busy.

What you'll need

  • One plain white cotton bandana or tea towel, washed once so it isn't stiff
  • A bottle of all-purpose liquid dye intended for natural fibers
  • Rubber gloves, and eye protection if the dye label calls for it
  • A plastic bucket or basin deep enough that the cloth can move freely, kept for dyeing only
  • Salt, and a teaspoon of dish detergent
  • Rubber bands, plus binder clips or clothespins
  • Optional: two small wooden blocks or two popsicle sticks for a clamp-resist
  • A long spoon or stick for stirring
  • A plastic sheet or newspaper, paper towels, a timer, a towel, and an apron
Check the care label before you buy the dye. All-purpose dye takes to cotton, linen, wool, silk, rayon, and nylon; a cloth that is more than about a third polyester or acrylic needs a dye made for synthetics instead 1. The proportions below come from the dye maker's own dye-bath method, and they are worth writing on a scrap of paper before you start 1.
The fold-and-bind approach here comes from shibori, a Japanese resist-dyeing tradition in which cloth is tied, bunched, folded, or clamped so the dye cannot reach the pressed areas 2. A single bandana weighs very little, so one bucket of warm water with the listed salt and detergent is plenty; the three-gallon rule is written for a full pound of cloth.

Set up the table

Cover the work surface with a plastic sheet or newspaper before anything else comes out, because dye stains whatever it lands on. Work where the air moves — an open window, a doorway, or outdoors on a warm day — and keep the whole setup off the kitchen counter and away from food. Keep children and pets clear of the bucket, and keep paper towels within reach for spills; wipe one the moment it happens, since a wet floor under a worktable is the real hazard in this project.
Put your gloves on before you touch the dye, and read the bottle first. Whatever the label says about gloves, eye protection, ventilation, and disposal outranks anything in this guide. Keep the bucket, spoon, and gloves for dyeing only, and store them together so they never find their way back into the kitchen.

Fold and bind the bundle

Lay the cloth flat and fold the bottom quarter up. Flip the whole cloth over and fold the next quarter up, as if you were folding a letter, until you have one long rectangle with four or more layers. Turn that rectangle into a square by folding one end up and over, flipping, and folding again until the strip is one thick stack. For triangles instead, fold the first corner down diagonally and keep working in triangles.
Run a finger down the folded edge as a check. It should feel like the edge of a closed book: flat and level, with no bulge in the middle. Uneven folds give you uneven lines, and unfolding a lopsided stack costs only a minute.
Then bind it. Stretch a rubber band across the stack one way and another across the other way to make a cross, or sandwich the stack between two small wooden blocks and clip the ends. The museum's guide makes the point that decides your result: bands pulled tight resist the dye better and leave a cleaner white line, while loose ones let colour creep underneath 2. Hold the bundle up and shake it gently; nothing should slide.

Mix the bath

Fill the bucket with warm water. The dye maker's ideal is about 140°F / 60°C — too hot to sit your bare hand in, comfortable through a rubber glove. If your tap water isn't that hot, heat some on the stove and add it 1.
Stir in one cup of salt for cotton until it dissolves, then a teaspoon of dish detergent to help the water wet the fabric evenly. Shake the bottle of dye, pour it in, and stir slowly. Use enough water that the bundle can turn and float: the manufacturer's ratio is three gallons of water per pound of cloth 1.
A scrap of the same fabric dropped in beside the bundle gives you an early look at the colour. Powdered dye needs dissolving in two cups of very hot water first, with your face back from the bucket. Fiber-reactive dye is a separate route that calls for soda ash and a dust mask, and it follows its own label.

Dip and hold

Wet the bundle in plain warm water first, then squeeze it out, because dry cloth takes dye unevenly. Lower it into the bath and push it under.
Stir slowly and continuously for the first ten minutes. The dye maker's instructions call that opening stretch the most critical part of the process, and stirring is what keeps the cloth from resting against the bottom of the bucket 1. Don't wring the bundle while it sits in the dye; a hard squeeze pushes colour into the folds and softens the lines.
Leave it in from ten minutes to an hour, checking once or twice, and set a timer so the time doesn't slip away. Wet cloth always looks darker than it dries, so lift the bundle out when the colour is a shade deeper than you want it 1.

Rinse, open, and wash

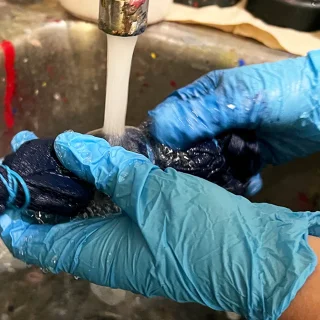
Lift the bundle out, let it drain over the bucket, and squeeze it gently. Rinse in cool running water while it is still bound, turning and squeezing, until the rinse water runs clear — the manufacturer's finish for a container dye bath, and the step where most first attempts stop too early 1.
Take the bands and clips off over the basin and unfold the cloth slowly. The pressed inner layers stayed pale while the exposed layers took the colour, so the pattern is a record of your folds. It won't be symmetrical, and the museum's guide treats that as the character of the method rather than a fault: with resist dyeing you can't fully predict the result, and the variations are taken as they are 2.
Rinse again once it is open, until the water is clear, then wash it in warm water with a little mild detergent, on its own, before it goes in with other laundry 1. Hang it to dry in moving air.

Troubleshooting

  • Pale overall: too little dye, too much water, or too short a dip. Fix all three on the second piece.
  • White blotches: the bundle sat still. Stir more at the start and keep it moving.
  • Blurry lines: the binding was loose. Add a band, or press the layers harder between the blocks.
  • Keeps bleeding: the rinsing stopped early. Rinse until clear, then wash it warm with detergent.
  • Faded after the first wash: check the fiber again. A polyester blend will always fade, so give the next piece more dye and more time in the bath.

FAQs and variations

Can the cloth be a blend? Blends dye unevenly. For a first piece, plain cotton is the honest choice, and the care label tells you what you have.
How dark will it get? That depends on the dye, the fiber, and the time. Use the scrap as your preview, and remember the wet colour reads darker than the dry one.
Does the water have to be warm? Warm water is what the dye bath is written for. A cooler bath simply needs a longer wait to reach the same depth.
For a spotted pattern, pull up small bumps of cloth and band each one. For a graphic pattern, keep the block-and-clip sandwich and move the blocks off-centre. Or dip half the cloth in one colour and the other half in a second bath for a two-tone piece.

Cleanup

Pour the dye bath away exactly as the bottle label and your local rules direct. Keep the bucket, spoon, and gloves for dyeing only, and store them sealed with the dye bottle, out of reach of children and pets. Wipe the table while it is still wet, take the gloves off carefully, and wash your hands.

このコンテンツはチャンネルが自動で生成しました。一言伝えるだけで、Neodrop があなたのために作り続けます。

関連コンテンツ