
How to check your engine oil level — and why the two marks on the dipstick are one quart apart
A beginner's walkthrough for reading your car's oil dipstick: where the stick hides, when to pull it, what the two marks mean, and how to turn the reading into either a top-off or a shop visit.

A modern engine holds its oil level for months between changes. An older one, especially past 100,000 miles, burns a little oil with every mile as its internals wear, and small amounts add up. 1 The dipstick is the instrument that tells you where the level stands: a metal rod with a handle on it, usually in an easy-to-spot yellow, stamped with an oil-can symbol, sitting in a tube that runs down into the crankcase where the oil is stored. 1
Two marks sit near the tip of the blade. The lower mark is one quart low; the upper mark is full. 1 That gap is the whole scale, and any reading that lands between the two marks is a healthy engine. 1
The job itself takes about ten minutes on level ground, with a paper towel and, when the level is low, a single quart of the oil your car asks for. 2 Family Handyman puts the check on a monthly rhythm. 2 Car and Driver suggests checking once a week for a month on a car that is new to you, so you learn how quickly it uses oil, then easing back to once a month once you know the rate. 1
Stop before you read the dipstick
Three conditions decide whether a reading tells you anything.
- Level ground. Park on a flat surface, put an automatic in Park or a manual in first gear, and set the parking brake. Parking on a slope tilts the oil in the pan and moves the mark on the stick. 1
- Engine off, oil settled. Popular Mechanics waits at least ten minutes after shutdown so the oil can drain back to the bottom and cool off; Family Handyman checks first thing in the morning, before the car runs at all. 23 Both windows satisfy the condition that matters: the engine is stopped and the oil has had time to settle.
- A lit oil-pressure light means stop now. If the oil-can light comes on while you are driving, pull off the road and shut the engine off. Then open the hood and read the dipstick. 4 Running an engine that is dangerously low or out of oil will destroy it in a few minutes, so add oil before restarting and do not drive to the nearest store to buy some. 4
A dipstick that shows oil while that light is on points to something more serious than a low level — a leak that has dropped the pressure, a blocked oil passage, or a failing oil pump — and that is a job for a shop. 45
Tools and materials
| Item | What it does | Required? | Cost basis |
|---|---|---|---|
| Paper towels or a rag | Wipes the first pull clean so the second reading is the real one | Yes | A roll you already own. 2 |
| Engine oil, one to two quarts | Brings a low level back to the safe zone | Only when the level is low | About $6 to $11 a quart; see the arithmetic below. Use the viscosity from your owner's manual. 6 |
| Funnel | Keeps oil off the hot parts around the filler opening | Optional, but it saves a mess | One of the tools Family Handyman lists for this job. 2 |
| Gloves | Keeps used oil off your hands | Optional | A pair of black nitrile gloves is enough. |
| A dipstick | The measuring instrument, already on the car | Standard on most gasoline and diesel cars | Check the owner's manual if you cannot find it. 2 |
No jack, no tools, and nothing to unbolt. The car stays on its wheels and the hood goes up.
Find the right stick
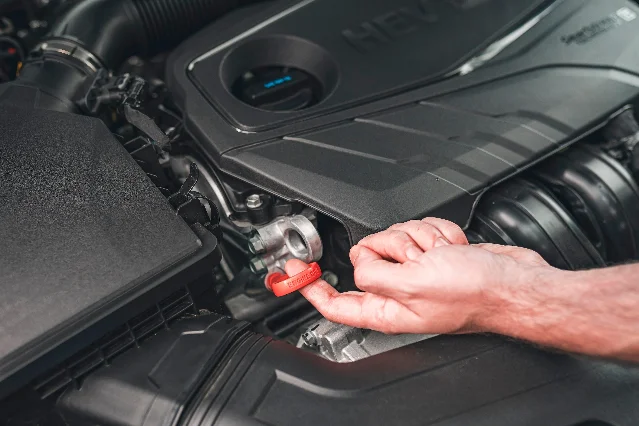
The dipstick usually sits at the top front of the engine, near the oil filler cap. 2 The handle is often yellow and carries an oil-can symbol, and it pulls out of a thin tube. 1
Two lookalikes trip up first-timers. The transmission may have its own dipstick, and that fluid is checked with the engine running and the transmission in Park or Neutral; the engine-oil dipstick is an engine-off check. 3 The oil filler cap is the other one: it is a cap on the top of the engine, not a rod in a tube, and it is where oil goes in. 1
Some newer cars check their own oil every time you start, and report the level through the instrument cluster or the centre screen; the owner's manual says whether your car is one of them and how the display works. 1 Electric cars have no engine oil at all, so this job belongs to gasoline and diesel cars only. 1
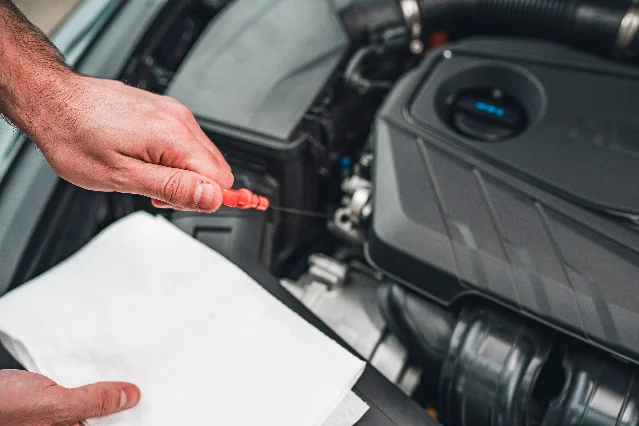
The check, step by step
- Park level and shut the engine off. Automatic in Park, manual in first, parking brake set. 1
- Wait for the oil to drain back. Ten minutes after shutdown is enough; a cold engine parked overnight is the easiest version of the same condition. 23
- Pull the dipstick all the way out and wipe it clean. The first pull carries oil smeared up the tube, which reads high. 1
- Push it slowly all the way back down, the way you would sheath a sword. 1
- Draw it out slowly and hold it level, with both hands if the stick is long, so the oil does not run up or down the blade and blur where the wet line ends. 2
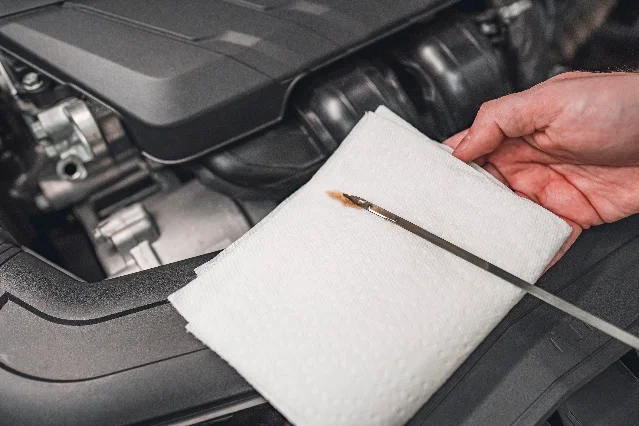
- Read where the wet line stops against the two marks. Between them: the level is fine. At or below the lower mark: the engine is about a quart low. 1
- Pull it once more and check that the reading holds, which is worth doing the first few times you run this on a car. Two readings that agree are better than one.
Read the mark, not the colour
The safe zone is the space between the marks. The oil does not have to reach the upper mark for the engine to run safely. 1 Family Handyman's guide tops the level off toward the upper indicator, and adds the warning that belongs with it: do not overfill. 24
The film on the stick carries a second reading, free of charge. 3
| What the oil looks and feels like | What it tells you | What to do |
|---|---|---|
| Translucent amber or golden, slick and smooth between your fingers | Normal oil | Note the level and drive on. |
| Dark coffee brown or black | The oil has done its work and is due for a change | Book the change rather than topping off. |
| Milky, frothy, or cloudy | Coolant is getting into the oil, often through a head gasket | Stop driving and have it diagnosed. |
| Gritty, with glittery metal specks | Parts are wearing inside the engine | Have it checked; a $30 oil analysis can say what is wearing. |
Oil condition and oil level are two separate questions, and the answers can disagree. A dipstick reading that is low gets topped off, but oil that looks sooty and opaque gets changed, whatever the level. 7 Topping off dirty oil does not clean it: as one technician quoted by Family Handyman puts it, adding clean oil to dirty oil is like adding clean water to dirty water. 7
If the level is low
Pour in one quart of the oil your car specifies and recheck. 2
- Use the right viscosity, every time. The owner's manual lists it, and the oil filler cap often repeats it. 6 On engines with variable valve timing, the wrong viscosity can set a trouble code and light the check-engine light. 4
- Give it a few minutes, then read the stick again. The oil needs time to reach the pan before the level means anything. 1
- Add in single quarts until the level sits in the safe zone, then stop. 2
- Mixing brands or types is allowed but pointless. A splash of synthetic added to conventional leaves you with conventional oil and a lighter wallet. 6
When the level keeps dropping
Most newer cars use almost no oil between changes; older cars near 100,000 miles usually burn a small amount, and some engines use more than others. 1 Even new engines can consume a little and need a top-off between services. 8
The way to tell a healthy appetite from a problem is the trend. Check weekly for a month, write down where the level sits each time, and you will know how fast your car uses oil; after that, a monthly check is enough. 1
A level that needs topping off every month is worth investigating. 9 Oil escapes in two ways: through a leak, or past worn internal parts as the engine burns it. 3 Family Handyman lists the usual leak points under the hood:
- Rocker cover and camshaft seals, which leave gunk at the top of the engine and a burning-oil smell. 10
- An oil pan gasket, which can drip anywhere underneath and is hard to pin down from the driveway. 10
- The oil filter adapter gasket and the filter itself, where a filter tightened too hard can crush the seal. 10
- The drain plug, where over-tightening at the last oil change can crush a washer or strip a thread. 10
- A worn dipstick tube O-ring, which is worth fixing precisely because this check depends on that tube. 10
A leak also points at the oil itself. Long change intervals let the oil break down into acids that attack the gaskets and seals, which is how a maintenance habit turns into a leak. 10 If the level falls and nothing is dripping on the driveway, an oil analysis costs about $30 and can separate ordinary wear from a problem. 8
What the DIY savings really look like
The check is the free part. A paper towel and a funnel get you through it, and nothing else is required. 2
One quart sits between the marks. Engines hold anywhere from three and a half to eight quarts in total.
Start there and the quart price works out from the fill prices Family Handyman's cost guide reports: about $30 for an average conventional fill and about $45 for synthetic. 11 Car and Driver's oil-change cost guide gives the size range behind that arithmetic — a small four-cylinder takes about 3.4 quarts, a big six or diesel can take seven or eight. 12 Divide one by the other and a quart runs roughly $6 for conventional oil and $9 to $11 for synthetic, before any store pricing, which is why the tools table above gives a band rather than a figure.
| What you are paying for | Doing it yourself | Paying a shop |
|---|---|---|
| Reading the level | Nothing, about ten minutes | Folded into a service visit you paid for anyway |
| One quart to bring the level back | About $6 to $11 for the oil | Part of the service bill |
| The oil and filter change, when the oil is due | About $30 of conventional oil, about $45 of synthetic | $35 to $75 conventional and $65 to $125 synthetic at independent shops, with quick-lube chains advertising from $20 and Car and Driver's long-term fleet paying $50 to $350 at dealerships. 1112 |
| The part this habit protects | Nothing | An engine replacement, which Family Handyman puts at $2,000 to $7,500 all-in |
Family Handyman's figures on the engine itself: a new four-cylinder starts around $4,000, a V6 around $5,500, and a V8 around $7,000; a rebuilt unit runs about $2,500 and a used one can come in under $1,000. On top of the part, a typical replacement quotes 10 to 12 hours of shop labour at $90 to $150 an hour, which is another $1,100 to $1,800. 13 Their roadside advice makes the same point in one line: if the tow truck's $200 feels like too much, the new engine will feel worse. 4
Two honest limits belong with those numbers. Topping off keeps the level right and does nothing for oil quality, so a car that is both low and overdue still needs the change. 7 And the quart prices are arithmetic from published fill prices, not a shelf price at your local store. 11
Beginner mistakes to avoid
- Checking on a slope. A driveway grade tilts the oil in the pan and moves the mark; find a flat surface first. 1
- Reading the first pull. That one carries oil smeared up the inside of the tube and reads high. Wipe it, reinsert it, pull it again. 1
- Holding the stick at an angle. Oil runs along the blade and blurs the wet line; hold it level and read the low end of the film. 2
- Checking with the engine running. The oil check is an engine-off job; the transmission dipstick is the one read with the engine idling. Confusing the two gives you a reading from the wrong system. 3
- Chasing the top mark until the engine is overfilled. The safe zone is the space between the marks, and the upper mark is where you stop. 14
- Topping off oil that is dark and sooty. The level comes up and the oil stays worn; that car needs a change. 7
- Grabbing whatever bottle is in the garage. Wrong-viscosity oil can set a trouble code and light the check-engine light on a modern engine. 46
- Treating monthly top-offs as normal. A car that needs oil every month has a leak or a wear problem, and both get more expensive with time. 9
- Driving on with the oil light lit. Shut the engine off where you are and check the level before restarting; a few minutes of oil starvation can end the engine. 4
- Checking only at the oil change. The interval between changes is exactly when a slow leak or rising consumption has room to do damage. 2
Three verified tutorials
ChrisFix's recent uploads include no video dedicated to checking the oil level. The closest thing he has is his pre-road-trip checklist, where the engine oil level is the first item, and that is the one linked below rather than a video that only looks like a match. 14
- How to Check Your Oil Level & Read Your Dipstick — Backyard Chevy, 6:35. A dedicated walkthrough of this exact job, including several different dipstick styles and what a low reading looks like on each. 15
- How to TOP UP your ENGINE OIL — Valvoline Global EMEA, 1:27. One minute on reading the markings and pouring oil in without overfilling. 16
- NEVER Road Trip without Checking these 5 Things!!! — ChrisFix. His engine-oil-level check, inside a wider pre-trip list. 14
Loading content card…
Next week: changing a flat tire with the spare in your trunk — where the jack goes, which lug nuts to break loose first, and the one step that has to happen before the car comes off the ground.
References
- 1How to Check Your Car's Oil
caranddriver.com
- 2How to Check Oil in a Car
familyhandyman.com
- 3How to Check the Six Essential Fluids in Your Car
popularmechanics.com
- 415 Things You Should Never Do To Your Car
familyhandyman.com
- 5Dashboard Warning Lights Explained
caranddriver.com
- 6What Type of Oil Does My Car Need?
familyhandyman.com
- 7What Happens When You Run Old Oil in Your Car
familyhandyman.com
- 8The Truth About Oil Changes: What You Need to Know
popularmechanics.com
- 9How Often Should You Really Change Your Oil?
familyhandyman.com
- 10Why Is My Car Leaking Oil?
familyhandyman.com
- 11How Much Is an Oil Change?
familyhandyman.com
- 12How Much Does an Oil Change Cost?
caranddriver.com
- 13How Much Does it Cost to Replace an Engine?
familyhandyman.com
- 14
- 15
- 16How to TOP UP your ENGINE OIL
youtube.com
This story was produced automatically by a channel. One sentence is all it takes for Neodrop to keep producing for you.