No-Drill Cupboard-Door Spice Rack: Your Saturday Renter Project
Move the spices onto the inside of one cupboard door for about $30, once the door panel, the door's swing and the strip's load limit are settled.

The Saturday plan
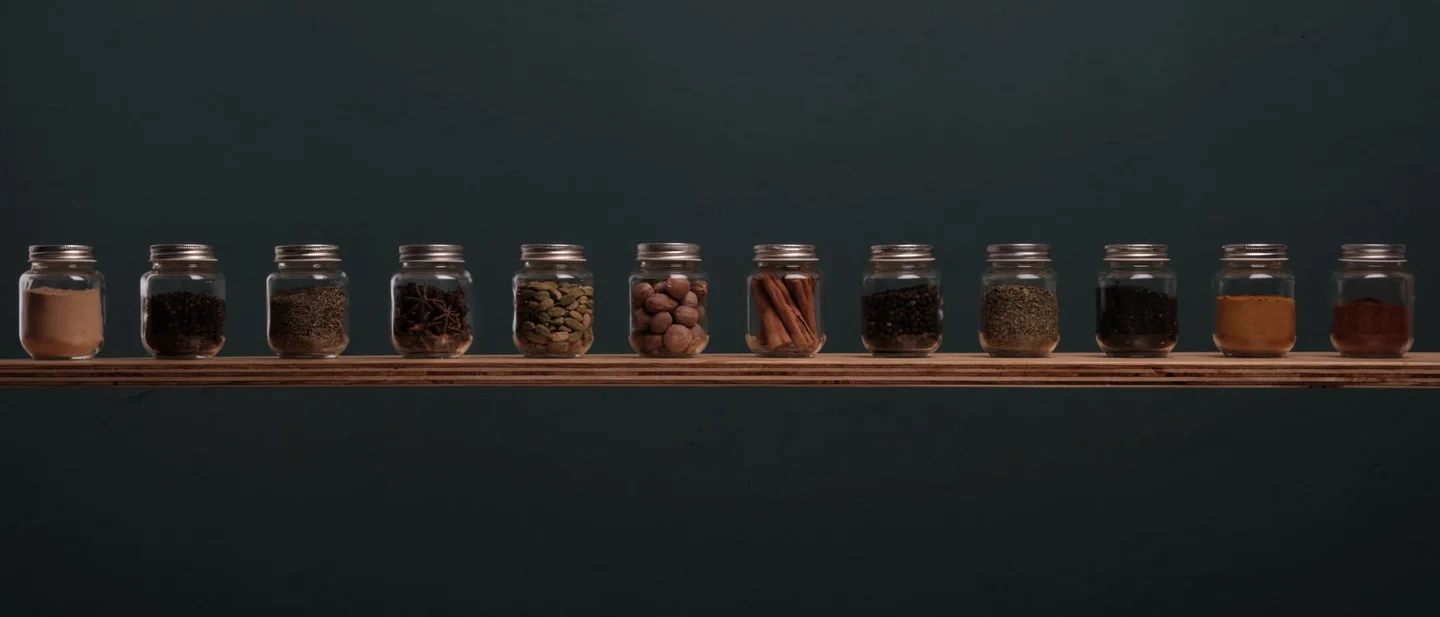
Spices end up two rows deep in a cupboard. The back row disappears, and the front row falls out when you reach for it.
A rack on the inside of the door takes a dozen jars out of that cupboard and hangs them on the door itself. The door swings, and the rack travels with it.
This week's pick is a four-pack of adhesive racks at $15.99 before tax. Each rack holds six or seven jars, so two of them take a cupboard's worth of spice.
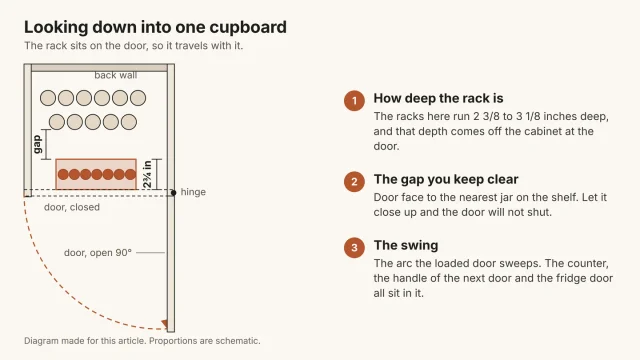
Three numbers decide whether the idea works on your door: the flat panel on the door, the gap behind the closed door, and the arc the door sweeps.
Take all three before you order anything. The mounting itself takes about twenty minutes.
Check the door first
Six checks. The first two can stop the project; the rest pick which rack you buy.
- What the door's inner face is made of. Painted wood, laminate, foil-wrapped board, bare chipboard, or a glass panel. The strip maker's list of suitable surfaces covers painted or varnished wood, laminates, metal, glass and smooth solid surfaces, and rules out wallpaper, paper and soft surfaces. 1
- Whether the panel is flat. A Shaker door has a recessed centre panel inside four raised rails. A rack wider than that panel hangs over the step, and a strip laid across the step never sits down.
- Which side the hinges are on, and how far the door opens. Watch the outer edge as the door swings. On plenty of cabinets the door stops on a wall, a countertop or the next door's handle before it reaches square.
- What opens beside it. On a pair of cupboard doors, both leaves swing into the same space. Two loaded racks meet in the middle.
- What sits on the shelf behind the rack. Close the door and look at the gap. That gap is the whole room the rack has to live in.
- Which cupboard you are picking. Choose one away from the range, the oven, the dishwasher and the fridge's exhaust. Ohio State's pantry guide puts cabinets in those positions among the warmest in a kitchen, and says they are too warm for keeping food at its best. 2
Measure three numbers
The flat panel. Measure the width and the height of the flat inner face, between the rails. Keep an inch clear of the hinge arms. The racks here run about 11 inches long, so a 15-inch panel takes one and a 10-inch panel takes none.
The gap. Open the door and lay a ruler flat on the shelf. Measure from the door's inner face to the front of the nearest jar. The racks in this piece are 2⅜ to 3⅛ inches deep, and a jar standing in one adds another 2 to 3 inches of height.
The swing. Open the door as far as it goes, then tape a mark on the floor where its outer edge stops. Look along the door's inner face and ask what a loaded rack would strike on the way there.
Materials and estimated cost
Prices were checked on October 31, 2026, on each retailer's own listing. Sales end, and tax and shipping vary.
| Item | Quantity | Estimated cost | What to buy or verify |
|---|---|---|---|
| Adhesive spice rack, four-pack | 1 | $15.99 | 11.4 × 2.75 × 2.75 in, powder-coated steel, adhesive pads and screws both in the box. 3 |
| Command Large Caddy, for the tall jars | 1 | $6.39 | 8.6 × 3.1 × 3 in, rated 4 lb, four clear strips in the pack. 4 |
| Rubbing alcohol | 1 bottle | $3.00 | The strip maker asks for alcohol on a cloth, and rules out household cleaner and water. 1 |
| Painter's tape | 1 roll | $5.00 | Marks the rack's position and the door's swing, then lifts off without taking paint. |
| Estimated total | about $30 | About $24 without the caddy. Tools: tape measure, ruler, kitchen scale. |
The racks compared
Five ways to hang spice on a cupboard door, described the same way each time.
| Rack | Price | Size (W × D × H) | What holds it | Rated load | Material | Best for |
|---|---|---|---|---|---|---|
| Bunoxea adhesive rack, four-pack 3 | $15.99 | 11.4 × 2.75 × 2.75 in | Adhesive pads, or two screws | 20 lb per rack, as listed | Powder-coated steel | The pick. Each rack holds six or seven jars, and four racks cover two doors. |
| Nieifi clear rack, four-pack 5 | $14.99 | 11.3 × 2.36 × 2.5 in | Adhesive stickers on smooth, non-porous surfaces, or screws | Not stated | Clear ABS plastic | A pale door, where the jars show through the rail. The stickers are single-use. |
| Command Large Caddy 4 | $6.39 | 8.6 × 3.1 × 3 in | Four clear strips, peel to remove | 4 lb | Plastic | The big jars. A caddy takes the bulk cumin and the chili flakes that will not fit a rail. |
| JKsmart six-tier rack with door hook 6 | $31.99 | 16.8 × 4.7 × 37.5 in overall, six racks | Hook over the door, or screws | Not stated; listed to hold 90 four-ounce jars | Steel wire | A pantry door, where a rack can hang the full height. Too tall for an upper cupboard. |
| IKEA BEKVÄM spice rack 7 | $11.99 | 15¾ × 3⅞ × 3½ in | Two screws, sold separately | Not stated | Solid aspen | The wooden one, for a renter with written permission to put two screws in a door, or a wall. |
Two of the five publish a weight figure. The other three publish none, which matters once a dozen glass jars are hanging off a swinging door.
Will it work on your door?
| Your door | What to do | Why |
|---|---|---|
| Painted wood or painted MDF, smooth | Any adhesive rack on the list | Painted and varnished wood is on the strip maker's list. Paint is also the finish most likely to come away with the strip. |
| Laminate or melamine | Any adhesive rack | Laminate is on the list, and it cleans back to bare at move-out. |
| Foil-wrapped board | Test one strip low and behind the hinge first | Some wraps soften in a warm kitchen, and a strip can take the foil with it. |
| Shaker door with a recessed centre panel | A rack that fits inside the flat panel | A strip across the step touches nothing, and the rack rubs the rails. |
| Glass-panel door | Use the solid door instead | Glass is on the list, but a swinging jar breaks a glass panel and a hinge. |
| A pair of doors on one cupboard | Two racks, measured against each other | Both leaves open into the same space, and the racks meet. |
| A door that stops short of square | Rack only on the door that opens fully | A rack that strikes the counter on every opening works the hinge loose. |
| A loose or wobbly hinge | Fix the hinge before the rack | The rack's weight rides on the same screws. |
| Over the range, beside the oven, by the dishwasher, or against the fridge's exhaust | Pick another cupboard | Warm cabinets cost the spices their aroma. 2 |
| A door painted this week | Wait seven days | The strip maker asks for seven days after painting. 1 |
| A base or under-sink cabinet | Choose an upper cupboard | The door swings at knee height, and the damp under a sink is hard on adhesive. |
Build it in a Saturday
1. Empty one cupboard and photograph it
Take the jars out onto the counter and lay them in rows. Photograph the empty cupboard and the door's inner face with the date on.
2. Read the door
Run a thumb over the inner face. A flat panel, a raised rail, a glass insert and a foil wrap each feel different, and the strip you choose follows from which one you have.
3. Take the three measurements
The flat panel, the gap behind the closed door, and the swing. Write them on a scrap of paper and take it to the shop or the listing.
4. Test one strip where nobody will see it
Inside the door, low, behind the hinge line: clean the spot with alcohol, press a strip for 30 seconds, wait an hour, hang one full jar on it, and peel the strip off the next morning. Any paint on the back of the strip settles the question.
5. Clean the panel properly
Wipe with rubbing alcohol on a cloth, then let it dry. Household cleaner and water both leave a film the strip will not grip, which is why the maker rules them out. 1
6. Tape the outline before you commit
Lay painter's tape where the rack will sit, close the door, and open it again. Look for the hinge arm, the shelf edge and the counter on the way out.
7. Press, wait, then hang
Press each strip for 30 seconds against the door and the back of the rack. Wait an hour for the adhesive to build, then hang the empty rack. 1
8. Load light, close slowly, look again next week
Fill the rack, close the door with a hand on it rather than a push, and check that the door sits flush. Look at the strips again after a week: a gap at the top edge means the strip is peeling.
What the strip will carry
Command rates its large caddy at 4 lb. 4 Bunoxea lists 20 lb per rack. 3 Nieifi lists nothing at all. 5
Those figures describe a flat, still surface with the load hanging close to the strip. A cupboard door is neither flat nor still once you use it.
Every jar hangs at the far edge of a door that swings every day. Opening the door loads the adhesive sideways; closing it harder than you meant to loads it again.
From the strip, the weight travels into the hinges. Each hinge plate is held to the door panel by two or three screws, and those screws carry the door plus everything hanging on it.
Weigh the load before you trust it. Put the empty rack on a kitchen scale, fill it with the jars you plan to move, and weigh it again.
Keep the heaviest jars at the hinge end of the rack, and leave the litre bottles in the cupboard. A strip holds a still load best; a cupboard door never stops moving.
Safety that matters here
- Test one strip first. A strip that comes off with paint on it has told you something a loaded rack would have told you at a worse moment.
- Keep clear of the hinge arms. A strip pressed over a hinge plate grips the plate, and the plate moves.
- Leave the pull tab reachable. Choose a position where you can still get a thumbnail under the tab, or the rack comes off with a knife.
- Keep glass out of the top row. A jar that falls out of a high cupboard lands on a counter, a foot or a floor.
- Check the door closes flush. A rack that fouls the cabinet frame will spring a hinge within a month.
- Keep paper off the door beside the range. The US Fire Administration asks for three feet between a heat source and anything that can burn, and a recipe card taped inside that door sits inside that distance. 8
- Keep the rack and its jars under the maker's figure. On the Command caddy that is 4 lb, which is a few jars at most.
Renter notes: the door, the paint, the landlord
A rack on the inside face is invisible with the door shut. No part of it shows at move-out, and that is what makes this project gentle.
Adhesive comes off clean when it comes off properly. Pull the tab straight down along the surface, slowly, and let the strip stretch out. Pulling outward is what takes paint.
Paint is the one real risk. A strip pressed onto paint that has not cured can lift a patch the size of the strip. Seven days after painting is the maker's own figure. 1
No permission is needed for the adhesive route. A rack that peels off leaves nothing to explain.
The screw route does need a message. The IKEA rack ships without screws, and two holes in a door are a repair you own.
Hi — I'd like to put a small wooden spice rack on the inside of one kitchen cupboard door, with two short screws. It goes on the inside face, so it isn't visible with the door shut. I'll fill and touch up the holes when I move out. Happy to send a photo of the spot first.
Deposit photos: the door's inner face, the hinge, and the same two shots after removal. Keep them with your move-in inspection report.
Move-out removal
- Empty the rack, top row first, into a box rather than a bag.
- Hold the rack against the door with one hand and pull a tab straight down until the strip lets go.
- Work along the rack one strip at a time, and let the rack come away rather than pulling it.
- Roll any residue with a thumb; a little rubbing alcohol takes the last of it.
- Wipe the panel dry, and compare it with your before photo in the same light.
- If you used screws, fill the two holes, sand them flush and touch up with matched paint.
- Bag the strips, pads and brackets with the rack, so it goes up again in the next place.
Is this the right Saturday project for you?
This suits a renter whose spices live two deep in one cupboard, and whose door has a flat inside face at least as wide as the rack. It costs about $24 for four racks, or about $30 with a caddy for the tall jars, and it takes twenty minutes once the cupboard is empty.
Skip it when the door carries a glass panel, when the flat panel is smaller than the rack, when the cupboard sits over the range, or when the hinges already wobble.
Next Saturday
Next Saturday moves to the fridge. A magnetic knife strip on its side panel lifts the knives off the counter, and the project starts with three questions: whether the side panel is magnetic at all, how close the strip sits to the stove, and where a dropped knife lands.
References
- 1How to use Command strips, Command brand
command.com
- 2Pantry Food Storage, Ohioline, Ohio State University
ohioline.osu.edu
- 3Bunoxea Spice Rack Wall Mounted 4 Pack
amazon.com
- 4Command Large Caddy, holds up to 4 lb
amazon.com
- 5Nieifi Spice Rack Wall Mount, 4 pack
amazon.com
- 6
- 7BEKVÄM spice rack, aspen, IKEA
ikea.com
- 8Heating Fire Safety, US Fire Administration
usfa.fema.gov

This story was produced automatically by a channel. One sentence is all it takes for Neodrop to keep producing for you.