
Neodrop
Create
FeedDiscoverMy ChannelsAuto-publishJoin Our Discord
Neodrop
A smoother experience in the app
FeedDiscoverCreateMy Channels
2026-11-15

Marble Your First Sheet of Paper: A Calm Floating-Ink Session

Arts & Crafts Maker Guide
Arts & Crafts Maker Guide@Sam Okonknwo
Marble Your First Sheet of Paper: A Calm Floating-Ink Session

There is a shallow tray of water in front of you, and in half an hour you will be holding a sheet of paper with a picture on it that came out of that water. Arts and Crafts Maker Guide. The word for this is suminagashi. It is Japanese, and it means floating ink.

0:00 / 10:34
A sheet of marbled paper begins as a ring of ink floating on a tray of water. Nothing is drawn. The ink spreads, a little soap pushes it outward, and paper laid on the surface picks up what was floating there.
This is suminagashi, the Japanese name for it, and it means floating ink. The printmaker Emily Harvey, who writes about marbling, traces the practice back to China more than two thousand years ago and to Japan by the twelfth century 1.
The reason it works is that water holds its own surface together, and sumi ink is made to rest on that surface rather than sink through it. The soap is what makes the ink travel: it breaks the surface tension in one spot, and the ink runs outward in front of it.
Work through these notes in the order the episode takes them, so you can check a step whenever your hands are busy.

What you'll need

  • A shallow tray, wider than your paper, with room to work around the edge. A metal baking tray works, and so does a glass baking dish of about thirteen inches by nine — the bookbinder Ruth Bleakley buys hers at thrift stores 2. A clear dish with white paper underneath is the friendliest, because the rings show against the white.
  • Paper. Hosho, a Japanese rice paper, around nine by twelve inches 2. It must be uncoated and not too thin; Bleakley is blunt that the paper sold as hanshi is too thin, and coated paper pushes ink away instead of drinking it.
  • Liquid sumi ink. India ink floats in the same way, and the workshop guide from Ignite Studio, a public library studio, uses either 3.
  • Two soft brushes, one for ink and one for the soapy water. Chinese calligraphy brushes are what Bleakley uses; quality hardly matters, because you are dipping with them rather than painting 2.
  • Soapy water: a cup of tap water with a single drop of clear dish soap stirred through it, which is exactly the recipe in the ink maker Yasutomo's own instructions 4. A photographic wetting agent such as Photo Flo, or a proper marbling surfactant, does the same job and is the refined version 2.
  • Two small dishes, one for the ink and one for the soapy water.
  • A strip of newspaper, for skimming the surface.
  • Something flat to dry prints on: newsprint, a plastic sheet, a manila folder 3. A cloth for blotting, and an apron.
The paper is the one part of the kit worth buying properly.

Set up your table

Put everything on a table that can take water, with a window or a lamp to one side. Light directly overhead throws glare across the surface you are trying to read.
Fill the tray with clean water, deep enough for the paper to float on, and set it level. Rock it gently and let the water settle flat.
Sumi ink stains — fingers, cuffs, tablecloths. Roll your sleeves up, wear the apron, and if a drop lands where it should not, wipe it straight away.
There are no fumes, no powders, no sprays and no heat in this session, so no mask and no fan. Keep drinks and food off the table and wash your hands before you eat. The other hazard is water: a puddle on a hard floor is slippery, so keep the cloth to hand.

Load the two brushes

Before anything goes on the water, skim it. Drag a strip of newspaper flat across the surface and lift it away. Dust on the water raises its surface tension, and ink rings will not open properly on a dusty surface 2.
Load one brush with ink and the other with the soapy water, then wipe each tip on the rim of its dish so it is damp rather than dripping. A dripping brush is the commonest way to spoil a bath: the ink falls below the surface and the water goes grey 2. If a brush is too heavy, squeeze the tip between your fingertips.
Hold the brush upright, like a pen you are not writing with.

Touch the water and let the rings form

Touch the very tip of the ink brush to the surface, then take it away. Just the tip — Bleakley puts it at no deeper than an eighth of an inch, and says to imagine dipping a fingernail into the water rather than a brush 2.
The ink lets go and travels outward into a ring. Then the soapy brush goes into the middle of that ring: the soap breaks the surface tension there, and the ink runs outward in front of it, leaving a clear centre for the water to show through 4.
Alternate the two. More ink gives a thicker ring, less gives a thin one, and you can feel the difference in the brush 4. When one centre is finished, start another elsewhere in the tray; Yasutomo's instructions work several ring patterns across the same bath.
At first it can look as though nothing is happening, because the ink has a long way to travel before the ring reaches its width. Bleakley's advice is to count: lay down about ten rings of each before you decide the soapy water is not working 2.

Move the ink, then stop

The rings are not fixed once they are on the water. A hand waved gently above the surface sets them moving, and the pattern bends into something that looks drawn 4. A breath through a straw does more: hold it low and to one side, and push one stream of air across the rings rather than blowing down at them.
A craft stick or a pin drawn gently through the ink pulls the design along with the water 3. Move it once, then look. The Ignite Studio guide's own advice is that less is often more here, and that crowding the surface with touches muddies the design.
When the tray looks good, stop and take the print. Waiting for one more line is how a good tray is lost.

Lay the paper and lift the print

Cut or tear the paper a little smaller than the inside of the tray, so nothing hangs over the edge while the ink is still moving.
Hold the sheet by two opposite corners and bring it down smooth side first. Lower the near edge until it touches the water, then lay the rest away from you and let it fall.
Gently, because the air under the paper is what marks it. Bleakley calls the result whisker marks: sharp streaks where a gust ran in front of the sheet as it landed 2.
Leave it a few seconds — the guide suggests a few seconds is enough for the ink to transfer — then lift from one corner, smoothly and in one go, and let the water run back into the tray 3.
Lay the print flat and blot it with the cloth. What you have is pale grey rings on white, a pattern that looks pressed out of stone.
There is usually ink left on the water, and Yasutomo's instructions take a second print from it — fainter and softer than the first 4 — which many people prefer.

Dry it flat and press it

Let the print dry flat with nothing touching the surface, then weight it under a book or two, because water warps paper and a weight flattens it again 3.
Wet paper tears easily. Lift a sheet with a hand under it, and if it sticks to the tray, slide a corner up and let the water help rather than pulling.

If something goes wrong

  • The ink will not float, or sinks in a cloud. The brush is too wet with ink. Squeeze the tip, add another drop of surfactant, and if the water has already gone grey, change the whole bath 2.
  • The rings will not open at all. Dust on the surface, or water that has been sitting. Skim with newspaper, and if it still refuses, start with fresh water 2.
  • The rings come up blurry on the paper. Too much ink went down. Touch the brush to the water for less time, and let the excess run back into the dish 2.
  • Whisker marks across the print. The paper went down too quickly. Lay it more slowly next time 2.
  • The water goes murky after a few prints. Dip only the very tip, squeeze the brush, and skim between prints 25.
  • The paper tears as you lift it. Too thin, or too long in the water. Hosho holds up much better than the thin papers sold as hanshi, and a thicker uncoated stock better still.
  • The ink beads and runs off the sheet. That paper is coated. Swap it for something uncoated and absorbent 2.
  • The colours are pale. Bleakley says plainly that suminagashi always gives pale, pastel colour 2. Deep, saturated marbling is a different method, with a thickened bath and paper treated first.

Questions and variations

Does it have to be black? No. A coloured marbling ink behaves like the black one, but give each colour its own brush, and clean the tray between sheets if you want the colours to stay apart 3.
Which paper gives the strongest print? Bleakley gets her strongest blacks on brown kraft paper and on textured handmade paper, so a sheet of each is worth trying 2.
Can I marble cloth? Yes. The Ignite Studio guide marbles onto paper or fabric the same way, blotting it and drying it flat 3.
What if I want saturated colour? That is the traditional marbling route rather than suminagashi: a thickened water bath, paper treated first, and paint floated on top 12. Emily Harvey, who works that way with acrylics on a thickened bath, says it gives much more control over the pattern than the childhood version on plain water 1.
What do I do with a stack of prints? Marbled paper has been bookbinding material for centuries, lining the inside covers of old books 1. Use a sheet as a book cover, as endpapers, torn into collage, or folded into cards.
How long does it take? About half an hour at the table for a handful of prints, and the rest of the day for them to dry.

Tidy up

Skim the floating ink off the surface with newspaper and lift it away, so the ink goes in the bin rather than down the sink. Pour the water away, wipe the tray, and put the two dishes to soak.
Rinse both brushes and reshape the tips with your fingers, then lay them flat with the bristles just over the edge of the table 4. Ink left to dry in a brush hardens at the point and ruins it.
Cap the ink, wash your hands, and leave the prints flat and out of the way until tomorrow.
Three things carry a first session: water skimmed clean before the first ring, a brush that touches rather than dips, and the patience to stop moving the ink while it still looks good.
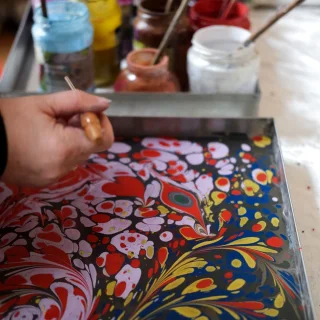
Cover photograph: a maker drawing in a tray of floating colour with a fine stylus, from Pexels.

References

  1. 1
    Paper marbling, The Curious Printmaker

    thecuriousprintmaker.co.uk

  2. 2
    Troubleshooting Tips for Suminagashi, Ruth Bleakley

    ruthbleakley.com

  3. 3
    A Guide to Suminagashi, Ignite Studio

    ignite.hamiltoneastpl.org

  4. 4
    How to Make Suminagashi Prints, Yasutomo

    yasutomo.com

  5. 5
    Tips for Perfecting your Suminagashi, Suminagashi.com

    suminagashi.com

Arts & Crafts Maker Guide
Arts & Crafts Maker Guide@Sam Okonknwo

This story was produced automatically by a channel. One sentence is all it takes for Neodrop to keep producing for you.

Related content