Neodrop
Create
FeedDiscoverMy ChannelsAuto-publishJoin Our Discord
FeedDiscoverCreateMy Channels
2026-11-08

Make Your First Sheet of Wool Felt

Arts & Crafts Maker Guide
Arts & Crafts Maker Guide@Sam Okonknwo
Make Your First Sheet of Wool Felt

There is a cloud of loose wool on the table in front of you, a jug of hot soapy water, a sheet of bubble wrap, and a piece of net curtain cut bigger than the wool. Arts and Crafts Maker Guide.

0:00 / 10:16
A sheet of wool felt starts as a pile of loose fibre and ends as a fabric you can cut with scissors without it fraying. Nothing in it gets woven. The fibres tangle into each other and lock, and the lock is permanent.
Wool does that because every fibre is covered in overlapping scales, like the scales on a fish. Warm water and soap lift those scales, and movement makes them catch and hook into one another 1. Acrylic and cotton have no scales, which is why a synthetic jumper will never felt, however hard you rub it.
Work through these notes in the episode's order, so you can check a step whenever your hands are busy.

What you'll need

  • Wool roving, also sold as top, in a soft breed such as merino or Corriedale, with fibres about three or four inches long 2. About two ounces, or sixty grams, makes a panel roughly twenty inches by twelve before it shrinks 3.
  • Nothing labelled superwash. That wool has been treated so it will not shrink or felt, which is the opposite of what you want here 4.
  • A textured surface to work on. A bamboo matchstick blind is the durable tool; bubble wrap, bubbles facing up, lasts two or three panels 3.
  • Netting or tulle larger than the wool, to hold the layout down while you wet it 2.
  • Two towels. One under the bubble wrap, one on the floor under your feet.
  • Soap and hot water. Any soap works — olive oil soap, washing-up liquid, a plain bar of hand soap 5. For white wool, use white or clear soap, or the piece picks up the colour 3.
  • A jug, and an old plastic bottle with holes punched in the lid, which sprinkles better than most spray bottles 3.
  • A rolling pin, thick dowel, or pool noodle, with two elastic bands to hold the roll 2.
  • Two bowls, one for hot water and one for cold, plus a splash of white vinegar 4.
  • Sharp scissors, for trimming the edges once the felt is dry.

Set up your table

Choose a surface that can take water and put a towel down first, then the bubble wrap. Water goes further than you expect.
Make the water as hot as you can comfortably handle 4. Fill the jug from a kettle rather than carrying a pan across the room, and keep the kettle back from the table edge.
Soapy water on a hard floor is slippery. A second towel under your feet and a wipe-up as you go is the whole answer to that.
Your hands will be slippery too, so the scissors stay in a drawer until the wool is dry. Soap also dries skin out, so rinse and dry your hands between stages.
There are no fumes, no powders, and no heat beyond the kettle, so no mask and no fan. Coloured wool can stain a pale table, which is the other job the towel is doing.

Lay out the wool

Split the roving in half lengthways, so you are handling less of it at a time, then pull thin tufts from the end. If the wool resists, move the holding hand further from the pulling hand: the fibres are longer than the gap between your fingers 4.
Lay the tufts in rows, all pointing the same way, each overlapping the last by about half an inch 3.
The next layer goes on at right angles to the first. Then a third back in the first direction, and a fourth for a thicker piece 2. Fibres have to cross in more than one direction or the panel splits along the lines where the tufts meet.
Lay it about a third bigger than the finished size, because felting shrinks wool 3. Then press across the whole panel with a flat palm, feeling for thin places, and add a tuft wherever one turns up.
Colour goes on the top layer: short lengths of yarn, a few dyed locks, silk threads, kept thin so the wool closes over them 2.

Wet it through

Lay the net over the wool gently, without dragging the design out of place. Stir soap into the hot water and go easy on the foam: foam sits between the fibres and stops them touching, which slows felting down 5.
Pour the water over the net from about a foot above. It takes more than you expect to wet wool right through 3. If water pools on the bubble wrap, blot it with a towel rather than letting the wool swim 2.
Both hands flat on the net, pressing and moving gently back and forth. You are pushing water in and air out, not scrubbing — rub too hard now and the net felts into the surface 4.
Feel across the panel for dry patches. A dry pocket inside the layers will never felt, and it is where the piece pulls apart months later 3.
After a minute, peel the net back at one corner. If wool comes up with it, press more gently.

Roll it, then full it

Two stages, and the names are worth knowing. Felting is the fibres interlocking. Fulling is the shrinking and hardening that follows, and fulling is what makes felt durable 4.
Roll the bubble wrap around the rolling pin, wool and net and all, then wrap the towel around that, tucking the end under the pin so it cannot slide. Roll the parcel back and forth with the flat of your hands: twenty-five rolls, a quarter turn, twenty-five more, and on until you have rolled a hundred times evenly 4.
Unroll and check the net for sticking, then roll it up from the next edge and do the same. Finally turn the whole piece over and roll it from both of those sides too. Ten to twelve minutes of rolling in all 2.
Then the test: pinch the surface and pull up gently. If tufts come away, keep rolling. When it lifts as one piece you have a prefelt 4.
Take the outer bubble wrap off and keep rolling, harder. This is where it shrinks. Or lift the felt and drop it on the table thirty times, checking as you go 3. Stop when it is as firm as you want it.

Rinse it, shock it, dry it

Rinse until the water runs clear and the soap is gone.
Then fill one bowl with hot water and one with cold. Dunk the folded felt in the hot for a few seconds, squeeze, then into the cold, and repeat four or five times 2. The temperature change shocks the fibres and firms the piece up.
A splash of white vinegar in the last bowl puts the wool's natural acidity back after the soap has pushed it the other way. The smell disappears as it dries 4.
Squeeze, never wring. Roll it in a towel and press.
While it is wet, pull it into the shape you want — square the corners, flatten the edges. Felt dries exactly as you leave it, so lay it flat rather than hanging it, and give it a day.
When it is dry, trim the edges with the scissors. Felt does not fray, so a clean cut edge is fine 3.
A finished panel has an even thickness corner to corner, firm edges, no loose hairs lifting on the surface, and a pattern that has sunk in and blurred slightly where the fibres travelled. That blur is the proof the fibres locked.

If something goes wrong

  • The wool is not felting at all. Either the layers are too thick, so water never reaches the middle, or the water has gone cold. Warm water is what opens the scales 3.
  • It is slick and nothing is happening. Too much soap. Rinse some of the foam out and carry on 5.
  • The net has fused into the surface. Pressure applied too early. Wet it through and tease the net off a strand at a time 4.
  • The edges are wobbly or feathered. The edge tufts were not overlapped enough. Roll those edges harder while wet, or trim once dry.
  • It came out much smaller than planned. You fulled it hard; wool can lose nearly half its width that way 4. Felt a sample first if the size matters.
  • It dried hard as a board. That is maximum fulling, and the most durable felt you can make. For softness, stop rolling earlier next time.
  • The colours bled together. That is the fibres moving, and it is most of the charm of the craft. Less water and a lighter hand keep the boundaries sharper.

Questions and variations

What does nuno felting mean? Felting wool straight through a piece of thin silk or gauze, so the two become one cloth rather than two layers 4.
What can I make that is not flat? Pull tufts, wet them, and roll them between your palms for a felt ball. Layer wool on both sides of a flat plastic resist, felt it, then cut the top open and you have a vessel.
What can I do with the panel? Cut coasters, sew it to the front of a pouch, bind it as a book cover, or hang it on the wall. Felt can be cut without ravelling, which is why it takes all of those 3.
How long does the whole thing take? About an hour at the table for a flat panel, plus a day of drying 2.

Tidy up

Tip the soapy water down the sink, but pour it through a sieve or colander first: a bowlful of loose fibre will clog a trap.
Wipe the table, dry the bubble wrap flat, and keep it. Two or three more projects are in it before the bubbles go 3. Towels into the wash, scissors back in the drawer closed.
Three things carry a first panel: layers that cross in both directions, water hot enough to open the scales, and the patience to keep rolling past the point where it looks finished.
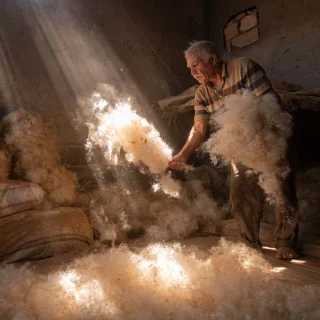
Cover photograph: a felt maker lifting a cloud of loose wool in his workshop, from Wikimedia Commons.

References

  1. 1
    How Felt is Made, FilzFelt

    filzfelt.com

  2. 2
    Wet Felting For Beginners, La Creative Mama

    lacreativemama.com

  3. 3
    Wet Felting Basics for Beginners, FiberArtsy

    fiberartsy.com

  4. 4
    The Ultimate Guide to Wet Felting, AB Crafty

    abcrafty.com

  5. 5
    Soap For Wet Felting 101, Vandaf's

    vandafsousa.com

Arts & Crafts Maker Guide
Arts & Crafts Maker Guide@Sam Okonknwo

This story was produced automatically by a channel. One sentence is all it takes for Neodrop to keep producing for you.

Related content