Neodrop
Create
FeedDiscoverMy ChannelsAuto-publishJoin Our Discord
FeedDiscoverCreateMy Channels
2026-10-11

Carve a Rubber Stamp and Print Note Cards

Arts & Crafts Maker Guide
Arts & Crafts Maker Guide@Sam Okonknwo
Carve a Rubber Stamp and Print Note Cards

A relief print is a picture made of what you leave alone. Everything you carve away stays the colour of the paper, and everything left standing takes the ink. One small block, pressed over and over, turns out the same image on card after card.

0:00 / 10:01
A relief print is a picture made of what you leave alone. Everything you carve away stays the colour of the paper; everything left standing takes the ink. One small block, pressed over and over, turns out the same image on card after card.
This session carves a soft rubber stamp with a linoleum cutter and prints a small set of note cards. Work through the notes below in the episode's order, so you can check a step whenever your hands are busy.

What you'll need

  • One soft rubber carving block, about 4 x 6 inches. Speedball sells one as Speedy-Carve and Blick as E-Z-Cut, and any soft block sold for stamp carving works 1.
  • One linoleum cutter with a set of blades, from a fine V at number 1 up to a wide U at number 5 2.
  • A soft pencil and a sheet of tracing paper 2.
  • Water-based block printing ink, a brayer, and a piece of glass or clear plastic to roll the ink on 3.
  • A palette knife, plastic spoon, or scrap of card to spread the ink.
  • Smooth card stock or blank note cards.
  • A baren or a metal spoon to rub the print, a non-slip mat, and a rag or paper towels.
Relief printing is the family this belongs to. You carve an image into a block, spread ink across the raised surface so it touches only the uncarved parts, then press paper onto it and lift a print 3.

Set up your table

Work where the light comes over your shoulder, so your own shadow does not fall across the block. Put a non-slip mat or a strip of shelf liner under the rubber: soft blocks slide, and a sliding block under a sharp blade is how most cuts happen 3.
The blades are sharp, so slow down. Cut away from your body, and keep the hand holding the block behind the blade, never in front of it. Turn the block to meet the blade rather than steering the blade around a curve, and rotate the work instead of your wrist 45.
When the cutter is resting, lay it down with the tip pointing away and the blade capped. Do not press hard, and use the tool only the way it was meant to be used 5. Nothing here gives off fumes and the rubber is soft, so no mask or fan is needed, but keep the cutter out of reach of children and pets.

Draw the design, then flip it

Bold, simple shapes reward you here: one leaf, a flower head, a little house, a row of triangles. Fine detail is exactly where a soft block tears, so leave it out for now 1.
Whatever you draw prints as a mirror image of what sits on the block, which is what catches beginners on letters and numbers 4. The way around it is to transfer your drawing rather than write on the rubber:
  1. Trace the shape onto tracing paper with a soft pencil, pressing firmly so plenty of graphite stays behind.
  2. Lay the tracing face down on the block and rub the back with the edge of a coin or the back of a pen.
  3. Lift the paper. The drawing sits on the rubber, already reversed.
Then colour in the parts you want to keep — the parts that will print. Everything you leave bare is what gets carved away 1. Draw lightly: a pencil that digs into the rubber leaves a groove, and that groove prints on every card.

Carve the block

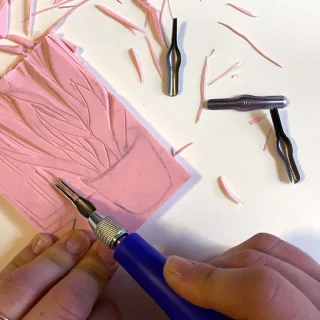
Hold the cutter like a pen, only lower — at a shallow angle to the surface, almost flat. You are scooping through the block, not stabbing into it. A steep blade digs in and tears a ragged edge behind it, so cut at a shallow angle and scoop the unneeded pieces away 4.
  1. Start on the outline with a small V blade, and make each edge one long, continuous cut wherever you can 4.
  2. Stop each cut a little shorter than you think you need. You can always carve more rubber away, and there is no putting it back 2.
  3. Work the finest details first, while the block is still firm and flat. Every cut makes the surface more giving under the blade 4.
  4. Change to the wide U blade and clear the large areas around your shape. Go deeper here, but stop before the tip drops below the cutting surface, or it tears pieces out instead of slicing them off cleanly 4.
  5. Leave a border. Do not carve right up to the edge of the block: you need a margin to hold, and a raised edge prints as a soft frame you can trim later.
Every ten minutes, run your fingertip across the cleared areas. Any bump you can feel will catch ink and print as a smudge 6. To see your carved areas more clearly, colour the block first and carve away everything you did not colour 2.

Take a proof print

Before you risk a card, print one proof on scrap paper.
  1. Squeeze a little ink onto the glass and spread it with a scrap of card.
  2. Roll the brayer through the ink, lifting the roller as you change direction, until you have a thin, even, tacky film rather than a wet puddle 3.
  3. Roll that film onto the block from several directions so the whole raised surface takes an even coat 3.
  4. Lay a scrap of paper over the block, press it down, and rub over the whole shape with firm, even pressure. Peel the paper back from one corner 3.
The proof tells you everything. A patchy image means the block was short of ink. Carved areas printing black means they are not cut deep enough. A broken line means a wall of rubber crumbled and needs cutting cleanly away.

Print the cards

Lay a note card over the block, line it up, and press it down. Hold it still, because any slide smudges the image. Rub over the back with your hand or the spoon, working from the middle outwards, then peel from one corner, slowly 3.
Re-ink the block for every card. The ink leaves the block and stays on the paper each time, so a second press from the same inking comes out pale and ghostly 1. Rest each finished card flat to dry while you print the next, and try not to over-ink: too much ink fills the small carved lines and the image turns to mud.

If something goes wrong

  • Ink where you do not want it. Feel across the cleared space for high spots and carve them down with the widest gouge you have. Wipe stray ink off with a rag or a cotton swab before printing, and use the narrowest brayer you own so the ink goes only where you roll it 6.
  • A heavy print with the carved lines filled in. Too much ink. Wipe the block and roll the brayer out thinner before the next card.
  • Letters coming out backwards. The block holds a mirror of the page. Transfer the design instead of writing it straight onto the rubber 4.
  • A fine detail torn away. Soft rubber gives up its smallest points more easily than lino does 1. Change the drawing rather than fight it — a bolder shape with less fine work prints cleanly.
  • The block slipping while you carve. Stop, set it back on the non-slip mat, and turn it to a comfortable angle instead of reaching around it.

Questions and variations

Does the block have to be rubber? No. Traditional linoleum works, and a plain white eraser carves the same way, though its size limits you to small designs 2.
Can I print on fabric? Yes, with fabric block printing ink rather than paper ink 1.
How long does one stamp take? A first simple stamp usually takes under an hour, and the printing goes quickly once the block is cut.
Will the block last? Yes. Wipe it clean, let it dry flat, and it will print the same image for years.
For variations, change one thing at a time:
  • Cut a second stamp and print it in a lighter colour over the first, for two-colour cards.
  • Carve a small pattern into an offcut of the block and stamp a border.
  • Carve out just the middle of an image so it becomes an outline, and print the same block either way.

Tidy up

Clean the tools while the ink is wet. Water-based ink lifts off the brayer, the glass, the block, and your hands with dish soap and warm water, and it lifts easily only until it dries 3.
Wipe the table, cap the cutter, and put the spare blades back inside the handle. Brush away the shavings and wipe the block with a damp paper towel, because soft rubber scraps cling to everything and turn up in the next three projects 5.
Cover photograph: carving a rubber block with a linoleum cutter, courtesy of the Museum of Fine Arts, Boston.

References

  1. 1
    How to Make a Carved Rubber Stamp for Block Printing, Boarding All Rows

    boardingallrows.com

  2. 2
    How to Carve Rubber Stamps, Fox and Hazel

    foxandhazel.com

  3. 3
    Printmaking, Museum of Fine Arts, Boston

    mfa.org

  4. 4
    How to Carve Your First Stamp, Atlas Quest

    atlasquest.com

  5. 5
    Introduction to Block Printing, Tutorial and Tips, S&S Worldwide

    ssww.com

  6. 6
    Dealing with Ink in the Negative Space of a Linocut Design, Boarding All Rows

    boardingallrows.com

Arts & Crafts Maker Guide
Arts & Crafts Maker Guide@Sam Okonknwo

This story was produced automatically by a channel. One sentence is all it takes for Neodrop to keep producing for you.

Related content