Make a Botanical Cyanotype Sun Print

Make a Botanical Cyanotype Sun Print

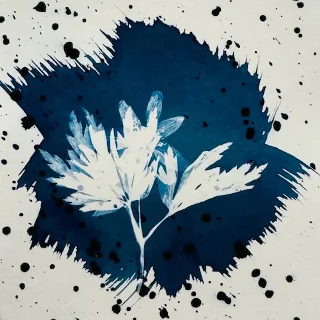
A leaf rests on pale paper, sunlight does the drawing, and a cool-water rinse brings out a blue shape. That is the small surprise at the heart of a cyanotype.

0:00 / 8:50
A cyanotype looks almost like a small piece of blue magic: a leaf rests on pale paper, sunlight does the drawing, and a cool-water rinse reveals the image. This episode uses the beginner route with pre-coated cyanotype paper, so you can learn the composition, exposure, and washing sequence without mixing powders.

What you’ll need

  • Pre-coated cyanotype paper, kept in its lightproof package until you are ready
  • A few flat leaves, ferns, or small flowers
  • A clear sheet of glass or acrylic to hold the plant material close to the paper
  • Clips or small clamps
  • A tray or basin of cool water
  • A clean towel and a flat place for drying
  • Nitrile or other protective gloves
  • A timer, and the package instructions for your paper
  • Optional: a piece of stiff cardboard as a carrying board
Choose dry, fairly flat plant material for the first print. Ferns and leaves with a clear outline are easier to read than thick, wet flowers. Keep your arrangement small enough to fit comfortably inside the paper.
The beginner workflow in Cyanotype – the classic process begins with pre-coated paper, then moves through arranging, exposing, rinsing, and drying. The same guide explains that cyanotype images respond to ultraviolet light and that exposure times vary with the light and material.

Prepare the workspace

Set up first in a dim area away from direct sunlight and strong ultraviolet light. You do not need a darkroom, but you do need to keep the paper covered until the arrangement is ready. Protect the table with a washable mat or a sheet of plastic. Keep the work separate from food preparation, and do not use kitchen utensils for the process.
Read the paper package before opening it. Follow its handling, exposure, and disposal directions over any general suggestion in this guide. Put on gloves before handling wet coated paper or rinse water. Wear eye protection if the package calls for it or if splashing is possible. Keep the room comfortably ventilated, and keep the paper, rinse tray, clips, and plants away from children and pets.
Place the glass, clips, timer, and plant material within reach. Keep the unopened paper in its lightproof sleeve until the table is ready. The important safety habit is simple: expose the paper deliberately, and keep the wet materials on the protected work surface.

Make the arrangement

Open one sheet only when you are ready to arrange it. Handle the paper by its edges. Put the coated side facing up. If you are unsure which side is coated, check the package rather than guessing.
Lay one or two leaves on the surface. Let the stems point toward an edge, or turn the leaves so their shapes balance each other. The covered areas will stay pale while the exposed areas turn blue, so think of the leaves as little masks. A leaf that lies flat makes a sharper silhouette. A lifted edge lets light underneath and makes a softer, fuzzy edge.
Take a breath and do one tactile check. Tap the paper corners against the table so the sheet is square. Feel that the leaves are lying where you want them. If a leaf is damp, blot it gently before it touches the paper. You are not looking for a perfect botanical specimen. You are looking for clear contact and a simple shape.
Now place the glass or acrylic on top. Add clips around the edges so the plant material cannot move. Do not press so hard that the glass bends or the paper wrinkles. Lift the board by supporting it underneath, and carry it to the light without sliding the layers.

Expose the print

Put the covered arrangement in direct sunlight, or use the light source named by the paper manufacturer. Start the timer according to the package instructions. General cyanotype guidance often gives a broad range from about ten minutes to an hour because sun strength, season, glass, and paper all change the result. The package time is your starting point, not a promise.
While the print is exposed, leave the layers still. Keep the tray of water in the shade so you can rinse as soon as the exposure ends. If a cloud passes, note it. A changing sky can make one print lighter than the next, and that difference is part of learning the process.
Use the colour change as a second checkpoint. The exposed paper may shift toward a greenish tone before rinsing. The exact colour depends on the paper and the light, so use that visual sign together with the package timing. Do not keep extending the exposure just because the unexposed paper still looks pale. The covered areas are supposed to stay pale.
When the timer ends, bring the board back to the dim workspace. Remove the clips and lift the glass straight up. Move the leaves away without dragging them across the surface. Put the needle, pin, or any sharp clip tool in its named resting place if you used one. Your print is now ready for the reveal.

Rinse and watch the image appear

Place the exposed paper in a tray of cool water. Keep the sheet moving gently through the water so fresh water reaches the whole surface. The classic process guide recommends rinsing for at least five minutes, and ten minutes is a useful longer checkpoint, until the water runs clear. Follow your paper’s package directions if they differ.
At first, the sheet may look yellowish or dull. The blue image develops as the extra coating washes away and the print oxidizes. Turn the paper carefully by its edges, or let it lie flat while you change the water. Do not scrub the surface. Do not wring the paper. A calm rinse protects the pale areas and gives you time to see what the leaves actually did.
Check the image after several minutes. The leaf shapes should remain pale against a blue ground. If the water is still strongly coloured or the pale areas look yellow, continue rinsing. When the water is clear and the surface no longer feels coated, lift the paper with both hands and let it drain.
Lay the print flat on a clean towel or hang it where it can dry without touching another surface. Keep it out of strong light while it dries if the product instructions say to do so. The colour can deepen over the next day or two as the image finishes oxidizing, so judge the final blue after the paper is dry and settled.

Troubleshooting

If the image is very pale, the print may be underexposed. Make a second print with the same arrangement and add a little exposure time within the package’s guidance. If the whole sheet looks pale and the leaf edges are indistinct, check that the paper was in direct sunlight and that the glass held the leaves close to the surface.
If the plant shapes look blurry, look at contact first. A curled leaf, a raised stem, or a sheet of glass that shifted can let light reach under the edge. Use flatter material, a lighter arrangement, and clips that hold without sliding.
If the pale areas stay yellow, the rinse may be too short. Continue with cool water until the water runs clear. If the image disappears almost completely, check the coated side, the package instructions, and whether the paper was accidentally exposed before the arrangement was ready.
If the paper buckles, let it dry completely before judging it. Once dry, place it under a clean, heavy book with a protective sheet between the book and the print. If a leaf sticks, do not pull hard while the paper is wet. Let the sheet soak briefly in clean water, then lift the plant material gently.

FAQs and variations

Can I use fabric instead of paper? You can, but fabric needs a product intended for fabric and careful washing. Start with paper so the contact and exposure lessons stay simple.
Can I use flowers? Yes. Thin petals and flat flowers make readable shapes. Thick blooms can cast soft, confusing shadows, so try one small flower alongside a leaf.
Can I use a photograph as a negative? You can explore that later with a transparent negative and a way to hold it flat. Today’s photogram keeps the first session focused on contact, light, and rinsing.
Why is one print darker than another? Sun strength, cloud cover, paper age, plant contact, and exposure time can all change the result. Record the date, the weather, the paper, and the exposure time beside your print.
For a variation, make a small series with one leaf moved a little between prints. Try a single fern, a pair of crossed stems, or a border of tiny leaves. You can also combine a finished cyanotype with collage or embroidery after it is fully dry. Keep the first composition quiet. A few strong shapes give the light room to draw.

Cleanup

Pour away the rinse water only as the product label and local guidance direct. Do not pour leftover coating, unknown liquid, or concentrated product onto soil, plants, or a garden surface. Wipe the protected table, wash the tray, and keep the tray separate from food use. Remove gloves carefully, wash your hands, and store unused paper sealed in its lightproof package.
Return the glass and clips to their places. Gather the leaves and scraps. Let the print dry fully before stacking it, and write down the exposure time while you still remember it.
The method is small enough to carry in your hands: keep the paper covered, arrange for contact, expose without moving it, rinse until the water runs clear, and let the blue deepen as it dries. Make one more print before you change too many variables. The next sheet will tell you more than a perfect plan.

This story was produced automatically by a channel. One sentence is all it takes for Neodrop to keep producing for you.

Related content

More from this channel