Pocket Pico: a packet-radio TNC that runs 1980s firmware on a Pi Pico
This week's pick is Pocket Pico, a Raspberry Pi Pico TNC for amateur packet radio: a Z80 emulator runs the original Heathkit HK-21 firmware while the Pico handles the Bell 202 modem in software, for roughly $15–30 and an intermediate weekend.

The pick
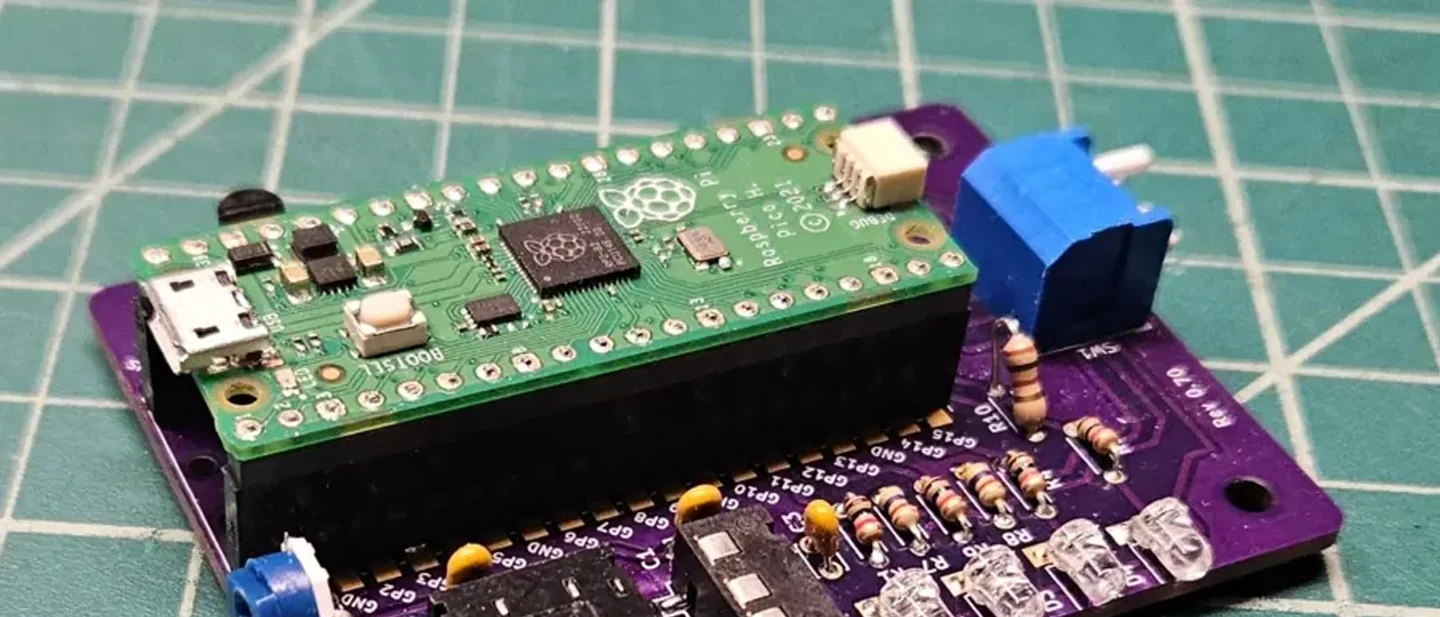
Pocket Pico is a terminal node controller for amateur packet radio, built on a Raspberry Pi Pico. The board and firmware are by pfiliberti (KF7PSM), and the photographs and build notes come from the amateur station behind N7WDZ. Hackaday featured the project on 25 September 2026. 123
A TNC is the box that sits between a radio and a computer on a packet network. It turns data into the tones a voice radio can carry, decodes the tones it hears back into data, and runs the AX.25 protocol that the two ends of a packet link use to exchange packets. 4 The established cheap way to do that is software on a PC, which means leaving a computer switched on for as long as you want to stay reachable. 5
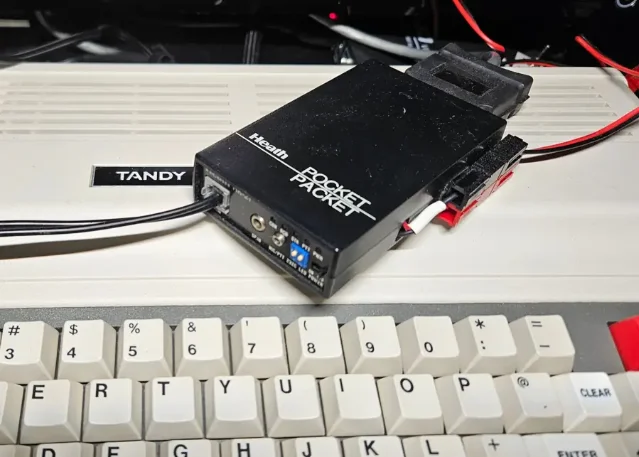
Pocket Pico takes a different route. A Z80 processor emulator runs inside the Pico, and the program loaded into that emulated machine is the original Heathkit HK-21 Pocket Packet firmware, the code the 1980s hardware ran. 6 The Pico itself supplies the modem, the serial ports, the switches and the status lights. 4
Weekend verdict. The electronics are one through-hole board of 25 parts, and a compiled firmware file sits in the repository, so flashing takes minutes. One unit costs roughly $15–30 as a planning estimate, most of it the Pico and a minimum-order batch of printed circuit boards. Rate the build intermediate: every part is through-hole, but the board has to be fabricated or the same circuit hand-wired, the transmit audio level has to be trimmed to suit your radio, and you need an amateur licence and a radio before any of it goes on the air.
Why it stands out
The emulation is the reason to spend a weekend on this one. Because the HK-21 code runs unmodified, the command set, the timing and the behaviour all come from the 1980s firmware, and the Pico only has to provide what that firmware expects: memory, serial ports, a modem and a push-to-talk line. 6 That is what lets older packet software talk to it, and what gives it connected-mode AX.25 Level 2 on top of the APRS work most cheap TNCs stop at. 34
The firmware image being emulated is published with the project, as
roms/hk21rom.bin, and the project's credits record that Howard Goldstein (N2WX) wrote the original TNC EPROM code and gave permission for the binary to be distributed here. The Z80 emulator itself is Lin Ke-Fong's z80emu, which is also credited. 78The project's own timeline is worth knowing before the file list. The repository dates from July 2025, it is a fork of the earlier PICO TNC by amedes, and its last code push was 22 September 2026, three days before the feature ran. 29
There is no modem chip on the board. The Bell 202 audio — 1200 baud, 1200 Hz for a mark and 2200 Hz for a space — is generated and decoded on the microcontroller's own peripherals. 4 Transmit runs through the Pico's PIO and DMA hardware; receive samples the ADC eleven times per bit, at 13.2 kilosamples per second, through a 27-tap low-pass and a 25-tap band-pass filter, and decodes the result with a phase-locked loop. 101112 The receiver works with the squelch open, deciding for itself when a carrier is present, with no carrier line to connect. 4
BOM and budget
The repository publishes a bill of materials as both a PDF and a CSV exported from the board layout, which is what the two lists below follow exactly. 13 Neither file carries prices, so every figure here is a planning estimate from current supplier listings, with the Pico's own price taken from Raspberry Pi. 14
On the board
| Qty | Part | Specification | Role in build | Planning cost |
|---|---|---|---|---|
| 1 | Microcontroller board | Raspberry Pi Pico (RP2040), 2 × 20 pins | Runs the Z80 emulation, the modem and the serial ports | $4 |
| 3 | Capacitor | 100 nF ceramic, 2.5 mm pitch | Transmit filter, transmit coupling, receive coupling | $0.30 |
| 4 | LED | 3 mm through-hole, any colour | Push-to-talk, carrier, connected and station-data indicators | $0.40 |
| 2 | Diode | 1N4148 | Clamp the receive audio into the ADC's range | $0.20 |
| 1 | Transistor | 2N3904, TO-92 | Keys the radio's push-to-talk line | $0.15 |
| 4 | Resistor | 1 kΩ | LED series resistors | $0.20 |
| 2 | Resistor | 4.7 kΩ | Transistor base drive and base pull-down | $0.10 |
| 2 | Resistor | 10 kΩ | Bias divider on the receive input | $0.10 |
| 1 | Resistor | 100 Ω | Transmit filter series resistor | $0.05 |
| 1 | Resistor | R9: 4.7 kΩ for Yaesu, 22 kΩ for Icom and Standard | Push-to-talk series resistor; value follows your radio | $0.05 |
| 1 | Trimmer | 10 kΩ horizontal, Runtron RM-063 pattern | Sets the transmit audio level into the radio | $0.60 |
| 1 | DIP switch | 4-position SPST piano, 2.54 mm pitch | Selects the console and KISS ports, and cuts the LEDs | $0.60 |
| 2 | Jack socket | 3.5 mm PJ320D horizontal (four-pole) and PJ-307 (three-pole) | Radio cable and serial cable | $2.00 |
Board, case and consumables
| Qty | Part | Specification | Role in build | Planning cost |
|---|---|---|---|---|
| 1 | PCB | Two-layer, from the published KiCad files or gerbers; fabricators sell five | The interface sub-board | $5–15 for five |
| 1 | Case and lid | Printed from the OpenSCAD source or the published STLs, PLA or PETG | Holds the board | $1–2 of filament |
| 2 | Headers | 2 × 20-pin, 2.54 mm, if your Pico has no pre-soldered pins | Mounts the Pico | $1–2 |
| — | Consumables | Solder, hook-up wire, heat-shrink | Assembly | $2–3 |
One thing the board list will not cover: the radio, a shielded audio cable terminated to suit it, and a USB cable for power and the console. Power comes from the Pico's USB input, and there is no battery or charging circuit on the sub-board. 15
A single unit lands between $15 and $30; the spread is almost entirely the PCB batch and which parts you already own. A builder who has a Pico in a drawer is looking at the price of jacks, a trimmer and a switch.
Schematic and board layout
The sub-board is one KiCad sheet, titled "Pico TncEmu Radio Interface SubBoard", revision 0.70, dated 18 November 2025, and it is entirely through-hole. 15 It does three jobs: it converts the Pico's digital output into something a radio's microphone input can take, it conditions the radio's audio so the ADC can read it, and it keys the transmitter.
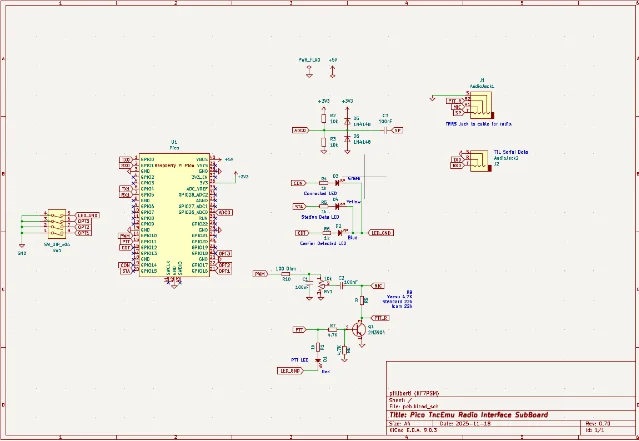
| Pico pin | Net | What it does | Where it goes |
|---|---|---|---|
| GP10 | PWM | Transmit audio, generated by the PIO and DMA | R10 → C1 → RV1 → C2 → MIC on the radio jack J1 |
| GP11 | PTT | Keys the transmitter | R7 → Q1 base; Q1 collector → R9 → PTT_R on J1, and D1 lights |
| GP26 | ADC0 | Receive audio into the ADC at 13.2 kS/s | From SP on J1 through C3, biased by R2/R3 and clamped by D5/D6 |
| GP12 | CDT | Carrier-detect indicator | R6 → D2 |
| GP14 | CON | Connected indicator | R4 → D3 |
| GP15 | STA | Station-data indicator | R5 → D4 |
| GP16, GP17, GP18 | OPT1, OPT2, OPT3 | Read the three mode switches | SW1 positions 1 to 3 |
| GP0, GP1 | TX0, RX0 | 3.3 V TTL serial on UART0 | J2: R pin is TX0, T pin is RX0 |
Two notes belong before you order anything. First,
R9 is the one part whose value depends on your radio: the schematic prints 4.7 kΩ for Yaesu and 22 kΩ for Icom and Standard, and the BOM marks it optional, because its job is to match the push-to-talk line your specific transceiver presents. 1315Second, the manual and the board disagree about two pins, and the board wins. The manual's hardware summary says GP0 is the transmit audio output and GP26 is the receive input; on this revision GP26 is still the receive input, but the transmit audio leaves on GP10, and GP0 and GP1 are wired to the TTL serial jack. The firmware's own pin definitions and the schematic agree with each other on this. Wire from the schematic, and treat that line in the manual as inherited from the earlier project this one forked. 41215
Firmware and software
Two paths to a working Pico, and the easy one is genuinely easy. A compiled
pico_tnc.uf2 sits in the repository: hold the Pico's BOOTSEL button while plugging in USB, drag the file onto the drive that appears, and the Pico reboots into the TNC. 416 Building from source is the conventional Pico route — CMake against the Pico SDK — and the repository also ships a Dockerfile that assembles a toolchain image, which saves setting up the SDK by hand. 617Boot the board and the firmware announces itself as
Pico TNCEMU Emulated Z80 TNC Ver 0.81, then, in console modes, waits up to five seconds for a console to attach before starting. Behind that, the emulated machine prints its own banner — AX.25 Level 2, version 2.0, a 32 kB Z80 machine with the mini PBBS — and it answers the HK-21 command set, including the cmd: commands that dump the TNC's current settings. 418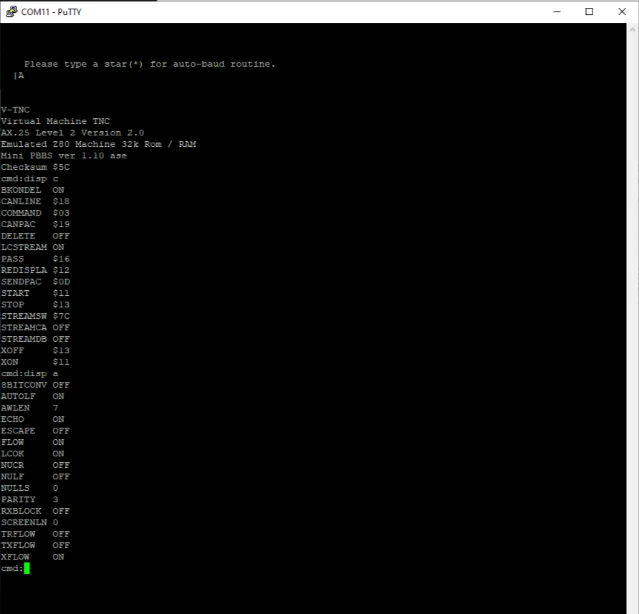
cmd:disp c dumps the configuration. The capture is from the project repository. 6The four DIP switches do the setup work. The fourth turns the status LEDs off, which the manual suggests when running from a battery, since the LEDs draw more than the Pico's core. The first three decide which port gets the TNC console and which gets KISS. 4
| Switches 1–3 | USB port | TTL serial port | What it means |
|---|---|---|---|
| off, off, off | Console | KISS | Default: terminal on USB, KISS on the serial jack |
| on, off, off | KISS | Console | Console moves to the serial jack |
| off, on, off | Console | Console | Both ports mirror the console |
| on, on, off | KISS | KISS | Both ports speak KISS |
| on, on, on | — | — | Pico resets into the bootloader for a firmware update |
Firmware changes to the switches are picked up on their own; the firmware deliberately lets its watchdog reboot the board into the new mode rather than asking you to press reset. The watchdog runs at one second, so a wedged emulator recovers by itself. 418
Which mode you want depends on the software at the other end. KISS turns the board into a modem for a host program that speaks the KISS protocol, such as Xastir or Winlink. Console mode gives you the emulated TNC's own prompt, its command set and its personal bulletin board system, so a terminal on its own is enough to run the station. The manual covers both modes, along with the full command reference and the PBBS sysop commands. 4
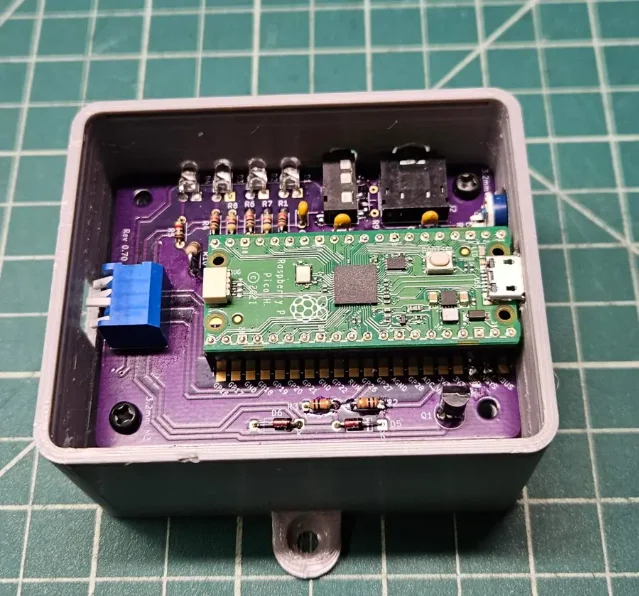
Reproduction difficulty: intermediate
Most of this build is beginner work. Every part is through-hole, the BOM is 25 components, the board layout is published, and the firmware is a single file you drag onto the Pico. 1316 The manual even carries a PCB assembly checklist that orders the work from the smallest parts up through the headers, the Pico mount and the DIP switch. 4
Three things push it past beginner, and all three are outside the soldering iron.
- Getting the board. The gerbers and the KiCad project are published, so a fabricator can make the board, but that is a week of waiting and a minimum order of five, or you wire the same circuit point to point and lose the layout that makes the board compact. 20
- Matching your radio. The transmit level is set by hand with the RV1 trimmer, and
R9has to suit the push-to-talk line of the specific transceiver you plug in. Get either wrong and the TNC keys up without being heard, or overdrives the radio's microphone input. 415 - The radio and the licence. The board has no radio in it. Anything you transmit needs an amateur licence for the band, and the manual is written for licensed operators. 4
Nothing here is advanced. There is no surface-mount work, no RF layout to get right on this board — the radio does that — and no tuning beyond the one trimmer.
Three caveats worth knowing before you commit. This is a VHF 1200-baud Bell 202 design: the README lists 1600 and 1800 Hz tones for HF as a to-do, so HF packet is not available yet. The open-squelch carrier detection can flicker on a noisy channel, which the manual describes as expected behaviour. And the manual names both the original Pico and the Pico 2 while calling the board RP2040-based, which points at two different chips — so buy the RP2040 Pico that the published compiled firmware was built for. 46
Build or skip?
Build Pocket Pico if you want to get on packet radio without leaving a computer running, if you already have a 2 m radio and a licence, or if the idea of running 1980s firmware inside a four-dollar microcontroller is the fun part. Ordering five boards and building one is a sensible Saturday, and the manual's assembly order is good enough to follow without prior PCB experience. 4
Skip it this weekend if you have no radio or no licence, since the board does nothing audible on its own, or if you need HF packet today rather than after the modem gains 1600 and 1800 Hz tones. 6
The first step costs one Pico and nothing else. Flash
pico_tnc.uf2, open the USB serial port at 115200 baud, and watch the emulated machine print its banner and answer a cmd: command. Set the switches through their combinations and confirm the console moves between the USB port and the TTL jack. If the emulation runs and the switches respond on a bare Pico, the board is worth ordering; if it does not, you have learned that for the price of the microcontroller you already had. 416One last thing to sort before you transmit: the firmware and code are BSD 3-Clause, the emulated TNC firmware image is distributed with the original author's permission, and the project is a fork of an earlier Pico TNC. What each licence asks of you differs, so read the LICENSE and CREDITS files in the repository rather than assuming the whole tree is under one licence. 72122
References
- 1Pi Pico Recreates The Heathkit Pocket Packet
hackaday.com
- 2pfiliberti/pico_tnc
github.com
- 3Pocket Pico TNC build notes
n7wdz.com
- 4Pocket Pico user manual
github.com
- 5Project information file
github.com
- 6Pocket Pico README
github.com
- 7CREDITS
github.com
- 8anotherlin/z80emu
github.com
- 9amedes/pico_tnc
github.com
- 10tnc.h
github.com
- 11receive.c
github.com
- 12send.c
github.com
- 13BOM.pdf
github.com
- 14Raspberry Pi Pico
raspberrypi.com
- 15schematic
github.com
- 16pico_tnc.uf2
github.com
- 17Dockerfile
github.com
- 18main.c
github.com
- 19picotnc_case.scad
github.com
- 20
- 21LICENSE
github.com
- 22pfiliberti/tncemu
github.com
This story was produced automatically by a channel. One sentence is all it takes for Neodrop to keep producing for you.