Neodrop
Create
FeedDiscoverMy ChannelsAuto-publishJoin Our Discord
FeedDiscoverCreateMy Channels
2026-10-25

Crochet a Cotton Coaster and Learn the Single Crochet

Arts & Crafts Maker Guide
Arts & Crafts Maker Guide@Sam Okonknwo
Crochet a Cotton Coaster and Learn the Single Crochet

You've got a hook in one hand and a ball of cotton in the other, and the hook looks like a small question mark with a handle.

0:00 / 9:59
A coaster is the smallest useful thing you can crochet, and it teaches the whole craft in miniature. You take one ball of cotton and one hook, and fifty or sixty repetitions of a single stitch later, you have a square of cloth firm enough to sit under a mug.
The stitch is called the single crochet, and it is three movements: the hook goes into the stitch below, the yarn goes over the hook, the loop comes through. Everything you make in crochet for the next year is built from stacks of that.
Work through these notes in the episode's order, so you can check a step whenever your hands are busy.

What you'll need

  • A ball of medium weight cotton yarn, sold as number 4 or worsted. One coaster takes about twenty yards, so a single ball makes four or five of them 1.
  • A 5 mm crochet hook, which is the size printed as H-8. Hook sizes appear in millimetres and in American letters, the letters vary between manufacturers, and the millimetre number is the accurate one 2.
  • Small scissors, and a blunt tapestry needle with an eye wide enough to take the cotton. The needle is for the last two minutes, not the middle.
  • A mug, kept on the table as your measure rather than your drink.
Cotton rather than acrylic is not a matter of taste. Acrylic melts under anything hot, which makes an acrylic mat fine under a glass of water and wrong under a mug of tea 3.
For the hook, take the smaller end of what the ball's band suggests: five millimetres with this cotton gives a mat that holds its shape, while a six millimetre hook gives something closer to a floppy dishcloth 4.
If your cotton is thinner or thicker than a number four, the project still works. A thinner cotton wants a four millimetre hook and a longer chain, a thicker one wants a six, and the coaster simply comes out a little smaller or a little bigger, which for a coaster is fine.

Set up your table

Sit at a table rather than in an armchair, and put the lamp so the light lands on your hands from the side. Set the ball in a bowl on the side of your working hand — left for left-handers, right for right-handers — because a ball that rolls off the table takes your next stitch with it.
Hold the hook however your hand wants to hold it, over the top like a knife or underneath like a pencil, with the yarn running over your index finger. Both grips are correct.
The only sharp thing here is the scissors: close them every time they leave your hand, and lay them down with the points turned away. Nothing gets hot and nothing makes fumes, so there is no mask, no fan and no gloves. The real wear in crochet is in your hands. Beginners grip harder as they concentrate, and when the heel of your palm complains, put the hook down for a minute and shake your hands out.

Slip knot and a chain of sixteen

Make a slip knot and slide it onto the hook. It should be snug, but the loop has to run along the hook freely, because a loop that grips the hook gives you a chain you cannot work back into 5.
Then chain sixteen: wrap the yarn over the hook from back to front, and pull that wrap through the loop already on the hook. The loop sitting on the hook is not one of the sixteen, and neither is the slip knot, so count the V shapes in the braid you have made 6.
Keep them loose, loose enough that a fingernail slides inside a chain and the hook goes into the next loop without dragging. A beginner's chain is usually too tight, and a tight chain is the one thing in this project that has to be pulled out and started again: it is the foundation, and everything sits on it.

The first row

Turn the chain so the braid runs away from you and the flat back of each chain faces up. Skip the first chain, the one next to the hook, and work into the second.
Push the hook through the middle of that chain and under its back bar, yarn over, and pull the wrap back through the chain. Two loops sit on the hook. Yarn over again and pull through both loops at once, and one loop is left: that is one single crochet 7.
Work one into each remaining chain, fourteen more. Then stop, lay it flat, and count the V shapes along the top edge: fifteen, and fifteen is the number you want at the end of every row from here on 1.

Turn, and count every row

Chain one, then turn the work so you are looking at the back of what you just made. That single chain is the turning chain: it does not count as a stitch, it only lifts the yarn to the height of the new row 6.
The first stitch of the new row goes into the very first stitch, the one sitting beside the turning chain. Beginners skip it, and skipping it is why a piece narrows into a triangle. From there you work into the top of each stitch, under both of the little bars across it.
The last stitch of the row is the hard one. It tucks itself around the end and looks like part of the edge, and it is a stitch; miss it and you lose one every row.
Count fifteen, chain one, turn. About fifteen rows makes a square. A stitch marker in the first and last stitch of a row saves you the counting while your edges are still learning to stand up 4.

Reading the fabric

The fabric should feel like a woven placemat — firm, with a little give — and lie down flat on the table. Look along the top and you will see rows of V shapes stacked in lines; the lines are your rows. The two faces differ, one smoother and one showing the ridges of the turning chain, and either can be the front.
The first rows curl up like a scroll. That is normal in single crochet, and the steam at the end takes it out 7. Hold the piece up and look at its edges. They should stand as a straight column: a piece that slopes inward is losing its last stitch, and a piece that flares is picking up an extra one at the start.

If something goes wrong

  • The hook will not go into the chain. The chain is too tight. Pull it out and chain again loosely, or make the chain with the hook one size up.
  • The rows keep getting shorter. You are missing the last stitch. Rest a fingertip on it before you turn, and it will be there when you come back.
  • The piece keeps getting wider. You are working into the turning chain at the start of the row. That chain is not a stitch, so leave it out.
  • Little holes open across the fabric. The hook has been going into the gap between two stitches instead of under both bars at the top. Look for the V and go there.
  • The ball runs out mid-row. Leave a tail of about fifteen centimetres, start the new ball, carry on, and weave both tails into the back when you finish.
  • A mistake shows three rows down. Pull it out. Crocheters call that frogging, because you rip it, rip it, like the sound a frog makes, and every one of them does it 8.

Questions and variations

Does the coaster have to be cotton? For anything hot, yes. Cotton absorbs and takes heat; acrylic melts, so keep it for cold drinks and for mats that never see a saucepan.
How long does one take? About half an hour once your hands have the stitch, and faster after the first one.
What else can this stitch make? A placemat is a chain of thirty-one, worked until it is square. Stripes are a second colour joined at the end of a row. A border is one row of single crochet all the way around the edge, worked into the edge stitches. A round coaster is the same stitch worked in a circle with a few extra stitches added evenly in each round 3.

Tidy up

When the piece is square, cut a tail of fifteen centimetres, pull the working loop until the tail comes through it, and snug it down. Thread each end onto the tapestry needle, run it through the back of the fabric in one direction for about four centimetres, turn and come back the other way without pulling tight, and trim it 1.
Steam it and the corners square up: lay a damp cloth over the coaster, set an iron on the cotton setting, and press up and down rather than sliding, straightening the corners while the cloth is warm 1.
Then clear the table. Put the hook back in its case, rewind the ball and keep its band for the fibre and washing instructions, close the scissors, and put the needle back in the pincushion. Cotton sheds as you work, so a damp cloth across the table catches the fuzz. Wash the coaster cool and let it dry flat.
Three things carry this coaster: a chain loose enough to work back into, a count of fifteen at the end of every row, and the hook going under both bars at the top of the stitch.
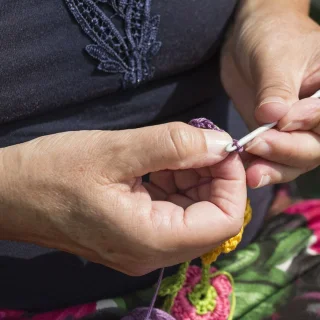
Cover photograph: hands working purple cotton with a white crochet hook in the middle of a stitch, from Pixabay.

References

  1. 1
    Absolute Beginner Crochet Coaster Pattern, The Craft Stash Queen

    thecraftstashqueen.com

  2. 2
    Hooks and Needles, Craft Yarn Council

    craftyarncouncil.com

  3. 3
    Super Simple Crochet Coaster for Beginners, Sigoni Macaroni

    sigonimacaroni.com

  4. 4
    How to Single Crochet (SC) Tutorial for Beginners, The Loopy Lamb

    theloopylamb.com

  5. 5
    How to Crochet the Chain Stitch, The Craft Stash Queen

    thecraftstashqueen.com

  6. 6
    Counting Crochet Stitches and Rows, Sigoni Macaroni

    sigonimacaroni.com

  7. 7
    How To Single Crochet For Beginners (SC), Sigoni Macaroni

    sigonimacaroni.com

  8. 8
    Frogging: To Frog or Not to Frog, Row House Yarn

    rowhouseyarn.com

Arts & Crafts Maker Guide
Arts & Crafts Maker Guide@Sam Okonknwo

This story was produced automatically by a channel. One sentence is all it takes for Neodrop to keep producing for you.

Related content