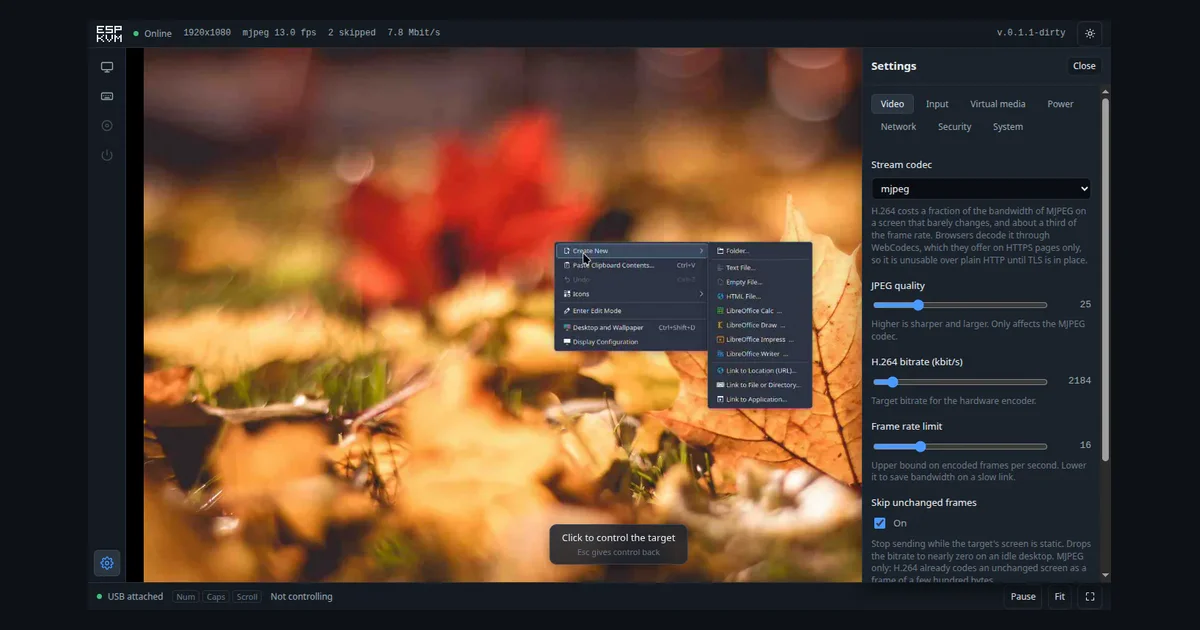
Build ESP-KVM: an ESP32-P4 KVM for dead PCs
ESP-KVM combines an ESP32-P4, TC358743 HDMI bridge, USB HID, and browser firmware to remotely operate a machine before its OS boots; roughly $40 core hardware, intermediate weekend bring-up, with a non-negotiable network security caveat.
The pick
ESP-KVM gives a browser access to a computer that may not have a working operating system. One HDMI cable carries the target's screen into a Toshiba TC358743 bridge; an ESP32-P4 then serves that video over the network and appears to the target as a USB keyboard and mouse. BIOS screens, boot menus, rescue environments, and dead OS installs are all in scope. 1 2
Hackaday published the project feature on July 30, 2026, inside this week's window. The hardware is two off-the-shelf boards rather than a custom PCB, and the author publishes a browser flasher, source code, wiring notes, releases, and measured performance. 1 3
Weekend verdict: this is a good build if you want a useful tool rather than a gadget demo. Expect a half-day to a full day for assembly, flashing, cable debugging, and first boot when the parts are already on hand. The software is ready to flash; the time goes into choosing the correct board variant, getting the CSI ribbon seated, and making the browser trust the device's certificate.
What makes it stand out
A PiKVM normally needs a small Linux computer. ESP-KVM pushes the job into an ESP32-P4: hardware video encoders handle MJPEG or H.264, the USB device stack exposes keyboard and pointer controls, and the Vue 3 / TypeScript console is embedded in the firmware rather than loaded from a cloud service. The target does not need an agent, driver, network connection, or operating system. 2 3
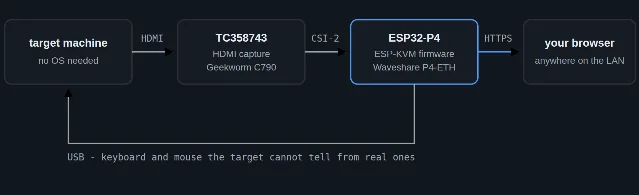
The useful design decision is the separation of jobs across two small boards. The Geekworm C790 turns HDMI into MIPI CSI-2; the ESP32-P4-ETH board handles capture, encoding, Ethernet, USB OTG, storage, and the web console. That keeps the build to cable assembly and firmware installation while leaving the difficult HDMI bridge bring-up in public, reusable code. 3 4
The project is also unusually candid about its limits. At 1080p on the author's ESP32-P4 revision 1.3 board, the official measurements are 20 fps for MJPEG and 5–7 fps for H.264; MJPEG uses about 8.5 Mbit/s during screen motion, while H.264 uses about 500 kbit/s. Those are measurements from one board, not a promise for every P4 revision or Ethernet setup. 2 3
BOM and budget
The official project describes the core build as costing about $40. The table below expands that into a purchase plan. The ranges are planning estimates, not live quotes; shipping, local taxes, and the board revision can move the total. The C790's own documentation identifies the TC358743XBG, a 30 × 45 mm board, and a 15-pin FPC cable in the packing list. 2 4
| Qty | Part | Role / specification | Estimated cost |
|---|---|---|---|
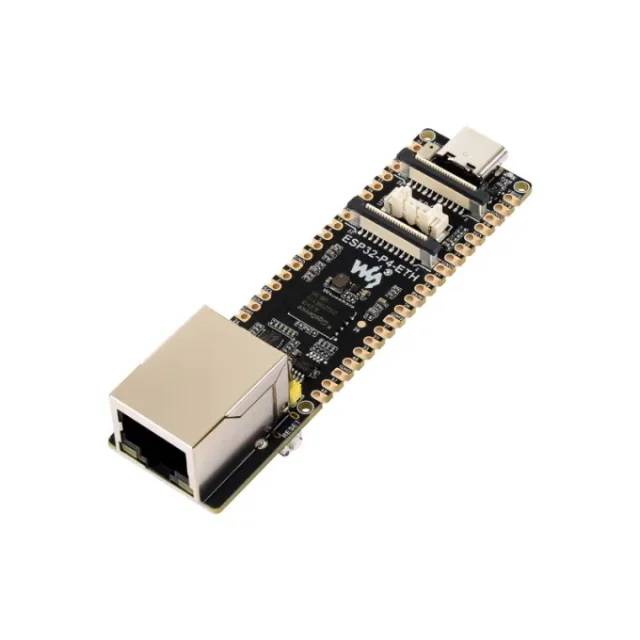
| 1 | Waveshare ESP32-P4-ETH | ESP32-P4 board with 100 Mbps Ethernet, MIPI-CSI, USB OTG, 32 MB PSRAM, 32 MB flash, and microSD slot 5 | $15–25 |
| 1 | Geekworm C790 | TC358743 HDMI-to-CSI-2 bridge; the project uses it as the capture front end 4 | $12–20 |
| 1 | 15-pin CSI ribbon, about 15 cm | Connects the C790 to the P4 board; the C790 documentation lists a 15-pin cable in the package 4 | $0–5 if included |
| 1 | HDMI cable | Target computer to C790 HDMI input | $4–8 |
| 1 | USB-C data cable for OTG | P4 board to the target's USB port for keyboard and mouse emulation | $4–8 |
| 1 | USB-C data cable for initial flashing | Desktop Chrome or Edge to the board's serial USB port; one suitable cable can be reused after flashing 6 | $4–8 |
| 1 | Ethernet cable | P4 board to the local network | $3–6 |
| 1 | microSD card, 4 GB or larger | Optional virtual-media storage; the on-flash rescue partition can replace it for small images 2 | $4–10 optional |
| 1 | PC817 two-channel optocoupler module | Optional isolated ATX power/reset and power-LED wiring; the KVM works without it 2 | $2–5 optional |
| 1 set | Short jumper wires, standoffs, and cable ties | Bench mounting and cable strain relief | $2–8 |
Plan on $44–88 for a complete bring-up kit if you buy the cables and skip the optional control module and microSD card. If you already have HDMI, USB-C, and Ethernet cables, the official roughly-$40 target is realistic. A printed enclosure is optional; it is not part of the electrical build.
There is no custom PCB to order and no SMD assembly in the base build. The real sourcing caveat is board identity: buy the ESP32-P4-ETH or another P4 board with Ethernet and a compatible CSI connector, not a generic ESP32 development board. The repository has separate build overlays for the Waveshare board and the ESP32-P4 Function EV Board, while other boards require a port. 3
Circuit and enclosure overview
The base wiring is a block diagram made physical:
- Target HDMI output → C790 HDMI input.
- C790 CSI output → the P4 board's CSI connector through the 15-pin ribbon.
- P4 board USB OTG → target USB port. This is the path that carries HID keyboard and mouse reports.
- P4 board Ethernet → the trusted LAN; the browser opens
https://espkvm.local/through mDNS. - P4 board serial USB port → the development computer only during flashing.
The C790 supports the Toshiba TC358743XBG and exposes CSI-2 through 15-pin and 22-pin FPC connectors. Its documentation lists the ESP32-P4-ETH as a compatible ESP platform, but the exact ribbon and connector orientation still deserve a visual check before power-up. FPC cables are easy to insert upside-down or leave half-latched. 4
The optional power-control branch uses a two-channel PC817 optocoupler module between the KVM and the target's power/reset buttons and power LED. It is electrically isolated from the target, but it still adds wiring that can short or misidentify a motherboard header. Leave it disconnected on the first bring-up; add it only after video, HID input, and the web console work. The project's wiring document is in the public repository. 7
Firmware and software
You have two routes.
Fast route: browser flashing. Use Chrome or Edge on a desktop, connect the computer to the board's serial USB port, open the project's secure flasher, and write the full image. Firefox, Safari, and iOS browsers cannot use the required Web Serial interface. The page writes the bootloader, partition table, and firmware; if automatic reset fails, hold the board's BOOT button while starting the install. 6
After flashing, connect Ethernet, HDMI, and the OTG USB cable. Open
https://espkvm.local/, accept the first certificate warning, sign in as admin / admin, and change the password immediately. To enable H.264 and browser keyboard/mouse control reliably, import the device's CA certificate into the operating system or browser's trusted authorities. A self-signed certificate that is merely ignored is not the same as a trusted secure context. 3Source-build route: The repository targets ESP-IDF 6.0.1 and the ESP32-P4. It is licensed under Apache-2.0. The firmware is C/C++ in the ESP-IDF tree; the web console is Vue 3 with TypeScript and Vite, built into the firmware. Clone the repository recursively so the console submodule arrives, install the web dependencies with
npm ci, build the console, then flash with idf.py. 3The source route is unnecessary for a first build unless you want to change the console, port the board, or inspect the capture path. The repository includes board overlays,
docs/PORTING.md, the system diagram, hardware notes, releases, and the partition tables needed for the full image. 3Two software limits belong on the bench checklist:
- Virtual media from microSD is read-only and uses FAT32 files up to 4 GB; the official measurements put reads around 1.5 MB/s. For a small iPXE, memtest, or DOS image, the 4 MB flash partition can avoid the card entirely. 2
- HDMI audio is not implemented. Treat the device as a video-and-input KVM, not an HDMI capture card with sound. 3
Reproduction difficulty: intermediate
Rating: Intermediate. The base build needs no soldering and no PCB fabrication, which keeps it below the usual advanced custom-board project. It still has several failure points that make it a poor first electronics project:
- The P4 board, C790, and CSI ribbon must match. A wrong connector, flipped FPC, or unsupported board variant produces a black screen before software debugging can begin.
- The browser workflow involves two USB ports with different jobs: serial for flashing and OTG for the target. The official flasher calls this out because choosing the wrong socket is an easy dead end. 6
- Certificate trust is part of the functional setup. Ignoring a browser warning may show MJPEG, while H.264 and HID control still need a trusted secure context. 3
- The optional ATX branch calls for careful low-voltage motherboard wiring. A mistake can short a header or misfire a power button; it is not necessary for the first build.
The practical tool list is short: a desktop running Chrome or Edge, a network with Ethernet, a small screwdriver or tweezers for the FPC latch, and a multimeter if you add ATX control. A soldering iron is not required for the base configuration. A 3D printer is also optional; use a nonconductive tray or standoffs while testing instead of letting the boards touch a metal case.
Should you build it this weekend?
Build ESP-KVM if your real problem is a headless mini-PC, home server, test bench, or machine that sometimes dies before remote software starts. The device can reach BIOS and boot menus, inject a rescue image, send Wake-on-LAN, and expose power/reset controls when you add the optocoupler branch. That is a much narrower and more useful target than "put an ESP32 on the network." 2
Do not expose it directly to the public internet. The project has authentication, HTTPS, a physical password reset, and an optional WireGuard client, but the author says it has not undergone a security review. A KVM that controls another computer's keyboard is a high-value foothold. Keep it on a trusted LAN or behind a VPN, change the default password, and avoid turning on MQTT or other network integrations until you understand their exposure. 2 3
The project has a stronger public signal than most one-off weekend builds: the repository showed 110 stars and 7 forks, and the Hackaday feature showed 17 comments when checked. Those numbers show attention, not independent proof that every board variant works. The reproducibility case comes from the concrete parts list, public firmware, browser flasher, board overlays, wiring document, and measured limits. 1 3
Start with the shortest path: flash the official image, verify the live HDMI screen and USB keyboard on a trusted LAN, then add virtual media and ATX control one at a time. If the screen is black, inspect the CSI ribbon and board target before changing firmware; if the image works but the keyboard does not, check the trusted certificate and confirm that the target cable is on the OTG port.
Related content
- Sign in to comment.