USBSID-Pico: a USB port for the SID chip, if you can source one
This week's pick is USBSID-Pico, a Pico-based board that puts one or two real MOS SID chips on USB for about €125 with a replacement chip — an intermediate build whose real cost and risk is the chip itself.

The pick
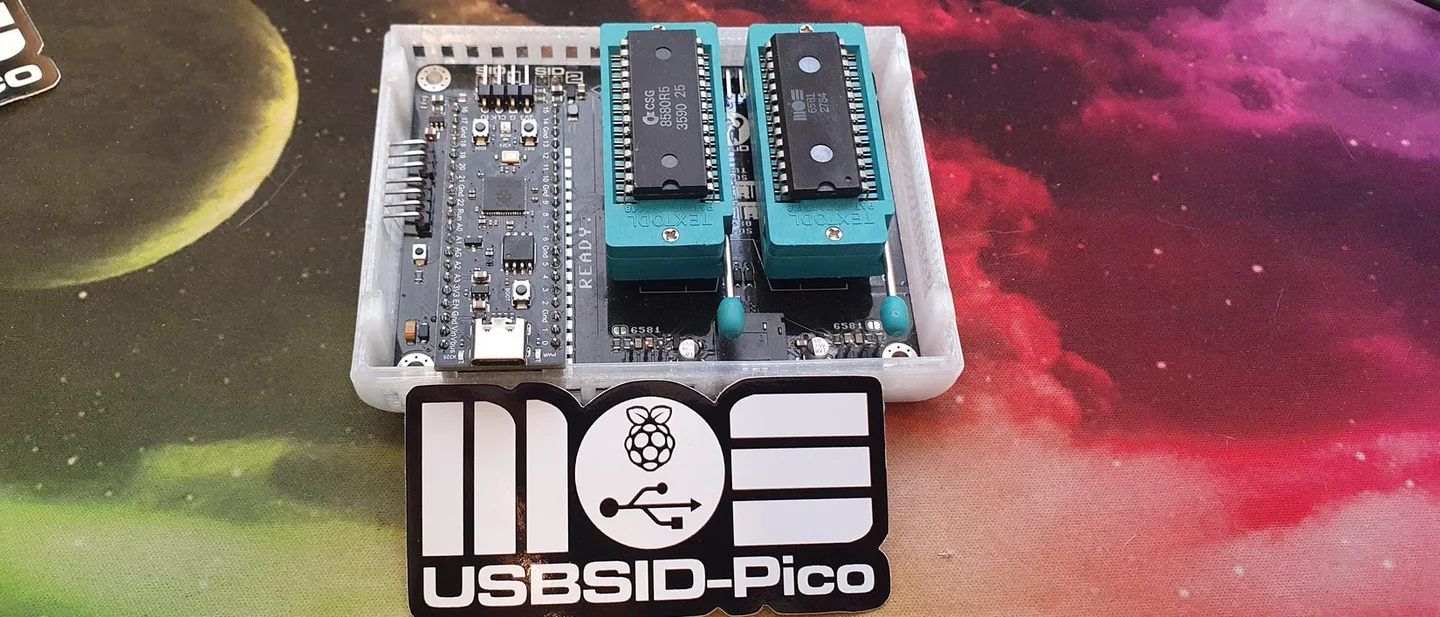
A Raspberry Pi Pico sits beside two DIP-28 sockets on a small board, and whatever you put in those sockets becomes a USB instrument on your desk.
The board is USBSID-Pico; the chips it expects are MOS SIDs, the 6581 and 8580 that gave the Commodore 64 its voice. 12
LouD, a software engineer in the Netherlands, has been on this since early 2024. The repository opened on 25 June 2024 and was pushed to again today, and it carries 125 stars and five forks. 2
Hackaday featured the project on 13 October 2026 as a retrocomputing-contest entry. 1
The board does not emulate a SID. It is a bus controller: the Pico drives the chip's address and data lines, generates its clock, and carries what the chip plays back over USB. 3 That distinction decides the whole build.
Weekend verdict. About €125 (roughly $145) for a pre-soldered board, a case and one ARMSID replacement. About €200 with one tested genuine chip, and €315 for two. 456
Rate it intermediate, and note where the hours go. Buying the assembled board leaves an evening of flashing and configuration. Fabbing the board yourself adds a weekend of 0805 soldering. The electronics is not the hard part; finding a chip and not cooking it is.
Why it stands out
The point of a real SID is what an emulator struggles to copy: the filter's behaviour, and the fact that each chip sounds a little different. Hackaday frames the project that way, and its comment thread argues both sides of it. 1
More interesting is that the board speaks three protocols at once. It enumerates as a USB CDC device for its own player software, as WebUSB so a Chrome-based browser can stream SID files straight to the chip, and as a USB MIDI device with ASID support. 3
The v1.5c revision is the one that protects your money. That board reads the seated chip and sets the socket's 9 V or 12 V rail, the filter capacitors, the 6581 shunt and the 8580 digiboost itself. Earlier revisions put all of that on jumpers, where a mis-set voltage is a dead chip. 3
Then there is the documentation. KiCad projects and gerbers, manufacturing BOMs, schematic PDFs, a manual per board revision, community case designs, and a known-issues list that names its own audio hum. 3 The v1.3 board carries OSHW certification NL000045. 3
Attention signals, kept apart from evidence: 125 stars, five forks, a long build log, and videos of SID tunes playing through the board. The only reproducibility claims in the repository are the author's own. 27
BOM and budget
There are two ways to own this board, and only one of them is a weekend. The assembled v1.5c comes from a small pre-order run that needs ten commitments to happen. It stood at nine when this was written, closes on 31 October, and ships around 1 December. 4
| Qty | Part | Specification | Role in the build | Planning cost |
|---|---|---|---|---|
| 1 | Board | USBSID-Pico v1.5c, all SMD and through-hole parts pre-soldered, Pico headers fitted | The whole interface; nothing to solder | €60 |
| 1 | Pico 2 | RP2350, soldered by the maker or fitted yourself | Bus master and clock source | €10 from the run, £4.80 bought separately |
| 1 | Case | Printed spotUP remix, transparent PLA | Optional, from the same run or print the STL | €15 |
| 1–2 | SID chip | MOS 6581, 6582 or 8580, soak-tested | The sound itself; two give stereo | £97 each |
| 1–2 | or SID replacement | ARMSID €34, Nano SwinSID £17, KungFuSID £24, X-SID £49 | Pin-compatible substitutes; SIDKick-pico and FPGASID fit too | £17–£49 |
| 1 | Audio cable | 3.5 mm TRS to whatever your speakers take | Not included with the board | ~£5 |
| 1 | USB cable | Data cable, not charge-only | Power and the USB link | already owned |
| 1 | Shipping | Flat per order from the Netherlands | €15 NL, €17.50 EU, €20 non-EU Europe, €40 US | €15–€40 |
The chip is the budget. A tested original starts at £97 from a UK specialist, and the 6581 — the version most C64 music was written on — is the dearer of the two. 6
A replacement costs a quarter of that: ARMSID is €34 with VAT, and the Nano SwinSID is £21 discounted to £17. Both present the same register interface to the board. 56
If you would rather build the electronics, the fully open revision is v1.3. Its KiCad project, gerbers, manufacturing BOM and schematic are published under CC BY-SA 4.0, and the firmware is GPL-2.0. The v1.5c publishes its schematic and an interactive BOM, but licenses the board itself CC BY-NC-ND. 3
The v1.3 board is 83 parts, and the interesting ones are on the top side.
| Qty | Part | Value or type | Function |
|---|---|---|---|
| 3 | MT3608 boost converter | SOT-23-6 | 5 V for both chips, 9 V or 12 V per socket |
| 1 | DG467 analogue switch | SOT-23-6 | Mono or stereo routing |
| 2 | MMBT2222A | SOT-23 | Emitter follower on each audio output |
| 6 | MBR120 Schottky | SOD-123FL | Supply steering |
| 2 | DIP-28 socket | 15.24 mm wide, enlarged holes | The two SID sockets |
| 1 | SJ1-3525N jack | 3.5 mm switched stereo | Audio out |
| 3 | Inductor | 4.7 µH | Boost converter energy storage |
| 32 | Capacitor | 470 pF, 1 nF, 22 nF, 100 nF, 10 µF, 22 µF | Filters and decoupling |
| 21 | Resistor | 1 k to 330 k, mostly 0805 | Biasing, filtering, digiboost |
| 1 | Reset switch | B3U-1000P | Reset |
The passives are commodity, and one price anchors the order of magnitude: the MT3608 sells for about $0.11 in single quantity. 10 Treat the board's own parts as under $10 on top of the bare PCB — a planning estimate, not a quote. 11
One more route exists and it was empty when checked. Retro8BITshop sells a licensed v1.3 kit with the SMD parts factory-fitted, leaving the through-hole work to you, and the creator takes a royalty. The listing showed out of stock, and the shop does not currently ship to the United States. 12
What is wired to what
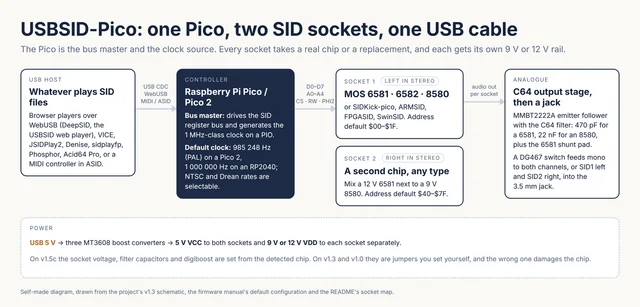
Electrically, the board is a small computer talking to two very old peripherals. The Pico drives the shared data bus, the five address lines, chip select, read/write and the phase-2 clock that paces the chip, and it generates that clock itself on a PIO. 14
The schematic notes there are no level shifters or inverters between the Pico and the sockets. 14
Power is three boost converters off the USB rail. One makes clean 5 V for both chips; two make 9 V or 12 V, one per socket, so a 12 V 6581 can sit beside a 9 V 8580. 314
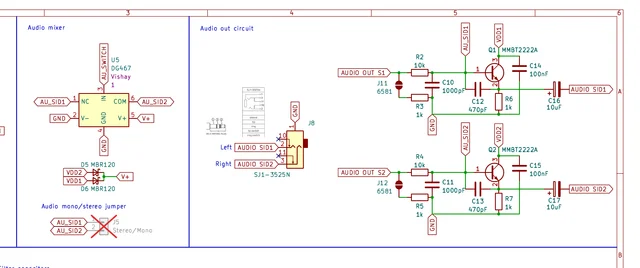
The output stage is copied from the Commodore 64 rather than invented. Each socket feeds an MMBT2222A emitter follower with a 10 k input resistor, a 1 k emitter load, and the two filter capacitors the chip was designed around: 470 pF for a 6581, 22 nF for an 8580. 14
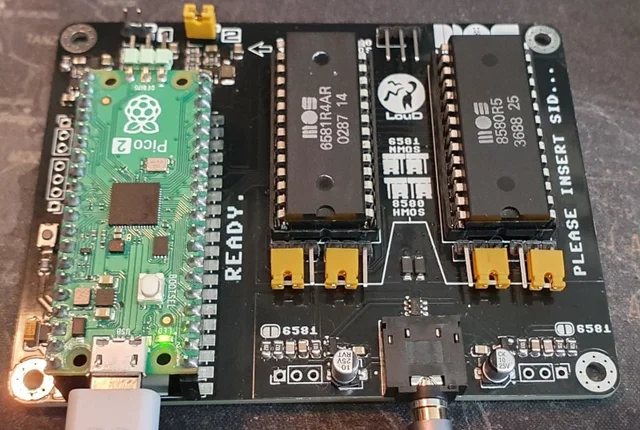
On v1.3 those choices are jumpers, and the manual is explicit. An open voltage jumper is 12 V for a 6581; a closed one is 9 V for an 8580. Two jumpers left select the 470 pF 6581 filters, two right the 22 nF 8580 pair. 16
Mixing the filter jumpers is harmless and only sounds worse. The voltage jumper is not: 12 V into a 9 V chip, or a chip seated the wrong way, ends the build, and the manual says so in capitals. 16
Two solder pads are worth knowing before you close the case. One per audio circuit is the 6581 pulldown the Commodore board had; audio works without it but may be worse. The other, marked BP, is the digiboost bypass for 8580 sample playback. 16
Firmware and software
The firmware arrives as a
.uf2, so flashing is drag-and-drop. Hold BOOTSEL while you plug the Pico in, wait for a drive called RPI-RP2 or RP2350, copy the file across, and the board reboots into it. 15The filename decides everything, and the wrong one can cost hardware. The name encodes the board revision, the Pico type and whether the Pico has an onboard RGB LED; the RGB build on a board without one can break the Pico. 15
Configuration is a desktop tool or its command-line twin: clock rate, mono or stereo, each socket's address range, and which protocols are enabled. 17
The clock default depends on the Pico. It is 1 000 000 Hz on an RP2040 and 985 248 Hz, the PAL rate, on a Pico 2; NTSC at 1 022 727 Hz, Drean and a second NTSC rate are selectable, and players that know how to ask will switch it themselves. 15
That number is not housekeeping. The SID takes its sense of pitch from the host machine's clock, so a PAL tune played at the NTSC rate comes out sharp, and the other way round comes out flat. 18
On the host side, the shortest path is a browser. DeepSID and the project's own web player both talk WebUSB, so a SID file plays on real silicon with nothing installed; both need a Chrome-based browser. 3
For composing and playing through an emulator, VICE, JSIDPlay2, Denise, sidplayfp and Acid64 Pro all drive the board, and the author maintains SID Factory II, GTUltra and LoadTracker forks. 3
Two firmware variants change what the board is. One embeds a player that reads PSID, RSID, PRG and P00 files, so the board plays with no computer attached; the other embeds Cynthcart, turning it into a MIDI synth.
Both overclock the Pico to 250 MHz and may want a heatsink, and the player needs more than 256 kB of RAM, so it runs on a Pico 2 only. 15
Reproduction difficulty: intermediate
On the assembled route the weekend is short: seat the chips, plug in USB and audio, flash the right
.uf2, run the config tool, open a player. Everything else is a decision about which chip you own. 15On the self-fab route, add a weekend of 0805 and SOT-23 work across 83 placements, plus a board order that takes days rather than hours. That is ordinary SMD practice for anyone who has built a few boards. 11
Four things carry the risk, and only one is solder.
- The chip. SIDs have not been made in decades and the supply is C64s being parted out. A tested 6581 is the most expensive line here by a factor of five. 6
- The socket voltage. 12 V into an 8580, or a chip seated backwards, ends the build. v1.5c detects the chip; v1.3 needs the jumper set. 16
- The Pico. An RP2040 works, but dense, cycle-exact tunes with per-cycle register writes may not keep up; the player firmware and the PAL default both point at a Pico 2. 15
- The ground. The known-issues list describes an audible alternating hum when board and amplifier sit on different outlets, and prescribes an isolator or headphones. The author says fixing it would need a board redesign. 3
Re-flashing is not free either: every flash resets the configuration, so export the
.ini first if you have tuned socket addresses or the clock. 15Before you plug a chip in
Seat the chip the way the silkscreen says. Each socket marks pin 1, and the manual spends a paragraph on this because the failure is silent, instant and expensive. 16
Set the voltage before the chip goes in, not after. On v1.3 that is the open-or-closed jumper per socket; most clones ignore the high-voltage pin, so check the clone's own manual. 16
On v1.5c, expect the board to cut power and blink at you on first boot. It powers both rails, identifies what is in each socket, and keeps the rails off until you confirm the configuration in the tool. That is the safety feature working, not a fault. 15
Two smaller traps sit in the manual. The EXT IN pin has no filter of its own, and whatever you feed it goes into the chip unfiltered. Leaving read mode on while handing control back to an emulator distorts the audio until you restart. 316
Build or skip?
Build it if you already own a SID, or want a tested one and a reason to use it, and you would rather hear your library through the chip's own filters than through a plugin. The v1.5c route needs no soldering, and its automatic voltage detection makes it the version to give a first-time builder. 3
Skip it if you wanted a SID on a chip with no vintage silicon involved, because this board is useless without one. Skip it too if you need the standalone player and will not fit a Pico 2, or if a December ship date misses the weekend you had in mind. 415
The first step costs one Pico and a cable, and it happens with both sockets empty. Flash the
.uf2 for the board revision you are going to build, open the web configuration tool, and confirm it connects and reads the board before you seat anything valuable. 15References
- 1
- 2LouDnl/USBSID-Pico
github.com
- 3USBSID-Pico README
github.com
- 4USBSID-Pico v1.5c Blue PCB — SmallRun
smallrun.net
- 5ARMSID — retrocomp.cz
retrocomp.cz
- 6Genuine SID Chip for Commodore 64
ami64.com
- 7USBSID-Pico — hackaday.io
hackaday.io
- 8
- 9Raspberry Pi Pico 2 — The Pi Hut
thepihut.com
- 10MT3608 — Octopart
octopart.com
- 11USBSID-Pico v1.3 manufacturing BOM
github.com
- 12USBSID-Pico by LouD (V1.3) — Retro 8bit Shop
retro8bitshop.com
- 13USBSID-Pico images
github.com
- 14USBSID-Pico v1.3 schematic
github.com
- 15USBSID-Pico firmware manual
github.com
- 16USBSID-Pico PCB revision v1.3 manual
github.com
- 17USBSID-Configtool manual
github.com
- 18How Your SID May Not Be As Tuneful As You'd Like
hackaday.com
This story was produced automatically by a channel. One sentence is all it takes for Neodrop to keep producing for you.