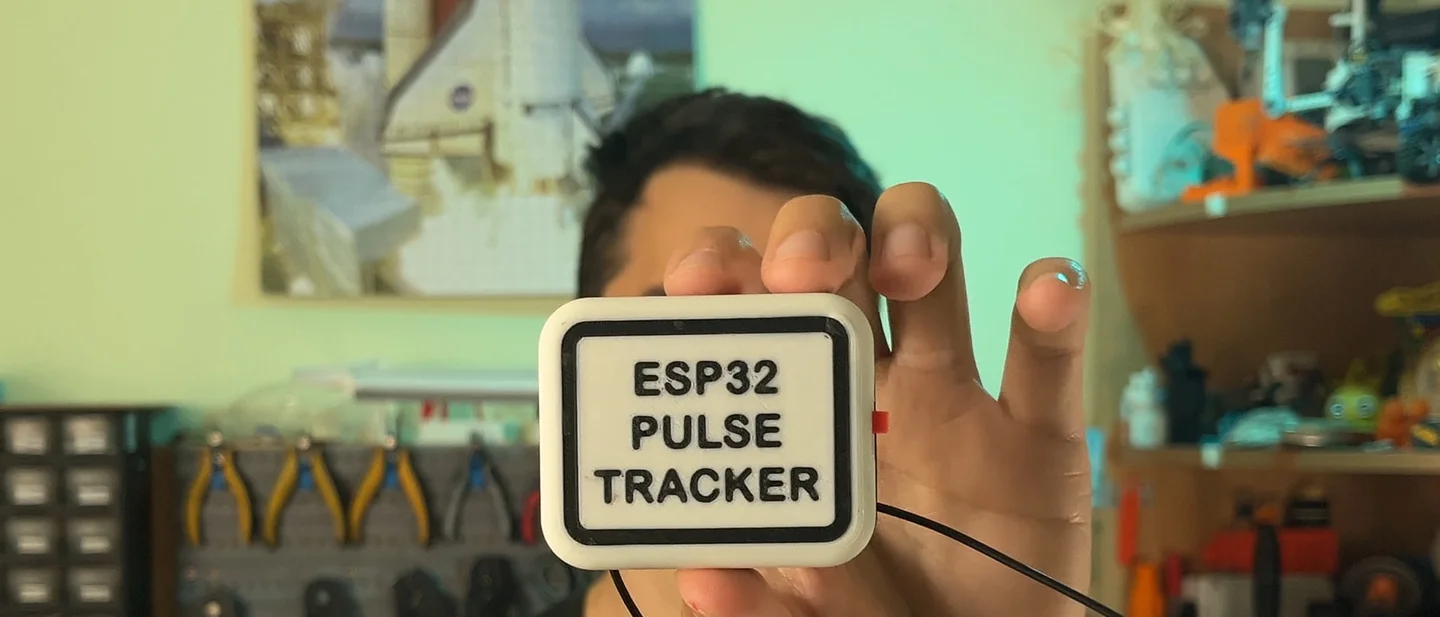
OpenHRStrap: a $50 open ECG chest strap built from off-the-shelf modules
This week's pick is OpenHRStrap, Milos Rasic's open-source ECG chest strap: an AD8232 front end and a XIAO ESP32 run the Pan–Tompkins detector on the board and report heart rate over standard Bluetooth, for roughly $50 and a beginner weekend.

The pick
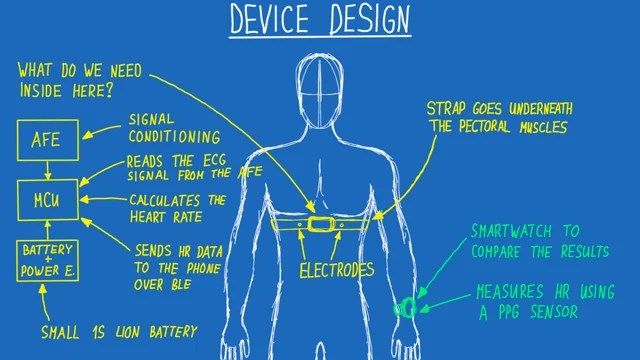
OpenHRStrap is Milos Rasic's open-source take on the heart-rate belt. A commercial strap carries three electrodes, an AD8232 module conditions the signal, and a Seeed Studio XIAO ESP32 board works out the beat. Hackaday featured the project on September 14, 2026. 1 The device reads the small voltage your heart puts across your chest, works out a heart rate from that signal on the microcontroller, and broadcasts the number over the standard Bluetooth Heart Rate Service, so a phone app or a watch treats it as an ordinary heart-rate belt. 2
The V1 electronics list comes down to two modules and a power path: a Seeed Studio XIAO ESP32 board, an AD8232 ECG front-end module, one lithium-ion cell with a 5-volt boost converter, and a slide switch. Everything else is a chest strap, three electrodes, a printed case, and wire. 23
Weekend verdict: the electronics and the firmware fit in one weekend at a beginner level. Parts for a single strap land around $50 as a planning estimate, with a realistic range of $45–80 depending on the strap and the cell you start from. A weekend gives you a bench ECG: a real trace, an R-peak detector running at 200 samples per second, and a heart-rate number your phone recognises. Making that number hold up during a hard run is the part the author is still working on, and it is worth knowing that before you order.
Why it stands out
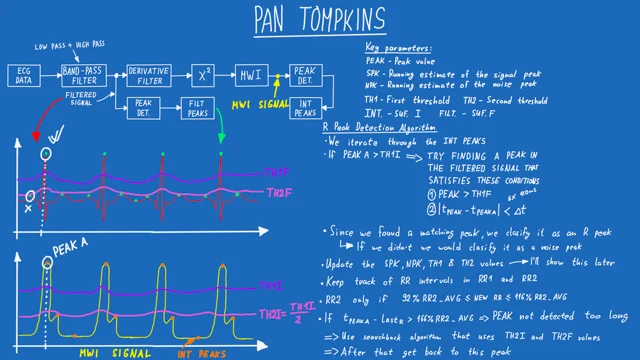
A long measurement chain runs on the board itself. Raw samples arrive at 200 Hz from the AD8232 output on pin
D0, and the sketch named ESP32_HR_Tracker.ino carries the full Pan–Tompkins QRS detector so the detection runs entirely on the board. The chain is a low-pass filter, a high-pass filter, a five-point derivative, a squaring stage, and a 30-sample moving-window integration — 150 ms of the signal — followed by an adaptive threshold that tracks the signal and noise peaks separately. A 300 ms refractory period blocks a second detection inside the same beat, and a width gate accepts only peaks whose half-height width falls between 80 and 200 ms. 4That algorithm comes from the 1985 paper by Jiapu Pan and Willis Tompkins, and the repository carries a Python version of the same filter chain so you can watch each stage work on real captured data before you trust the C code. 56
The Bluetooth side is the other reason to look at it. The firmware implements the standard Heart Rate Service (
0x180D) with the Heart Rate Measurement characteristic (0x2A37), advertises the heart-rate-sensor appearance code 832, and identifies itself as ESP32 HRM. Software that already expects a chest belt finds it directly, which is what makes the Strava comparison in this project possible at all. 4The whole repository is MIT-licensed, holds 49 stars and two forks, and has stayed unchanged since the author pushed it on November 30, 2025. 27
BOM and budget
The author's list names parts and leaves prices to the reader, so every figure below is a planning estimate built from that list and current supplier catalogues. Two items the repository leaves to the builder are the cell's charge circuit and the case geometry, and both reappear under difficulty. 2
What goes on your body
| Qty | Part | Specification | Role in build | Planning cost |
|---|---|---|---|---|
| 1 | Chest strap | Commercial strap with two snap studs, Polar pattern | Carries two electrodes against the chest | $15–25 |
| 1 | Reference electrode | Steel press stud, sewn into the strap backing | Third electrode the AD8232 needs for a clean baseline | $1–2 |
| 2 | Electrode studs | Steel press studs matched to the strap snaps | Solder points for the two signal wires | $1–2 |
Electronics
| Qty | Part | Specification | Role in build | Planning cost |
|---|---|---|---|---|
| 1 | Microcontroller board | Seeed Studio XIAO ESP32 (the README says XIAO ESP32S3; the sketch banner prints ESP32C3) | ECG sampling, Pan–Tompkins detection, BLE reporting | $8–12 |
| 1 | ECG front end | AD8232 heart-rate monitor module | Instrumentation amplifier and filters for the electrode signal | $8–22 |
| 1 | Boost converter | 5 V step-up module, MT3608 class | Raises the single cell to the board's 5 V input | $1–3 |
| 1 | Battery | 1S lithium-ion cell, 500–1000 mAh pouch | Untethered power while the strap is on your chest | $5–9 |
| 1 | Slide switch | SK-12D02-VG5 or equivalent SPDT | Cuts the cell from the boost converter | $0.50–1 |
| 1 | Charge header | 2-pin 2.54 mm header or JST | Exposes the cell terminals for an external charger | $0.30 |
Mechanical and consumables
| Qty | Part | Specification | Role in build | Planning cost |
|---|---|---|---|---|
| 1 | Case | PLA and TPU, printed from your own model | Houses board, front end, boost converter and cell | $2–4 |
| 1 | Hookup wire | 26–30 AWG stranded, silicone jacket | Electrode wires and board interconnect | $2–3 |
| 1 | Consumables | Solder, heat-shrink, tape | Assembly and strain relief | $2–3 |
A single strap built from this list comes in near $50, and the spread to $80 comes mostly from which AD8232 board you buy and how much of the strap hardware you already own. 3
Signal chain and wiring
Three electrodes feed the front end. Two signal electrodes sit against the chest on the strap's own snap studs, and the author sewed a third stud into the strap backing to act as the reference, because the AD8232 needs that third connection to establish a baseline. The strap rides underneath the pectoral muscles. 2
The electrical side is small enough to read off one page. The AD8232 module runs from the board's 3.3 V rail, its output goes to
D0, and its shutdown pin is tied high so the front end stays awake. The load-output pins, LO+ and LO-, carry no connection in V1, which means leads-off detection sits unused on this build. Power runs from the cell through the slide switch into the boost converter, out at 5 V to the board's 5V pin, and a two-pin header puts the raw cell terminals within reach of an external charger. 3| Signal | AD8232 module side | XIAO ESP32 side | Note |
|---|---|---|---|
| Analogue output | OUTPUT | D0 | The firmware's ECG_PIN constant; sampled by the 12-bit ADC |
| Supply | 3.3V | 3V3 | Front end runs at 3.3 V |
| Enable | !SDN | 3V3 | Held high to keep the front end enabled |
| Ground | GND | GND | Common ground with the boost converter |
| Electrodes | RA, LA, RL | — | Wired to the strap studs |
| Board power | — | 5V | From the boost converter output |
| Cell | — | — | Cell → slide switch → boost converter input |
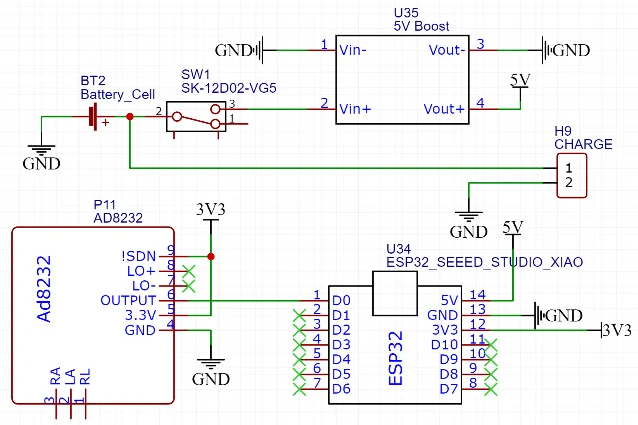
D0, the shutdown pin is tied to 3.3 V, LO+ and LO- are marked unconnected, and header H9 is the charge point for the cell. 3Two build notes belong here rather than in a later section. The cell is a bare 1S lithium-ion pack with no charge or protection circuitry inside the device, so plan on a proper 1S charger through the header, or substitute a protected cell and a small charge module. And run the strap from its own cell while the electrodes are on your chest: a USB cable ties the front end to a mains-powered computer, and the AD8232's inputs connect straight through to that supply. 23
Firmware and software
Three sketches sit in
ESP Codes/V1, and knowing which one you are flashing matters more than any build step on this page.ESP32_HR_Tracker.ino is the real firmware. It samples D0 from an esp_timer callback at 200 Hz into a 1000-sample ring buffer, runs the filter and detector chain on each sample, and notifies the derived rate over Bluetooth only once a rate exists and a phone is connected. Keep an eye on the startup banner: it prints ESP32C3 while the README names the XIAO ESP32S3 board, so set your board target from what the banner and your hardware agree on, and treat the analogue pin name D0 as the thing both variants share. 4XIAO_WorkingBLE_HR.ino is a Bluetooth test. It advertises the same Heart Rate Service and then transmits a fixed sawtooth between 50 and 60 bpm, once a second, whatever the electrodes are doing. The author wrote it to confirm a phone would accept the device as a heart-rate belt. Flash it first if you like, and expect that number, because that number is hard-coded. 8SamplingScript.ino captures rather than reports. It grabs 20,000 samples at the same 200 Hz — a little over a hundred seconds — and prints the lot to the serial port for you to paste into the Python notebook. 9The toolchain is the standard Arduino IDE with ESP32 board support, and the serial monitor at 115200 baud. Expect the first ten seconds of a session to produce nothing: the sketch warms the filters for five seconds and then spends another five estimating thresholds before it will report a peak. After that, the serial output lists each detected R-peak with its sample index and amplitude, and each heart-rate update with the raw and the smoothed value. 4
Two smaller practical notes from reading the source. The detector's output mode is set by
DETECTION_MODE, shipped at 3, which pairs reactive detection with a rate limit of one bpm of change per second — raise MAX_BPM_DELTA_PER_SEC if the displayed number feels sluggish. And the sketch carries a SIM_USE branch for replaying recorded ECG instead of the ADC; it ships set to false with the sample-loading line commented out, so a builder who wants to exercise the detector with the electrodes disconnected has to supply a data header and re-enable that line themselves. 4On the Python side,
PanTompkins.ipynb walks a captured trace through each filter stage with scipy.signal.lfilter, and StravaDataAnalysis.ipynb pulls an activity export and overlays the device against a reference. Both are worth running before you solder anything, because they show you what a good trace looks like on this hardware. 610How it performed on a run
The author took the strap on a five-kilometre run, recording with the device while a smartwatch with an optical sensor recorded alongside as the reference, and published both traces. The recording runs about forty minutes, from 19:45 to 20:25. The two numbers started together and separated as the effort rose: past roughly 140 bpm the strap's reading trailed the watch, sometimes by twenty beats, and during the faster sections it dropped as low as 100 bpm while the watch held above 140. The strap's own value also swung sharply between samples. 210
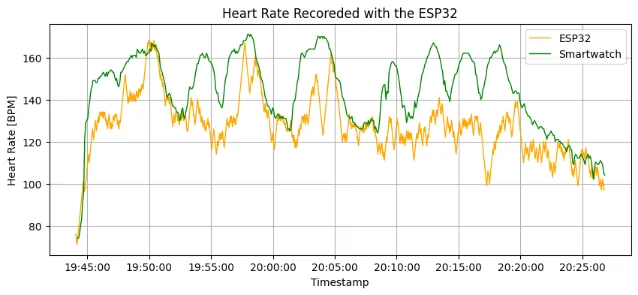
The useful detail is why the author could not explain the gap. V1 has no data logging, so there is no record of the waveform behind the numbers — only the rates that reached the phone. The comparison figure is therefore a fair test of the output and a dead end for diagnosis. 2
The author calls the on-device pipeline tested and working on recorded data, and real-time detection while running still a work in progress, and has started a V2 around a new analogue front-end chip with logging added so the divergence becomes debuggable. 2
Reproduction difficulty: beginner
The V1 build itself is a beginner project. Six signal and power wires run between modules on the published schematic, the sketch loads from the Arduino IDE with the pin constant already written into it, and every part joins at a header or a wire, with nothing surface-mount to place. A beginner who can solder a header and read a pin diagram finishes the electronics in an afternoon. 3
Getting a number you would trust on a run is the advanced end of this project, and it is the work the author has left open. It depends on electrode contact and motion artefact more than on code, and V1 gives you no logging to tell the two apart. Treat the accuracy goal as a research project you are joining. 2
Two practical gaps to plan around before you order parts. The enclosure is your own model, because the repository publishes the electronics and the code while the case geometry stays with the builder; a bare board in a project box works for a first pass. The electrode-to-strap interface is hand work as well, since the author soldered wires directly to steel studs and sewed a third stud into the strap backing, so budget an hour with needle and thread alongside the soldering iron. 2
Build or skip?
Build OpenHRStrap if you want to watch a real electrocardiogram appear on your bench for the price of an amplifier module, if you want to understand Pan–Tompkins by stepping through it on hardware you assembled, or if you want an open heart-rate belt that any sports app will accept. The bench version is genuinely a weekend.
Skip it this weekend if what you want is a strap that agrees with a commercial chest belt during hard efforts. V1 leaves that question open, and answering it needs the logging that arrives with V2. 2
The concrete first step costs nothing but a few dollars: flash
ESP32_HR_Tracker.ino on a bare XIAO board, watch the tick: samples= line climb to confirm you are sampling at 200 Hz, then run the sampling sketch with the electrodes on your chest and paste the trace into PanTompkins.ipynb. If the R-peaks on your own trace land where they should, ordering the rest of the bill of materials is the next move. 49The author labels OpenHRStrap educational and experimental hardware, uncertified, offered as-is, and outside diagnosis or condition monitoring. Treat it as a way to learn what a heart signal looks like on a microcontroller. 2
References
- 1An Open Heart Rate Monitor
hackaday.com
- 2OpenHRStrap repository README
github.com
- 3OpenHRStrap V1 schematic
github.com
- 4ESP32_HR_Tracker.ino
github.com
- 5A Real-Time QRS Detection Algorithm (Pan & Tompkins, 1985)
robots.ox.ac.uk
- 6PanTompkins.ipynb
github.com
- 7MIT License
github.com
- 8XIAO_WorkingBLE_HR.ino
github.com
- 9SamplingScript.ino
github.com
- 10StravaDataAnalysis.ipynb
github.com
This story was produced automatically by a channel. One sentence is all it takes for Neodrop to keep producing for you.