Neodrop
Create
FeedDiscoverMy ChannelsAuto-publishJoin Our Discord
Neodrop
A smoother experience in the app
FeedDiscoverCreateMy Channels
2026-11-22

Coil Your First Rope Bowl: A Calm Wrap-and-Stitch Session

Arts & Crafts Maker Guide
Arts & Crafts Maker Guide@Sam Okonknwo
Coil Your First Rope Bowl: A Calm Wrap-and-Stitch Session

In front of you is a length of rope, a ball of yarn and a needle, and by the end of this evening that rope will be a small bowl. Arts and Crafts Maker Guide. The craft is called coiling, and it is one of the oldest things people make.

0:00 / 10:12
A bowl made of rope begins as one length of cord, wound round and round on itself and stitched shut as it goes. Nothing is woven over and under. The rope is the skeleton, the yarn is the skin, and every few turns a stitch ties the new ring to the ring beneath it.
Basketry is one of the oldest crafts there is, and the basket-weaving entry on Wikipedia makes the reason plain: grass, wood and cord rot, so almost nothing survives. What we have instead are the marks baskets pressed into floors and into fragments of bitumen in the Middle East, and the baskets lifted out of a cave at Nahal Hemar 1. The craft is still worked in coils today, from the sedge baskets of the Ngarrindjeri women of South Australia to the coiled baskets of California and the Great Basin 1.
This is a first session: one length of cord, one needle, one small bowl, about an evening's work. Work through these notes in the order the episode takes them, so you can check a step whenever your hands are busy.

What you'll need

  • A core. About a quarter of an inch thick: cotton piping cord from a fabric shop, or nylon clothesline, which hardware shops cut by the foot. The maker Erin, writing for Hand Madiya, makes a bowl five inches across from roughly twenty-five feet of nylon clothesline; the Topeka and Shawnee County Public Library's coiled-basket guide builds a smaller basket from fifty-four inches of quarter-inch piping cord 23. Round boot laces make a lighter core if your yarn is thin 3.
  • Wrapping. About twenty yards of medium-weight yarn, or roughly fifty feet of hemp twine 23. Leftover skeins too short for a scarf are exactly the right size for this.
  • A tapestry needle — blunt, with an eye big enough for your yarn. Metal is sturdier; plastic will do. If you buy one thing for this project, buy the needle.
  • Scissors.
  • A little masking tape, if you like.
  • A bowl, a jar or a bottle, optional, to use as a form when the walls go up 2.
You do not need a kit, a loom or glue. Hemp twine gives a compact, firm bowl; yarn gives a softer, fuzzier one 2.

Set up your table

Work at a flat table in good light rather than in your lap. In your lap you cannot see whether the base is lying flat, and the base is what everything else rests on. Lay the rest of the cord out to one side in a loose hank and keep the working length clear of the yarn, which is what the library guide asks: keep the end of the cord free of tangling with your length of yarn 3.
Roll your sleeves back. The hazards here are small and real: scissors, kept closed between cuts, and a needle that will go into a fingertip if you push it towards yourself, so push away from your hand and keep the other hand behind the point. Wrapping is repetitive, so shift your grip every few minutes.
There are no fumes, no heat and no powders in this craft, so no mask, no gloves and no fan. Keep drinks off the table and wash your hands before you eat.

Taper the end and make the centre

Cut one end of the cord on a long slant, so it runs from full thickness down to a point. The taper is the difference between a lump in the middle of the bowl and a flat one 2.
Thread a yard or two of yarn onto the needle. With hemp twine, Erin cuts six feet, folds it in half and threads both ends, so the twine is doubled and about six inches of tail hangs past the eye 2.
Fasten the yarn to the cord about an inch and a half back from the tapered tip. The library guide ties a knot there; Erin's version lays the looped end of the twine flat on the cord, wraps it round and back through its own loop, and pulls it tight 23. Either way, wrap towards the tip until the yarn starts to slide off, then wrap back over what you just did, two or three turns, and the tip is locked 3.
Pinch the wrapped end into a tight little loop, like the eye of a needle, and hold it. Wrap the yarn around both strands of the loop until the hole in the middle is closed and covered. Then push the needle through the middle of the coil, pull the yarn through, and wrap around the new ring a few times to stitch it shut.
The library guide calls this spot the point of movement, and says plainly that it can be tricky; her advice is to unwrap it and start again if you are not happy with it 3. Everyone redoes the start. The checkpoint is a small, firm disc you can lay on the table without it springing open.

Wrap and stitch, wrap and stitch

Once the centre holds, the bowl is a rhythm: wrap the yarn round the bare cord a few times, anchor it to the ring beneath with a figure-eight stitch, then go back to wrapping.
The figure-eight is easier to do than to hear described. Push the needle down between the two rings, from the inside of the bowl out, then bring it back up over the working cord and pull; the yarn crosses twice, between and over, which is why it holds 3.
How many wraps between stitches is your choice, and the two guides disagree, which is reassuring. Erin wraps three times and then makes a figure-eight 2; the library guide wraps five 3. Choose one count and keep it, so the bowl stays even.
Pull each wrap snug — flat against the cord, with no rope showing through — but not so hard that the ring beneath buckles. Every few minutes, press the base flat on the table with the flat of your hand. The rings should be shut against each other with no daylight between them, and the disc should sit flat rather than rocking.
When the yarn runs short, stop with about two inches left. Lay that tail along the bare cord, lay the new length beside it with an inch and a half overlapping, and wrap the new yarn straight over both ends; the join disappears under the wrap 23.

Build the wall

A first bowl wants to be small and shallow. The wider the base, the more rope there is to keep flat before a wall can begin, so stop widening at about five inches across.
To turn the corner, do not lay the next ring flat beside the last one. Lay it slightly above it, resting on top, so the spiral starts to climb 3. You can shape it freehand, steering the curve with your fingers as you stitch, or stand a small bowl, a jar or a bottle on the base and wrap the coils up against its side and let the form decide the shape 2.
Reading the wall takes one finger along the inside of the last ring: sitting straight over the ring below, the wall goes up; leaning outward, the bowl flares; leaning in, it closes towards a neck. Change it by changing where you lay the next ring, not by pulling on what is already stitched.

Finish the rim

When the bowl is as tall as you want it, look at the cord you have left. Cut the end on a slant, the same taper you made at the start, and stitch that tapered end down to the ring below with figure-eight stitches 2.
Then wrap the yarn around the tapered end and the ring beneath as though the two were a single row of cord, so the end vanishes into the rim. Run the needle back along the inside through three or four of the figure-eight stitches, tucked under the wrapped yarn, pull it snug and trim close 23.
Press the bowl between your hands, put it down and walk away from it for a minute. Coming back to it across the room is how you see whether the rim sits level.

If something goes wrong

  • The start is loose or lopsided. Unwrap it. The first attempts are practice, and the cord is not damaged by being unwound 3.
  • A gap opens between two rings. Look at where you last stitched: a figure-eight has been missed, or the wrap count has drifted. Stitch the gap shut from the inside and carry on.
  • The yarn keeps sliding off the tapered tip. Wrap back over the last few turns instead of forwards, which is how both guides lock the end 23.
  • The cord tangles in the working yarn. Stop, lay the hank out flat and free it before going on; a tangle you wrap through becomes a knot in the wall 3.
  • Your fingers get sore. Hemp twine is rough, and Erin warns that fingers can get raw while wrapping. Shift your hold so a different part of the finger takes the rub, move your hand slightly as you work, and take a break 2.
  • The bowl comes out soft and fuzzy. That is yarn, not a mistake: hemp twine gives a firmer, tidier bowl and yarn gives a softer one 2.

Questions

Do I need a basketry kit? No. A core, a wrapping, a tapestry needle and scissors are the whole list, and a kit, a loom and glue are not part of it 3.
Yarn or twine? Both work and they give different bowls. Hemp twine is tightly woven and strong and makes a compact, tidy bowl; yarn makes a softer, fuzzier one 2.
How big should the first one be? About five inches across, with a shallow wall. A wider base means more rope to keep flat before the wall can start, and more chance of losing the shape.
What happens when the yarn runs out? You join it under the wrap: lay the old tail along the bare cord, lay the new length over it, and wrap the new yarn across both ends so the join disappears 23.
Can I stop before the wall? Yes. A flat, round coil is a trivet for a teapot or a plant pot, and it takes a fraction of the cord.
Why is the base cupping upward? The wraps are pulling harder than the coil wants to lie. Ease the tension for a few inches and press the base flat as you go.

Variations, and what to do with it

Once one bowl is done you have the whole craft, and everything else is a change of material. Thicker cord makes a thicker coil and builds volume faster; thinner cord makes a finer, slower bowl 2. Fabric strips cut from an old shirt wrap like yarn and use up cloth instead of yarn. Stop before the wall goes up and you have a flat, round trivet for a teapot or a plant pot. The finished bowl is a place for keys, for stitch markers, for the odds and ends that collect on a hall table.

Tidy up

Close the scissors and put them back in the drawer. Park the needle somewhere named — a pincushion or its packet — so it does not roll off the edge and into a carpet. Hank and tie the leftover cord, and put the offcuts in the bin rather than on the floor. Wash your hands, and leave the bowl on the table where you can see it tomorrow.
Three things carry a first bowl: a centre pulled tight enough to hold its own shape, a stitch that goes in after every few wraps, and the willingness to unwind the first attempt.
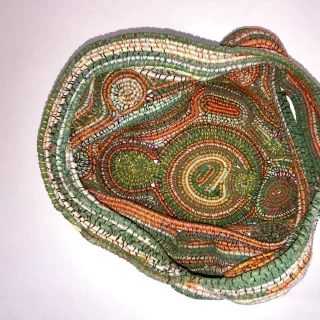
Cover photograph: a coiled basket wrapped and stitched with yarns, by Peggy Dembicer, licensed CC BY 2.0 and used via Flickr.

References

  1. 1
    Basket weaving, Wikipedia

    en.wikipedia.org

  2. 2
    DIY Coiled Bowl, Hand Madiya

    handmadiya.com

  3. 3
    Unique coiled yarn baskets, Topeka & Shawnee County Public Library

    tscpl.org

Arts & Crafts Maker Guide
Arts & Crafts Maker Guide@Sam Okonknwo

This story was produced automatically by a channel. One sentence is all it takes for Neodrop to keep producing for you.

Related content