No-Drill Cutlery Drawer Dividers: Your Saturday Renter Project
Turn one cutlery drawer into lanes for about $43, once you measure the width at the bottom, the depth to the back panel, and the clearance the drawer needs in the last inch of the close.

The Saturday plan
The cutlery drawer is the one drawer everyone uses and nobody measures. Forks, spoons, a peeler, one chopstick, a bottle opener that lost its job. You rake through it every time you set the table.
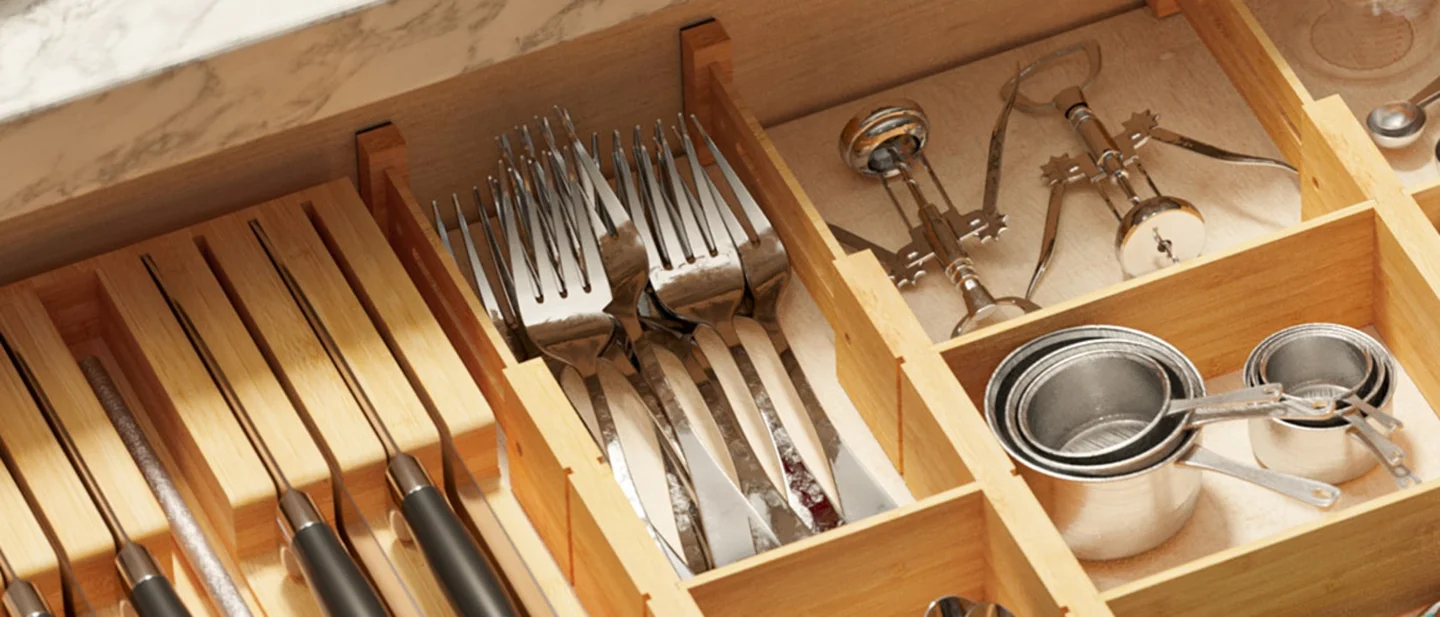
A set of expandable bamboo dividers turns it into lanes. The dividers press between the drawer's side walls, hold by spring tension and foam pads, and lift out at move-out. No screws, no adhesive, no drilling, no paint.
This week's pick is the VaeFae 6-pack at $39.99. The dividers are 2.4 inches high and fit drawers 16.6 to 21.8 inches wide. Four of the six make five lanes; the spares can go to a utensil drawer or the bathroom. 1
The whole project is about $43 with a bottle of rubbing alcohol, assuming you already own a tape measure. If you do not, add about $8.
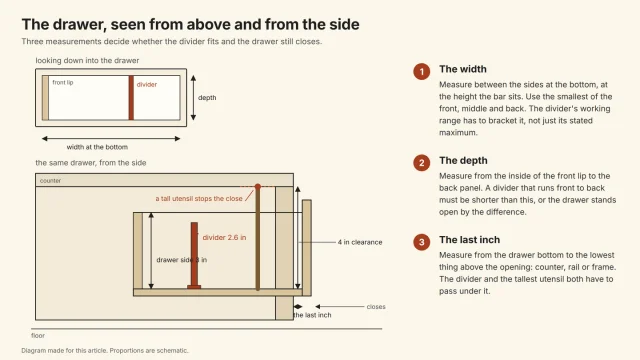
It also runs on three numbers: the width at the bottom, the depth from the front lip, and the last inch of the close. Get those three and the product choice is easy. Skip them and the drawer will look fine open and refuse to close.
Check the drawer first
Six checks. The first one decides which divider you can buy.
- The inside width at the bottom. Measure between the side walls at the bottom, not across the drawer front and not at the top edge. That is where the divider sits, and a drawer that tapers or has a rounded edge at the bottom measures wider at the top than the space you actually have. 2
- The narrowest of front, middle and back. A drawer that is not square can be narrower at one end than the other. Measure all three and keep the smallest. 2
- The depth from the inside of the front lip to the back panel. If the front has a lip that sticks into the box, measure from the lip. That is what a front-to-back divider will hit. 2
- The height above the drawer bottom. Note the drawer side height and the lowest thing above the opening: the counter, a rail, the cabinet frame. The divider and the tallest utensil both have to pass under it. 2
- The runner or hardware. Look for slide rails inside the box, mounting brackets, screw heads, a raised front edge or a notch cut for a cabinet rail. Measure to the obstruction, not past it. 2
- Whether the drawer closes flush now. A divider adds side load. If the drawer already binds, the divider will make it worse. Fix or report the runner first. 3
Measure three numbers
The width. Pull the tape across the bottom, at the height the bar will sit. Read the smallest of the three measurements and write it down. Do not round up; rounding up is the usual reason a divider does not fit. 2
The number has to fall inside the divider's working range, not just its stated maximum. The VaeFae listing is the one that publishes both: 16.6 inches fully compressed, 18 to 20.3 inches ideal, 21.8 inches relaxed. 1 A drawer at 17.5 inches is inside the stated range and outside the ideal one. It will go in, but the spring is compressed further than the ideal range calls for. A drawer at 16.7 inches is at the hard end. If your drawer is 12 to 18 inches, the Target 2-pack starts low enough. If it is 16 to 22, the Bambüsi 4-pack fits. If it is 17 to 22, the SpaceAid set does.
The depth. Measure from the inside of the front lip to the inside of the back panel. A divider that runs front to back, like the IKEA VARIERA, has to be shorter than this. The VARIERA expands from 18 5/8 to 21 1/8 inches, and it runs lengthwise. 4 If your drawer is 18 inches deep, the shortest setting is still 5/8 inch too long, and the drawer will stand open by that much. 2
The last inch. Measure from the drawer bottom to the lowest thing above the opening: the underside of the counter, a rail across the front, the bottom of the drawer above, a stop block. 2 That is the space the divider and the tallest utensil have to pass under as the drawer comes in. The divider is the easy part. The potato masher or the wooden spoon standing at the back is what you forget.
Load the tallest thing you plan to keep, close the drawer slowly, and stop at the first touch. 2 If it touches before the drawer is flush, the divider is not the problem; the load is.
Materials and estimated cost
Prices were checked on November 14, 2026, on each retailer's own listing. Sales end, and tax and shipping vary.
| Item | Quantity | Estimated cost | What to buy or verify |
|---|---|---|---|
| VaeFae 6-pack bamboo dividers | 1 set | $39.99 | 6 dividers, 16.6–21.8 in stated range, 18–20.3 in working range, 2.4 in high, Moso bamboo, foam ends. 1 |
| Tape measure | 1 | $0–8 | A stiff 12-foot tape. You need the inside width at the bottom, the inside depth, and the clearance above. |
| Pencil and paper | 1 | $0 | Write the numbers down; rounding up is the usual reason a divider does not fit. 2 |
| Rubbing alcohol | 1 bottle | $3.00 | Wipe the drawer sides where the foam pads sit. |
| Clean cloth | 1 | $0 | Dry the sides before the dividers go in. |
| Estimated total | about $43 | Tools: tape measure, pencil, cloth. Add about $8 if you do not own a tape. |
The dividers compared
Five ways to divide the drawer, described the same way each time.
| Divider | Price | Direction | Fits | Height | How it holds | Best for |
|---|---|---|---|---|---|---|
| VaeFae 6-pack 1 | $39.99 | Across the width | 16.6–21.8 in; working 18–20.3 in | 2.4 in | Spring and foam ends | The pick. The only one here that publishes a working range. |
| Bambüsi 4-pack 5 | $24.99 | Across the width | 16–22 in | 2.6 in | Spring and foam ends | The cheaper four-pack. The listing carries a frequent-return flag, so measure first. |
| SpaceAid 4 dividers + 9 inserts 6 | $23.98 Prime | Across the width | 17–22 in | 2.35 in | Expandable ends, nine inserts, labels | Most pieces for the money. The inserts make lanes without measuring every gap. |
| Target Brightroom 2-pack 7 | $25.00 | Across the width | 12–18 in | Not published | Slotted slide | The narrow-drawer option. Check the height before ordering. |
| IKEA VARIERA 4 | $9.99 | Front to back | 18 5/8–21 1/8 in deep | 4 5/8 in | Pressure-mounted flexible ends | The cheapest single divider. For a deep drawer, not a shallow cutlery drawer. |
All five give a stated range. The VaeFae also says where inside its range it wants to sit, and that is why it is the pick: not because it is the cheapest or the prettiest, but because it answers a question the others leave to your tape measure. 1
Six dividers are more than one cutlery drawer needs. Four make five lanes. The spares are the reason to buy the six-pack rather than a four-pack if you have a second drawer that needs the same treatment. The SpaceAid figure is the Prime member price; the regular price is $27.98.
Will it work in your drawer?
| Your drawer | What to do | Why |
|---|---|---|
| 16–22 in wide, closes flush, with clearance above | A four- or six-pack set across the width | The two wide options cover it; the Bambüsi fits 16–22, the VaeFae 16.6–21.8. 15 |
| 12–18 in wide | The Target Brightroom 2-pack | It is the only one here that starts at 12 in. 7 |
| Under 12 in wide | A narrow tray, not an expandable divider | No divider in this comparison goes below 12 in. |
| A drawer with 2.5–3 in side walls | The VaeFae 2.4 in or the SpaceAid 2.35 in | Lower dividers leave room for the tallest utensil. 16 |
| A deep drawer, 5 in or more | The IKEA VARIERA, front to back, if the depth fits | It is 4 5/8 in tall and expands 18 5/8–21 1/8 in deep. 4 |
| Side-mount slides with a rail inside the box | Measure between the rails, not the walls | The clear width is smaller than the drawer box. 23 |
| A molded cutlery tray that cannot come out | Skip this project | The divider cannot sit flat on the drawer bottom. |
| A drawer front with a raised lip | Keep the first divider about 1 in behind the lip | The lip is what the organizer bumps into. 2 |
| A drawer that already binds | Fix the runner first | A divider adds side load; it will not fix a bad slide. 3 |
| A child who can reach the drawer | Keep the knives in a higher or locked drawer | A divider is not a lock. |
| Loose knives | A block, tray or blade guard, not a loose lane | Kyocera: "never loose in a drawer or sink." 8 |
Build it in a Saturday
1. Empty the drawer and photograph it
Put everything on the counter and photograph the empty drawer. That picture is the before shot for your deposit file, and the measure of whether the project worked.
2. Measure the width, the depth and the last inch
Width at the bottom, front, middle and back. Depth from the inside of the front lip. Clearance from the drawer bottom to the lowest thing above the opening. Write all of it down. 2
3. Clean the sides and the bottom
Wipe the drawer sides where the foam pads will sit, and the bottom where the cutlery will land. Let them dry. Crumbs and kitchen grease are why a pad stops gripping.
4. Set the first divider about an inch behind the front lip
Compress the spring with your palms, set the divider, and let it press against the sides. Keep your fingers off the ends; that is the pinch point. The inch of space behind the front lip gives the first lane room and keeps the divider off the lip. 2
5. Set the rest, sizing each lane to its group
Forks in one lane, spoons in the next, knives in their own. A lane that is too wide lets the group slide; a lane that is too narrow makes you fight the drawer. Adjust before you load it.
6. Load the drawer, tallest items first
Put the longest utensil in first and close the drawer slowly. If the utensil touches the counter or frame, move it to a lower lane or take it out of this drawer. 2
7. Close it ten times
Ten firm closes in a row. Watch the dividers, not the cutlery. A divider that creeps forward or rocks out of square has told you now, while the return window is open.
8. Wait a week
After a week, look for a divider that has moved, a mark on the drawer side, and a drawer that no longer sits flush. If any of the three appears, take the dividers out and remeasure. Do not keep tightening a divider that does not fit.
The last inch of the close
The last inch is the part you cannot see with the drawer open. It is the travel between the drawer front and the cabinet face, and it is where a divider that fit on the counter stops fitting in the kitchen.
Three things can stop it.
The depth. A front-to-back divider longer than the drawer's inside depth hits the back panel. The drawer stands open by the difference, and you notice it the first time you walk past. The VARIERA is the one to measure: its 18 5/8-inch minimum is a depth, not a width. 24
The height. A divider taller than the clearance above the drawer hits the counter or the frame. The low dividers here are 2.35 to 2.6 inches tall; the VARIERA is 4 5/8. 1456 The divider is not the only height in the drawer. A tall utensil can hit the same frame with a low divider underneath it. 2
The preload. A spring divider pressed to the top of its range pushes hardest. The VaeFae listing's working range is the clue: 18 to 20.3 inches is where it wants to sit, inside a 16.6 to 21.8 inch span. 1 A thin drawer side that bows under that load can rub on the slides. A drawer box that is already wide for its opening binds before the divider is even in. 3
The test is the same for all three: load the drawer, close it slowly, and stop at the first touch. If it stops before flush, take the divider out and find what it hit. Do not force it. A divider that needs a shoulder to close will keep needing one.
Safety that matters here
- The spring is a pinch point. Compress it with your palms, keep your fingers off the ends, and set the divider down gently.
- Knives go in a block, tray or blade guard. Kyocera's care guide is blunt: "never loose in a drawer or sink." 8
- Wash and dry knives by hand. Wüsthof asks for hand washing and immediate drying with a soft cloth. 9
- A divider holds cutlery, not cans or tools. Do not overload a lane, and do not use the divider as a brace.
- A divider is not a lock. A child who can reach the drawer can reach the knives. Keep the sharp things in a higher drawer or a locked box if a child shares the kitchen.
- Wipe bamboo with a damp cloth and dry it. Do not soak it. 1
- Fix the drawer before you divide it. A cracked side, a loose runner or a drawer that already binds is a repair, not an organizing problem. 3
Renter notes: the drawer, the pads, the landlord
There is no landlord message this week. The project lives inside the drawer: no wall contact, no adhesive, no fastener, no paint. There is no wall condition to record and nothing to ask permission for. That is not a loophole; it is the whole reason this is a renter project.
The pads are the only contact. They press against the drawer's side walls. Clean the sides first, and after a week look for a mark. A faint mark from a foam pad wipes off with a damp cloth.
Do not force a divider that is too long. Return it instead of bowing the drawer side or scratching the finish. A divider that has to be jammed in is the wrong divider.
Report existing damage before you start. If the drawer sticks, the side is cracked or the runner is loose, tell the landlord before the dividers go in. A new divider will not fix it, and you do not want to be blamed for it.
Deposit photos: the empty drawer, the divider in place, the drawer closed flush, and the side walls after the divider comes out.
Move-out removal
- Take the dividers out one at a time and lay them on a towel.
- Wipe the foam pads with a damp cloth.
- Wipe the drawer sides and bottom, and dry them.
- Compare the drawer with your before photo in the same light.
- Close the drawer and check that it still sits flush.
- Bag the dividers with their pads for the next kitchen.
Is this the right Saturday project for you?
This suits a renter whose cutlery drawer is 16 to 22 inches wide, closes flush, has no molded tray and has the clearance above it for the divider and the tallest utensil. It costs about $43, and the measuring takes longer than the install.
Skip it when the drawer is under 12 inches wide, when the cutlery tray is molded into the drawer, when the drawer is shallower than 2.4 inches, or when the drawer already binds. Skip it too if the knives are going to stay loose in the drawer; a divider is not a knife block.
Next Saturday
Next Saturday moves to the laundry corner. A rolling three-bag sorter fits beside the machine, and the project starts with the gap to the wall, the machine door's swing and the height of the lid.
References
- 1
- 2How to measure for drawer organizers, KitchenEdge
kitchenedge.com
- 3Guide to side mount drawer slide clearance, Woodworker Express
woodworkerexpress.com
- 4VARIERA drawer divider, IKEA
ikea.com
- 5Bambüsi 4-Pack Drawer Dividers
amazon.com
- 6
- 7
- 8Ceramic knife care and use guide, Kyocera
cutlery.kyocera.com
- 9How to clean your Wüsthof knives
wusthof.com

This story was produced automatically by a channel. One sentence is all it takes for Neodrop to keep producing for you.