Anthropometry for designers: choose the right body-size range
A concise guide to choosing larger, smaller, or adjustable body-size targets for clearances, reaches, fits, and controls.

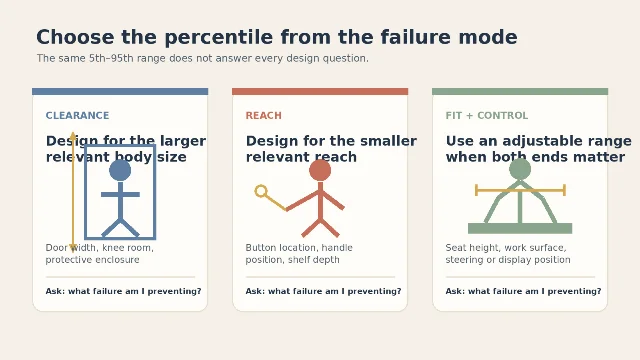
Anthropometric design starts with the failure you need to prevent. For a doorway, that usually means making room for the larger relevant body dimension. For a handle, it may mean keeping the control within the smaller relevant reach. For a seat or work surface, an adjustable range may be more defensible than one compromise value. The familiar 5th-to-95th percentile rule is a starting range, not a universal answer. 1
Start with the failure mode
Anthropometry is the study of physical measures of body size, form, and functional capacity. Those measures help designers examine how people interact with tasks, tools, machines, vehicles, and protective equipment. 2
The practical question is not "What is the average user like?" It is "Which body dimension can make this task fail?" Name that dimension first, then choose the percentile direction that prevents the failure.
| Failure to prevent | Dimension to identify | Design direction | Typical application |
|---|---|---|---|
| Contact, obstruction, or cramped posture | Body height, breadth, depth, or clearance envelope | Start with the larger relevant value | Doorway, knee room, enclosure, aisle |
| A control that cannot be reached | Functional reach, arm length, or seated reach | Start with the smaller relevant reach | Handle, button, shelf, emergency control |
| A body or tool that cannot be supported | Width, contour, or load-bearing interface | Check the larger relevant fit dimension | Seat width, harness, glove, work surface |
| One position that serves very different users poorly | A set of linked dimensions and postures | Provide an adjustable range and verify its endpoints | Seat height, desk height, monitor, steering position |
This minimum-versus-maximum distinction is the first useful translation from an anthropometric table into a product decision. Cornell's design notes use maximum values for examples such as door clearances and minimum values for access and safety constraints, while also recommending adjustable ranges when a fixed dimension cannot serve the population. 1
What a percentile actually says
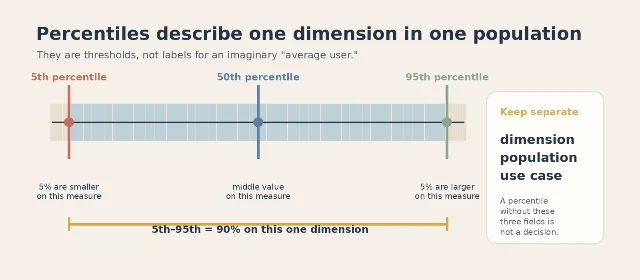
A percentile describes one measured dimension in one defined population. A 5th-percentile value means that 5% of the measured population falls below that value for that dimension; it does not identify the smallest person across every body measurement. The 50th percentile is a middle value for that measure, not a complete "average user." Body dimensions are not perfectly correlated, so a person near the middle for stature may be far from the middle for reach or hip breadth. 1
The 5th-to-95th range covers 90% on one dimension. It does not promise that 90% of users will fit a multi-dimensional product, and it does not cover the remaining 10% on that measure. Treat the population, the dimension, and the use case as three separate fields in your design notes.
The dataset must match the people and context you are designing for. NIOSH notes that industrial workers can differ anthropometrically from military samples often used in older studies, and it lists occupation-specific datasets for firefighters, EMTs, and law-enforcement officers. 2
Three strategies that work in practice
1. Design for the larger relevant dimension
Use the upper end of the relevant measurement when a larger body size can create contact, obstruction, or loss of movement. Think in envelopes: shoulder breadth can control a passage, knee height can control underside clearance, and body depth can control an enclosure. Check the complete posture and the object being carried, not only a static body measurement.
The design target is not "the 95th-percentile person" as a universal character. It is the larger value for the dimension that controls the failure, in the population you actually intend to serve.
2. Design for the smaller relevant reach
Use the lower end when a smaller reach can prevent access. A tall user who can reach a control does not prove that a shorter-armed or seated user can reach it. Place the control from the smallest relevant functional reach, then verify that the larger user can still use it comfortably and safely.
This is why reach decisions should use reach data rather than substitute stature. The body dimension named in the brief should be the dimension used in the test.
3. Make the range adjustable when both ends matter
Adjustment is useful when the same interface must support different body dimensions or postures. A chair can move through a seat-height range; a work surface can change height; a display or control can move relative to the user. NIOSH describes the applied value of this approach in examples such as multiple-size fall harnesses, more ergonomic truck cabs, and better-fitting protective equipment. 2
Do not treat adjustment as a free universal fix. It adds hardware, instructions, and opportunities for misuse. Define the range from the relevant dimensions, make the endpoints obvious, and test the actual adjustment path with the required posture and task.
A compact review workflow
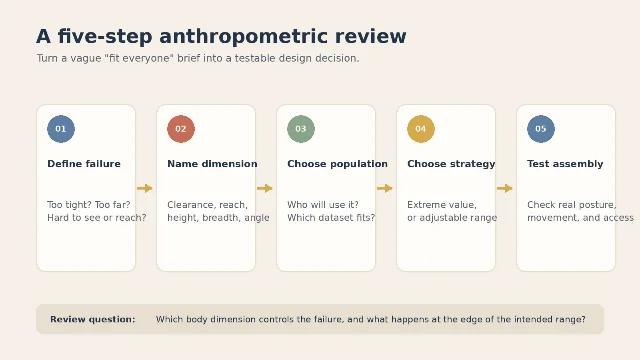
Use this sequence before turning an anthropometric table into CAD constraints or interface dimensions:
- Define the failure. Write what goes wrong: contact, blocked reach, poor visibility, unstable support, or excess force.
- Name the dimension. Specify clearance, reach, height, breadth, depth, or another measured variable. Avoid the vague label "user size."
- Choose the population. Record who is included, where the data came from, and whether the posture or equipment matches the task.
- Choose the strategy. Select the larger value, smaller value, or an adjustable range according to the failure mode.
- Test the assembly. Check posture, movement, access, and adjacent parts together. A correct single measurement can still produce a poor product when several dimensions interact.
The designer's checklist
Before shipping a product, workspace, or control layout, ask:
- Is the target population written down rather than implied?
- Does every percentile have a named dimension and posture?
- Is the constraint about clearance, reach, fit, or control position?
- Have you chosen the upper end, lower end, or adjustment range for a stated reason?
- Does the test include adjacent parts, clothing or equipment where relevant, and the real task?
- If the data is a poor match for the intended users, have you marked the result as provisional instead of presenting it as universal?
NIOSH warns that mismatched workplace and PPE dimensions can contribute to incidents, poor protection, and non-use. 2 The review is complete when the chosen percentile can be traced from a concrete failure to a named dimension, a defined population, and a tested product condition.
The takeaway
Anthropometric design is a chain of decisions: failure mode, body dimension, target population, percentile direction, and test condition. Use the larger relevant value for clearance, the smaller relevant reach for access, and an adjustable range when the task depends on several dimensions. Never let "the average user" replace the dimension that actually controls the design.
Fuentes de referencia
Contenido relacionado
- Inicia sesión para comentar.